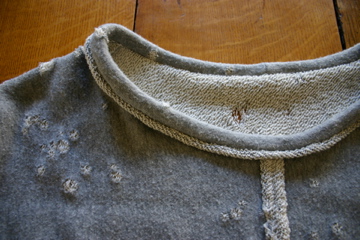
In general, I don't care for light grey on me (it can wash me out and emphasize my grey hairs), but this fabric spoke to me. It is full of lovely distressed "holes" so I bought it and snarfed it away. (In fact, another 6 yards are slated to be curtains in my teenager's bedroom. :) ) When I saw a beautiful sage green sweatshirt in a boutique, it gave me ideas. My top is quite different, but it was inspired by the $180 boutique sweatshirt.
I drafted a very simple pattern. I started with Marcy Tilton's top (Vogue 8582) because I had just used it and I knew it fit me well. (I highly recommend this pattern!) I copied off the neck and shoulder lines and marked the width of the top. I extended the shoulder line to the length of a long sleeve, measured the finished length I wanted, and connected the lines with a gentle curve. Voila, a dolman pattern I knew would fit me.

You can see the dolman line here:

Because of a trick I learned years ago, I was able to draft a single pattern piece. The only difference between the front and back was the neck curve, so I drew both on the pattern, cut the paper pattern on both lines, but didn't completely cut through the front neckline at CF. I left a little "hinge", reinforced with tape, so I can cut both front and back by moving that little piece up or down on the fabric.

This top features:
- The Reverse Binding for Single Knits (posted earlier today) at the neckline.
- A similar technique at CF. I cut a 1" S/A at CF and sewed the fabric, wrong sides together, letting the fabric curl at CF. Later I decided 1" was too much and I trimmed it down a bit. Probably 5/8" S/A is be best. (This worked because I cut the top with the selvedge along the hem of the top -- 90 degrees off from the usual grainline. So the knit runs vertically rather than horizontally.)
- A floating pocket.
- A back that is a few inches longer than the front. (Still deciding if I like this.)

That's it. I just love this sweatshirt and plan to make up several more in different fabrics - it's very quick to sew, comfortable to wear, and flattering on my challenging shape (which I fondly refer to as "potato on toothpicks"). My only challenge came from using raw edge techniques with this particular fabric. I think this fabric is what we used to call (years ago) a French Terry. The right side is the usual interlock fabric, but the wrong side is a knit terry with little white loops. While the raw edge of the grey (interlock) is well behaved, the terry side drops bits of white string and ravels badly. I tried a couple techniques to tame it (like Fray Check), but in the end, I sewed down my little rolled "tubes." I suspect that, over time, the terry side would stop dropping lint and behave, but I didn't want to take that chance.


