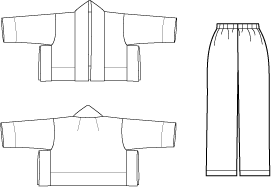
It's high time I made myself an Ikina jacket. I have seen numerous sewists who sing the praises of this jacket, which is reminiscent of a cropped kimono, but for some reason, it didn't bubble to the top of my pile, partly because I didn't seem to have the right fabric on hand.
Recently I bought 3 yards of a very yummy poly/cotton/lycra brushed twill from FabricMart. Originally, I wanted to use this fabric for the Sandra Betzina jacket, but when I realized that pattern wasn't working for me, I reallocated the fabric for the Ikina.
I.love.this.fabric. One side, as shown, has a brushed surface and looks sueded and the other side is slick and shiny, so it feels as if it's self lined. It has a lovely, weighty drape and a rich, warm color. The only downside is that it doesn't want to hold a crease, so I ended up topstitching every seam and every hem. Luckily, I love to topstitch and this fabric loves to be topstitched. :)
I made three changes to the pattern:
- I eliminated the side vents.
- I lengthened the jacket 3". This meant I also added 6" to the front band.
- I added a hanging pocket.
What I did not do was an FBA. I decided I didn't want to. I like this jacket as designed; I knew it would be large enough (I made an XL), and I liked the hemline a bit shorter in front. For this jacket, anyway. :)
I had been warned about one tricky aspect of this pattern – the bias front band. At least in some "wobbly" fabrics, this can be very tricky to construct. A sewist friend who has made this jacket multiple times reported that you can achieve a perfectly good result with a straight-of-grain front band. And, of course, in a knit, a bias band is not necessary. However, I really wanted to use a bias band because I like how it lays around the neck and forms a small fold-back collar (if you want to wear it that way).
I diligently followed the instructions for ironing the bias band to remove some of the stretch and to form the curve it will have on the final garment. The band is folded in half, the long way, before creating the shaping. I basted along the folded edge to keep it in place. You then trim the band to 3 5/8" wide. I marked 3 5/8" and then basted just inside the marked line.
Trimming the front band. The shaping has been applied.
My thinking was to treat the folded band as a single piece – to sew it to the jacket in one go, then trim the seam allowance to 1/4", overcast the raw edge, turn it towards the jacket (away from the band), and to topstitch. I was hoping that this would help avoid some of the problems other sewists have reported when they follow the directions, which tell you to sew one edge of the band, then turn the raw edge under and hand stitch that edge to the inside. This is tricky with bias, at least on an unstable fabric.
Well, the final result was ok. It could have been neater, but it's fine so long as no one scrutinizes it too carefully. :)
I am wearing the Ikina with my new Marcy Tilton pants (Vogue 8637), made using cream ponte I bought from Marcy Tilton.
I am not too crazy about the excess fullness at the shoulder. I'm not sure how to tweak the pattern to fix this.
My hand inserted into the spiffy hanging pocket that I added.
Hanging pocket, up close. I sewed one side into the side seam. I think you can make out the stitching at the upper left edge that anchors the pocket to the jacket.
The final item in this ensemble (and yes, I made these pieces to go together) is a Sewing Workshop Salsa blouse. This is #4 of this pattern for me. This time I made it using an Anna Sui cotton/rayon voile from FabricMart. This fabric was sold by the panel, and I fell in love with it, but decided to use it as a border print.
I purchased three panels and was able to just squeeze out this top. I changed the grain to put the front edges along the border stripe. I also put the sleeve hems along the border stripe and, yes, I intentionally cut them to use the stripe asymmetrically. This is the 4th time I've made this top but the first time I've actually finished every raw edge, using either French seams or flat felled seams. It just seemed the right thing to do with this very fragile handkerchief-weight fabric.
When the top was complete, I tried it on and it didn't fit! I quickly realized the reason – this was the first time I'd used a woven for this pattern. Twice I'd used knits and the third time a stretch woven. The top was tight across the waist, but fit me otherwise, so I added little flanges at the sides. The fronts now button to the flanges, instead of the back. This gave me an additional 3" in the waist and it's now perfect!

The flange, with the buttons sewn to the edge. This fixed the problem where it was too tight at the waist.
And, if you are observant, you will notice that this fabric has polka dots woven into it!!! swoon! :)


