Tuesday, February 3, 2015

Voting is up!


Rhonda had some technical difficulties yesterday (and it didn't help that she was caught in a snow storm trying to get back home), but the voting is now up!

The entries are all so different! It's fascinating and inspiring to see them!

To vote, scroll to the bottom of Rhonda's post and click the tiny heart in the upper right to select your favorite.

CLICK HERE TO VOTE!

Voting ends February 9th.

Thanks!

Sunday, February 1, 2015

Challenge Accepted!


On November 19th, Rhonda Buss, a blogging pal (and we will meet in person some day, mark my words), asked if I would like to participate in a challenge/competition. In fact, here is a snippet from her email, which explains the situation more fully:

Janet Prey who owns the American Sewing Expo and Islander Patterns gave me a lovely bolt of fabric. It's a shirt weight barkcloth. The fabric is printed in panels. It's white with a black floral print running the length of the panel. It's really quite lovely. So, here's the challenge....you may do anything you wish with the fabric, combine it with whatever you like. Whatever you choose to do must be finished no later than February 1st. I have 10 panels so there will be 10 entries. Each entry along with links back to your blog, will go up on my blog for voting. The winner will receive Islander's brand new pattern, The Motor City Motorcycle Jacket, along with the accompanying Craftsy class. Let me know if you would like to participate.

Rhonda is calling her challenge, "Get Your Motors Running."

I am really over competitions, but she seduced me by the challenge aspect of it. I love challenging myself. Let's hear it for frequent challenges, where we push ourselves creatively!

I agreed in fairly short order, and she mailed me a very interesting fabric panel. Roughly 24" by 60" (I forgot to measure it), it looked like this:

Since I received the fabric in November and the project wasn't due until February, I let the ideas start to percolate in the back of my mind while I put the fabric away.

When I revisited the project several weeks ago, I had developed some comments/observations/ideas. Here's a peek into my thought process:

  • I don't sew much with white, so I considered dying the fabric so that it would be, say red and black, or green and black. In the end, I decided not to bother with that, though I do think that it would have been a pretty effect.
  • There was not really enough yardage, by itself, for me to use *only* that fabric, so I immediately knew that I would mix it with a black fabric.
  • This woven fabric is *very* drapey and very ravelly. I should have serged the edges before throwing the fabric into the washing machine/dryer but I didn't, so I learned just how ravelly it was. I lost several inches along both (long) cut edges.
  • This fabric would be a natural for a top or blouse of some kind, particularly with its drapey quality. But, with my reverse-pear shape, I am more of a "bottoms" girl than a "tops" girl.
  • If I had had two of these panels, I would have made swishy pants with the motifs running down the outside leg.

I decided to use an idea that's I've been wanting to try for awhile: to use the panel as a "peekaboo" element in a faux wrap skirt.

There is no pattern for this. I used three fabric rectangles:

  • A rectangle for the main skirt. For this I used a black, drapey woven fabric that was a gift from Margy. (The black fabric has a bit of a greenish cast, which is why she didn't use it herself.)
  • A rectangle of the panel print. I needed this to be about 23" by the length of the skirt, plus a hem. I cut the panel print in half, lengthwise, placed the largest part of the prints so they were at the hem, and flat felled them together to get the width I needed. (Also remember that I lost some of the width of the original panel when it frayed mightily in the washer/dryer.)
  • A third rectangle of the black created a waistband casing for the elastic. Like I said, this was a faux wrap. ;)

(Note: If you were to make this for someone with a much smaller waist than hips, I would not use rectangles. In that case, I'd start with a basic fitted pencil skirt and alter from there. In that case, the wrapping feature might need to be functional so that you can put it on and take it off so I would eliminate the waistband/elastic. My waist and hips are virtually the same measurement, so rectangles and an elastic waist work fine.)

The skirt is constructed as a giant tube. It's as simple as that. Then it is folded. I folded it to expose the white panel to create a pleasing vertical line. I also realized, during construction (I love these happy accidents), that one edge of the fabric, with the attractive selvedge, could be used along the front as a further decorative element.

At Stone Mountain and Daughter, I purchased two sets of 3/4" D-rings and 2 yards of black cotton strapping, or ribbon - I'm not sure what it is called. I offset the faux wrap to expose about an inch of the white, and I used the ribbon and D-rings to create a decorative element. Note that these are more decorative than functional, as the skirt stays on thanks to the elastic waistband. Note that the cotton strapping tends to ravel, so I finished the raw edge with Fray Block, which I prefer over Fray Check. (I once did extensive experiments with both.)

Voilá.
(I admit it, not much hangar appeal...)

That's better!

And better still!

Thanks so much for inviting me to participate, Rhonda! It was a lot of fun. Rhonda plans to post a summary post Monday, Feb 2nd, with all ten entries and a poll for voting. As much as I shrink from the competitive aspect, I admit that I would really like Janet Pray's pattern and class so, what the heck. Please go vote for whomever you want to vote for!

And thanks to mem for the pictures!

And, yes, I was woefully overdue for a haircut, but I finally made it over to the hair college.

I predict that this student will go far!

Friday, January 23, 2015

Paris Pants a la Marcy Tilton


This is so weird for me! I am having to force myself to blog lately. This is a first in my 5+ years of blogging. This is not related to my sewing mojo, by the way. I am feeling a LOT of enthusiasm for sewing!

Last weekend I whipped up a pair of jeans!

But let's back up a moment.

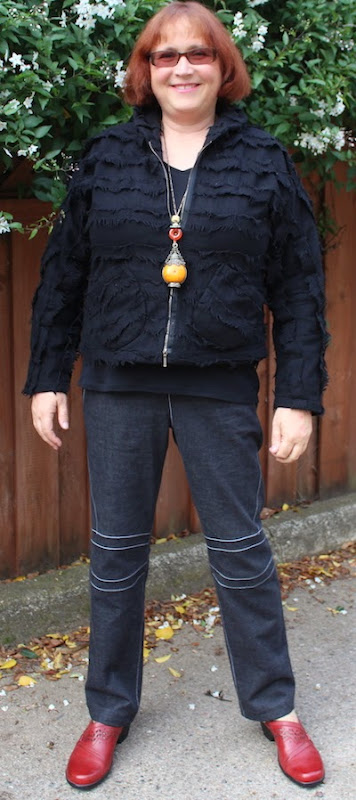
My absolutely favorite jeans to wear are my black stretch jeans with the internal seams outlined with white topstitching. I've counted three pair that I have made, but there may be more that I've forgotten about. All of these are in frequent rotation.


You can click on any image to learn more.

Last year, Marcy Tilton was inspired by a pair of jeans she saw in a Paris shop window. She later posted instructions on how to modify her skinny pant, Vogue 8859, to replicate those pants.

Last weekend, I used her instructions to make my own pair of these great pants. I had made Vogue 8859 before, so I had a solid starting point.

I refer you to Marcy's post for specifics on how to do these alterations. In addition to her alterations, I created a slanted front pocket, since I really need pockets in my pants!

Lining of slant pocket

It's so handy to use my backup machine for the heavy duty, contrasting, topstitching thread.

I've worn these pants three times this week, so they will definitely be a wardrobe workhorse!

Thanks, Marcy!

Sunday, January 18, 2015

Reversible New York Cape


I finally finished my cape!

When I wrote a post about different types of capes last October, I was already working on this one. I had to put it aside for awhile, and then it sat and sat, decorating my dress form. All it lacked was buttons.

But let's back up a bit.

This is a downloadable pattern from Tessuti. It comes only in one size. I didn't muslin this pattern, but I did tissue fit the paper pattern. I was with Georgene at the time, and she recommended a rather novel approach to the FBA. She suggested that I raise the shoulder seam on the front only, as shown in the following pic:

It's a rather unconventional approach, but Georgene got the idea by reading the wrinkles on the paper pattern as I was modeling it, and it gave me more room in the front. I didn't make any other changes to the pattern.

Georgene also suggested that I make the cape to be reversible.

I liked her suggestion but, grumble grumble, it meant more work for me, and more fabric to acquire. The main fabric is an incredibly soft wool knit from Emma One Sock. The other side is a charcoal-colored, water repellant fabric from Fabrics R Us, purchased the same day I went to PIQF.

The pattern has no pockets, but I wanted pockets on each side, so I spent time dithering over what sort of pockets to use. Have you noticed that these sorts of details require much cogitation? At least they do for me.

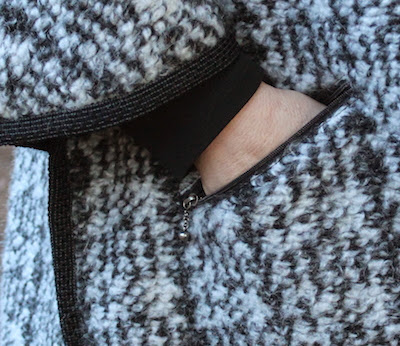
For the wool side, I made zipper pockets.

For the solid side I made patch pockets with a "window" opening. (I think I first saw this pocket on Pinterest long ago.)

Patch pockets ready to sew on

Completed pocket

This cape is mostly "open", like a poncho, but a button at each side creates some shaping, as shown in the following technical drawing:

Since I wanted the cape to be reversible, I had to get creative. I decided to put a buttonhole on the front and the back at each side seam. I then created button "cuff links" to go through the buttonholes on each side. Since this fabric has some loft, I used a piece of foam, with a slit cut out, to sew the button cuff links so that there would be about 1/4" of thread between them:

The shiny buttons are for the waterproof side. The artsy buttons are for the wool side.
I purchased the buttons at Britex.

A completed button cuff link

The buttons at CF are sewn on normally. This means that when I wear the cape with the waterproof side out, the left side buttons over the right. C'est la vie.

The cape is finished with a beautiful wrap-around binding that I purchased at Britex. I sewed it on by hand—it took me two days to complete.

Yes, those are polka dot socks

mem wanted me to twirl, so I removed the side buttons and let it fly!
Thanks to mem for these pics!

Tuesday, January 13, 2015

Floral Denim Jacket with Faux Piping


Whaaaaat?!?! Is Shams wearing a floral?!

A year ago I made a Sandra Betzina blouse as a jacket. I have worn that jacket a number of times and I wanted to revisit this pattern and make some changes: to lengthen the hem and the sleeves, add the button closure (which I'd left off of the previous version), and to use a stretch woven for increased wearing ease. When I saw this beautiful double-sided, stretch denim on Marcy Tilton's site, I snapped it up.

When I was sewing this up over the end-of-year break, I was having some trouble pinning the darts properly so I visited my friend, Ronda Chaney, head of the fashion department at Cañada College, and she pinned them for me. She also suggested that I add slits at the hem. Thanks so much, Ronda!

Here is the full list of modifications:

  • A generous FBA using a side dart.
  • Lengthened the hem by several inches.
  • Added side hem slits.
  • Faux piping along the front edges and the sleeve hems. This is done by "favoring" or exposing the facings just slightly. Topstitching in the ditch secures the mock piping in place. (Of course, you must also sew the facings on "backwards" to expose the other side, or use a contrasting fabric.)
  • Constructing the faux piping.

    I love the fluted collar on this pattern.

  • Omitted the sleeve pleats. Rather than lengthening and tapering the main sleeve piece, I decided to draft a lantern cuff for the rectangularly shaped sleeve.
  • Lantern cuff. You can also see the faux piping on the cuff and the hem slit.

  • Added pockets! I spent some time thinking about how to do this. In the end, I used a pocket inside a pocket. The inside pocket used the solid blue side of the denim and is much shallower than the larger outer pocket. This is perfect for my cell phone and tissues. The pockets are cut cross grain to take advantage of the wonderful selvedge.
  • Inner and outer pockets, before attaching. The fabric selvedge is at the top of both pockets.

    Completed pocket. The outer pocket is roughly 8" by 10".

  • Replaced the functional buttons with decorative buttons and snaps. The buttons that I found at Stone Mountain & Daughter were 1.5" across. I didn't want 1.5" buttonholes, so I sewed them on decoratively and added snaps.
  • Decorative button.

This denim was a dream to sew and very comfy to wear because it's extremely soft and stretchy. I expect to get a lot of wear from this!

Thanks to mem for the pictures!

Vogue 1385

P.S. I just saw on Sandra Betzina's Facebook page that she had surgery recently to repair pain in her neck, arm, and shoulders. It's so good to hear that she'll be in top form again soon!