Pages

Friday, December 6, 2013

Tutorial - Sleeve Hem with Zipper and Gusset


This is another tutorial inspired by the Style Arc Ziggi jacket. Previously, I wrote a tutorial on how to create the exposed zipper pockets.

The Ziggi, as with many moto jackets, features zippers at the sleeve hems. The sleeves are 2-piece sleeves and the zipper is placed in the back seam. These instructions would work with any similar jacket.


Note: Before you begin, make sure that you have checked the sleeve length and made any alterations to the pattern that are needed. It would be difficult, if not impossible, to lengthen or shorten the sleeve after the zippers are inserted. I should add that the Ziggi, like most Style Arc patterns, features a slim fit through the upper arm. You should also check the fit through the upper arm before cutting out your pattern.

The Ziggi jacket does not call for a gusset in the zipper opening, but I decided to add a zipper gusset. It's an easy alteration. The pattern calls for 6" zippers, but the notches on the sleeves indicate a shorter zipper. I used 5" YKK zippers.

No pattern is provided for the zipper facing, but it is extremely easy to create.

As you can see, the length of the zipper's teeth is 5", however, when the zipper pull is pointed down, the length from the top of the zipper to the tip of the pull is 5-1/2". Because I do not want the zipper pull to hang below the sleeve hem, I will make the "window" for the zipper at 5-1/2" long.

The zipper window is created on the under sleeve, but here I have chalked the lines for the zipper window on a scrap of lining. (The dimensions of the lining scrap aren't essential, as the excess is later cut off.) The sleeve hem is 1-1/2" wide, so the 5-1/2" window starts at 1-1/2" above the bottom of the fabric. The width of the window is 1/2" plus 3/8" (the seam allowance), or 7/8" wide.

Pin the chalked lining piece to the right side of the Under Sleeve (*14) at the back seam. Stitch the seam using a short stitch.

Trim the seam allowance to approx 3/8". From the raw edge, clip at a diagonal, right to the corner.

Turn the facing to the inside of the fabric. Baste close to the fold.

The back side.

Pin the Under Sleeve (#14) to the Top Sleeve (#12 which has been previously joined to #13) at the back seam. Stitch. Press seam allowance open, and then towards the under sleeve.

The zipper window is now ready for the zipper.

Position the zipper in the center of the window, with the top of the zipper at the top of the window. Pin in place.

Using the zipper foot, topstitch along the full length of the seam. Then go back and topstitch along the remaining two edges of the zipper window. This secures the zipper in place. In the pic above, the zipper on the right has been topstitched in place. Remove the basting thread.

Both zippers are topstitched in place.

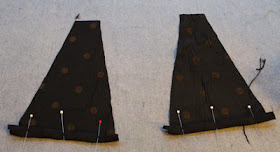
The back. The excess lining fabric has not yet been trimmed away.

Draft the gusset, if you want to use a gusset. It doesn't have to be precise - any excess can be trimmed later. For this gusset, the top is about 1-1/4" across. The length is about 7", which includes a 1" hem. The base of the gusset is about 4" across.

Cut 2 gusset pieces out of a scrap of lining fabric. I didn't want the polka dots to show on the outside when the zipper was unzipped, so I am used the back side of the polka dot lining fabric, which is solid black and slightly crinkled.

Hem the gussets.

Unzip the zipper. Position the gusset on the back of the sleeve, right side of gusset against the wrong side of the sleeve. (When the zipper is unzipped you should see the right side of the gusset.) Align the hem edge of the gusset with the end of the zipper's teeth. Pin the gusset to the seam allowance. (This is easiest when you have a seam allowance larger than 3/8".)

Flip the seam allowance over (I then move the pins to this side) and stitch the gusset to the seam allowance, as close as possible to the original line of stitching, and using a zipper foot. Then, pin the remaining side of the gusset to the seam allowance of the other side of the zipper and, once again, stitch as close to the stitching line as possible. (The picture shows stitching the second side of the gusset. There is a bit of excess gusset fabric, but that is fine.)

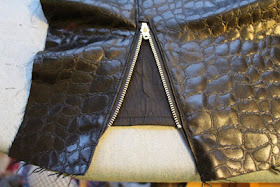
The gusset is now secured.

Back side of the gusset. Note the extra fabric - that can be trimmed away if it bothers you.

Back side of the gusset when the zipper is closed.

Next, stitch the other seam between the under sleeve and top sleeve, forming the sleeve tube. (No pic.)

Pin up the 1-1/2" hem. Topstitch, beginning and ending at the zipper. (I top-stitched at 1".) This completes the sleeve.

Closed zippers. Note that the zipper pull does not hang below the sleeve hem, as designed.

When these pics were taken, I had not yet lined the sleeves on the Ziggi jacket, so I am showing the sleeve from my Kwik Sew Moto Jacket. For this jacket, I created the zipper opening so that the end of the zipper teeth line up with the sleeve hem. This causes the zipper pull to hang below the sleeve hem when the zipper is closed. You have to decide which effect you prefer.

When lining the sleeve, hand sew the lining around the zipper opening, keeping the gusset free.

Baby, It's Cold Outside!


Thanks, everyone, for your kind wishes on my new job! I have been wrapping things up at my current job - I will miss the work and the people - but I am eager to get started at the new company.

So, have you heard about the SWANT?

I heard about it some time ago - it stands for SWeater PANT. Hey, JEGGINGS started this way, too. (Jean lEGGINGS.)

Anyway, people have been pinning (on Pinterest) instructions for refashioning a sweater into swants. And these two enterprising non-sewers have given it a try. They posted a video of their results.

You must check this out. :)

And on the subject of cold weather, I have broken out one of my favorite makes, from last Christmas, my flannel lined Style Arc Cassie pants. Ahhh, so warm and snuggly. I wore them last night for the 2013 Bernal Heights Holiday Evening Stroll.

Also, Margy has turned me on to another delightful cozy-warm product. I had heard about these, but it was her enthusiastic recommendation that opened my pocketbook: K. Bell Fleece Lined Legging.

Omigosh! I bought three pair and they are sooo nice. Smooth on the outside and fleecy on the inside. They do not make you look bulky. (After reading reviews, I did size up, btw.) I am planning to make more skirts to wear to work, and I will be enjoying these underneath. Thanks, Margy!

Finally, since this post has a cold theme, I also found the following video on Facebook: how to heat your room for a few cents a day. A very neat idea.

Stay warm, folks in the northern hemisphere! If you make any swants, please send me pics! (Stay cool, southern-hemisphere friends!)