Saturday, January 9, 2010

Report -- Sewing Workshop Open House


I wore my new Au Bonheur skirt with my black Salsa top. Over it I wore my Plaza jacket, which I took off for the photos. DD1 took these photos at the end of the day, so I am a bit rumpled. In this top photo it was a bit windy, which blew the skirt awry, but DD1 liked this photo the best. :)


Ahhhhhhh.... Today was a fun day. A very fun day. I attended the open house at The Sewing Workshop. The last one I attended was approximately 17 years ago, back when it was owned by Linda Lee. Quite a few teachers spoke and I was particularly interested in Bill Jones's class. He teaches how to embellish synthetic fabrics (like poly chiffon) by cutting it with a soldering iron. That looked like a very fun activity. I just might have to dig out my soldering iron, purchased back when I used to cut Mylar stencils for quilting. :)

I also won a door prize! A generous length of fabric from Satin Moon and a Sewing Workshop purse pattern that I did not own. I don't generally wear pink, so I need to figure out what to do with this very pretty fabric:


I also bought three gorgeous fabrics from a woman who was selling vintage pieces. I kept to the cheaper pieces that I can cut into without guilt.

No sewing today, but it was totally worth it. :)

Thursday, January 7, 2010

Technique -- Drafting a Knot-Front Top

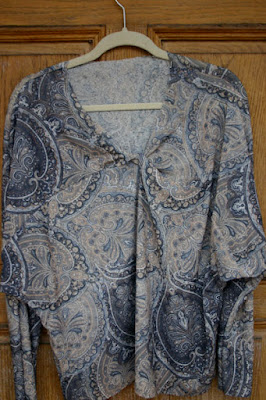
This tutorial describes how to start with a well fitting dolman sleeve top and use it as a basis to draft a knot-front top, similar to this design from Burda World of Fashion, May 2004:


Drafting Instructions

  1. Start with a well fitting dolman sleeve top.

  2. Hold the pattern up to your body and decide where you want the knot. Make a mark, shown on the following diagram as point A. The knot is located at this point and this is where the seam will be.

  3. From point A, end the CF line approx 2 1/2" above that point. This may mean drawing a higher neckline, or it may mean lowering it. The image above shows the neckline being raised (see the dotted line). The new neckline is marked by point C. The distance from point A to point C is 2 1/2".
  4. Draw in the seam from CF to the side seam/underarm. Precisely where to end this seam at the underarm is a judgment call, but the Burda pattern places it about where I have shown.

  5. Mark point D, about 2 1/2" inches from CF on the new seamline.

  6. Trace off the two pattern pieces: upper front and lower front. Make sure you maintain point D on both pieces.

  7. Adjust the CF line on the upper front: extend the neckline 1/4" from CF and taper that line back to the original CF. The drawing shows the original CF line with a dotted line. The solid line is the new CF line. This adds a bit of extra fabric at the neckline to accommodate the twist.
  8. Mark point E on the lower front. If you look at the photo of the Burda top, they located point E so low that it exposes the bra. (She must not be wearing a bra, but trust me on this one.) I suggest you make that point much higher, maybe 1.5" from the top of the pattern piece.
The back dolman pattern piece is left unchanged. You can now add seam allowances to the paper pattern, if you like. Or you can add them as you cut out the pattern (which is what I do). Either way, make sure to add seam allowances to the CF of the lower front, which now is a seam. The CF of the upper front is cut on the fold.

Cutting Instructions

This pattern assumes a knit fabric, since the fit of the original t-shirt assumes a knit fabric. The stretch needs to go around the body. It might be hard to find a fabric wide enough to cut the back and upper front pattern pieces on the fold. In that case you can shorten the sleeves, or you can use a 4-way stretch and cut the pattern across the grain. (I believe this is exactly why Burda didn't provide the pattern in a larger size.)
  • Back: Cut one on fold.
  • Upper front: Cut one on fold. Make sure you transfer mark D with a snip in the seam allowance.
  • Lower front: Cut two. Make sure you transfer marks D and E with snips in the seam allowance.

Construction Instructions

I have made this top a few times now and I found I prefer a different order to the instructions as those provided by Burda, which are pretty terse. (One of the reviews of this pattern on Pattern Review shows the Burda order.)

This is how I construct it:

  1. Finish the neck edges of the front and the back.
  2. Sew the CF seam on the lower front, from the hem to point E. Press the seam open.
  3. Sew the left bottom front to the left upper front, stopping at point D.
  4. Twist the upper front 360 degrees.
  5. Preserving the twist, sew the right bottom front to the right upper front, stopping at point D. It should look something like this:

  6. Form the knot: Place the top corner of the right front under the twist. Twist the top corner of the left front over the twist. Line up the CF to CF, right sides together, and stitch on the sewing machine as far as you can go to point E.

  7. The finished knot should look something like this:

    (This is my muslin, so I have not finished the neck edge.) The front is now completely constructed. The final steps are the same as they would be for any t-shirt.
  8. Sew the shoulder seams.
  9. Sew the underarm/side seams.
  10. Hem the sleeves and bottom.
Here is my first muslin:


This created a nice v-neck, but was a bit lower than I wanted. For a second draft, I would raise the location of the knot even higher. I would also move the seam a bit -- make it more horizontal over the bust.

That's it! It's pretty easy to draft this pattern and I hope my instructions haven't daunted or confused you.

If you make a top following these instructions, please let me know!

Technique -- Drafting a Dolman Sleeved Top

For some time now I have been saying that I wanted to draft a knot top, similar to #111, from Burda World of Fashion, May, 2004. You can see that design here:


This top features a high knot, rather than a knot at the bustline, as you more commonly see. That style is too revealing for many women, such as myself. Some women solve the problem by wearing a camisole, or by using modesty panel, but Burda's design makes that unnecessary.


Unfortunately, this issue is not easy to obtain and, even if you do manage to get your hands on a copy, the pattern is provided only in sizes 34 to 40.

In order to draft this pattern, you need to start with a well-fitting dolman sleeve pattern. This tutorial explains how to draft a dolman sleeved pattern. It is assumed that these pattern pieces do not have any seam allowance. Cut away seam allowances from your original t-shirt pattern. At the end, you can add the seam allowances back.

  1. Start with a well-fitting long-sleeved t-shirt pattern.

  2. Lay the top on a large piece of paper, and trace around the shoulder, center front, hem, and side seam. The dotted lines indicate the lines we don't really need.

  3. Extend the shoulder line.

  4. Fold the sleeve in half, the long way. Lay the should point against the shoulder, lining the fold against the lengthened shoulder line.

  5. Trace around the sleeve hem, and the sleeve. Join the sleeve to the body with a curve. The higher the curve, the tighter the fit under the arm. If you make it too high, the top may pull at the bust. If you make the curve too low, it may be too baggy. Make a best guess and you may have to tweak the curve when you make your muslin.

  6. The final pattern. Repeat this process for the back.


If you are going to test this pattern, make sure to add seam allowances. If you are going to use this pattern to make a knot top, do not add seam allowances yet.

Next, I will post instructions on how to create a knot front top.

Tuesday, January 5, 2010

Vogue 1018 - Sandra Betzina Skirt (#3)


This Sandra Betzina skirt is one of the first patterns I sewed last August when I returned to sewing. It has been one of my favorite patterns this year. I made it twice, both from printed fabrics, and I have worn both many times: the first skirt, from a lightweight Japanese striped woven, and the second skirt, from a sheer cotton plaid.

A DF (dear friend) admired both versions of the skirt, so I decided to make it for her for Christmas. She is taller than I am, so I had to size it up a bit. Previously, I modified the pattern by omitting the zipper and converting the skirt to an elastic waist with a rectangular yoke. I added the length to the top of the skirt, rather than at the bottom or by lengthening the yoke. She loves black (who doesn't?), and I wanted to make it in a knit. The pattern recommends lightweight jersey, so specially I ordered a lightweight wool jersey blend from Gorgeous Fabrics.

I liked the puckered effect of the tucks in the jersey. However the knit tends to stick to itself – I hope this won't make it difficult to wear. I lined the skirt with a lightweight sheer fabric – I thought it might flow better. (Originally I was going to leave it unlined so as not to add to the weight.)

Side One (there's no real front or back)


Other side


Detail of puckered texture


I still plan to make this again for myself, also in black. I think three versions of this skirt in my wardrobe should be sufficient, even for me. :)

Friday, January 1, 2010

Skirt with Twisted Drape -- Avec Poche (With Pocket) :)

I got enough feedback to convince me to make the pocket. Thanks to everyone who weighed in! I think you folks were right – the skirt is better with it. The instructions for the pocket were very confusing so I just made it up as I went along. I finished the pocket with a purple piped edge at the opening, and a bias binding around the outer edge, neither of which were in the original instructions.

Not the greatest photo, but it had started raining on my photographer. Those are raindrops on the lens. I am wearing it with my Teagarden T.

Thursday, December 31, 2009

Au Bonheur des Petit Mains - Skirt with Twisted Drape (JHL08001)


My first review of an Au Bonheurs pattern! :)

I fell in love with this skirt when I first saw it on the Au Bonheur des Petites Mains website. However, there were a couple tiny problems. First, the pattern is sized 36-44 and I am not a 44. Secondly, I don't "do" a skirt with a fitted waist. But I just loved the drape/pocket detailing on this piece, so I figured I would make it work.

Once the pattern arrived, I traced off the skirt, enlarging it to a 46. I then converted it to an elastic waist which involved altering both the skirt and the drape. The pattern piece for the drape itself is large and comes as two pieces that you connect together. The drape is intended to be cut on the bias, but with my alterations the pattern piece was too large to put on the bias. Instead, I cut it offgrain as much as possible. If you look at the garment in the photo, it doesn't look like they cut it on a perfect bias either. :)

The fabric, folded back on itself. It's very different on the two sides!


My hand is inserted into the portion of the fabric that is double sided.


This fabric was a very interesting piece I found last summer. I folded it back in the photo so you can see that it is double sided. Or maybe I should say that the purple portion is double sided. The other areas are a single thickness. The fuzzy "trim" indicates where the double sided part of the fabric ends. Also, the dark stripes between the purple are semi-sheer. The reverse of the fabric is a very sophisticated and slightly shiny stripe. After much thought, I decided to use that side for the drape. Where the drape twists, you can get a peek of the purple before it goes into the solid section of the fabric. It's interesting, eh?

The skirt itself is made from a black woven fabric with a slight stretch and a black stripe-on-stripe.

This was very easy and quick to sew up. I have not put the pocket on it. I am not sure about the pocket on me. The pocket in the pattern is fairly small so if I did use it, I would be tempted to size it up a bit. What do you think?


I have enough of this fabric to make myself another skirt. I am conflicted. I think I will use the purple side, but I also love that darker side...

Edited to add: I did make the pocket. You can see it here and here:

French Sewing Glossary

I started this glossary in this post. I am pulling it out as a separate blog entry. I am continually adding to it as I use the Au Bonheur patterns.

Please let me know if you find any errors or come across any phrases that should be added. Thanks!

Last updated: 4/1/2016. Thanks to Bessie Crocker for clarifying several of the terms, particularly about different types of stitches!

  • avantbras - forearm
  • bâtir - to baste
  • boutons/boutonnières - buttons/buttonholes ("1 bouton pour la taille" = "1 button for the waistband")
  • boutons pression - snaps (the kind you press, or hammer, that show from the front, not the sew-on type)
  • les bretelles - straps
  • coté - side ("Fermer les cotés..." = "Close the sides..." or "...du coté plat de la poche..." = "... the flat side of the pocket..."). I also saw it used to describe a side gusset, on the tee pattern with the 4 hanging points that are tied into knots.
  • coucher - to place ("Coucher les coutures vers la poche." = "Place the seams towards the pocket.")
  • coudre - to sew
  • coudre à points de surjet - to serge (though it literally means "to sew back and forth joining stitches")
  • ceinture - waistband; also belt or sash
  • chevaucher - overlap
  • col - collar
  • col châle - shawl collar
  • coutures - seams
  • couture(s) du cote - side seam(s)
  • couture(s) de dessous de bras - underarm seam(s)
  • cranter - to notch
  • dessus - top ("sur dessus de poche" = "on top of the pocket", "dessus de manche" = "upper sleeve")
  • dessous - below or underside ("dessous de manche" = "under sleeve"); "dessous" can also mean lingerie (similar to "undies") or interlining
  • devant - front
  • doublure - lining
  • dos - back
  • droit fil - straight of grain
  • emmancher - to fit one part into another, often with a fiddly bit that needs to be adjusted, such as easing a sleeve into an armhole
  • emmanchure - armhole
  • empiècement - yoke. Note that in the directions for the skirt I made with the twisted drape, they refer to the drape pattern piece as an "empiècement." My French friend thought this strange. She said usually an empiècement refers to a sewn-in yoke, like on a cowboy shirt.
  • en piquant - (while) catching
  • éncarter - press ("éncarter les coutures au fer" = "press seams open")
  • encolure - neckline
  • endroit - right ("endroit con endroit" = "right side to right side")
  • endroit du patron - right side of pattern
  • endroit du tissu - right side of fabric
  • entoiler - to interface
  • entoilage - interfacing
  • entoilage thermocollant - fusible interfacing
  • entoiler - to interface ("entoiler les parementures" = "interface the facings")
  • entournure - armhole
  • l'entrejambe - inside leg ("fermer l'entrejambe" = "close the inside leg seam" (from ankle to ankle)
  • envers du tissu - wrong side of fabric
  • les épaules - the shoulders ("assembler les épaules" = "sew the shoulder seams")
  • double epaisseur - double thickness
  • épingler - to pin
  • faufiler - to baste
  • le fil - thread ("1 fil de couleur contrastante épais" = "1 [spool of] topstitching thread in a contrasting color")
  • finition - finishing
  • les flèches - arrows ("coucher les plis selon les flèches du patron" = "form the tucks according to the arrows on the pattern")
  • fond - background ("fond de poche devant" = "front pocket back", as in a front jeans pocket)
  • la fourche - crotch ("fermer la fourche" = "close the crotch seam (from bellybutton to bottom)")
  • le genou - knee
  • de hanches - hipline
  • haut - top
  • jupe - skirt
  • lainage - woolens ("tissu type lainage" = "wool type fabric")
  • laine - wool
  • lisiere - selvedge
  • liens - ties ("faire 4 liens" = "make 4 ties")
  • ligne de pliure - fold line
  • ligne de taille - waistline
  • largeur pied de biche - the width of the presser foot
  • maille - a knit stitch
  • maintenir - to tack (hold temporarily)
  • manche - sleeve
  • milieu - center ("faire la couture milieu dos" = sew the center back seam)
  • molleton - flannel or fleece—a fabric with some loft, perhaps a Pellon-type fleece or batting
  • les œillets - eyelets, as in the metal kind you press, or hammer ("Poser l'œillet selon repère du patron." = "Apply the metal eyelet where indicated on the pattern.")
  • ourlet(s) - hem(s)
  • pantalon - pants
  • la parement - facing
  • parmenture - facing
  • parmenture du meme tissu - self facing
  • parmenture de la talle - waistline facing
  • passepoil - piping
  • patron(s) - pattern(s)
  • des pattes de boutonnage - buttonhole placket (or tab) ("Entoiler la moitié des pattes de boutonnage" - "interface half of the buttonhole placket")
  • le pince/les pinces - dart/darts ("fermer les pinces" = "close the darts)
  • piquer - to stitch/sew (verb). While the Au Bonheur patterns use the verb "piquer" to indicate stitching, it seems to be a bit inexact. The actual translation of "piquer" is "to sting" or "to bite". "Piquer a la machine" = a machine stitch. The word for a particular type of stitch is "point".
  • piquer le bord - edgestitch
  • piqure de soutien - staystitch; literal meaning is "support stitch"—soutien means "support", soutien-gorge means bra, as in "supports the throat"
  • plaquer - flatten ("plaquer la poche" = "flatten the pocket")
  • les plis - tucks or folds ("piquer les plis" = "sew the tucks")
  • pliure - to fold ("dans le pli" = "on the fold")
  • point - stitch (noun)
  • point de croix - cross stitch
  • point de devant - running stitch
  • pointe de poitrine - bust point
  • poche(s) - pocket(s)
  • rabattre - to fold ("puis rabattre les plis" = "then fold the tucks")
  • rep - ribbing made from silk, cotton, or wool ("1m de reps pour les liens" = "1 meter of ribbing")
  • repasser - to iron ("repasser pour aplatir" = "iron flat")
  • les repères - marks ("utilisant les repères B et A" = "using marks B and A")
  • revers - reverse, as in reverse side of the fabric ("pull á col revers" = "pullover with reverse collar"). Also used to describe something that turns back on itself, such as a lapel, a cuff that is formed by folding back the sleeve hem, or a pocket that has a turned-down element.
  • scotcher - tape ("scotcher les pièces 6a and 6b..." = "tape pattern pieces 6a and 6b...")
  • le serre cordon - cord stopper (for round elastic)
  • simple epaisseur - single thickness
  • sous-piquer - understitch
  • surjet - whipstitch. While the translation for surjet is "whipstitch", most instructions using the term mean a serged stitch (using a serger or overlocker).
  • surjeteuse - a serger (overlocker)
  • surpique - topstitch
  • surpique nervure / surpiquées nervurées - topstitch the seam(s) close to the edge (edgestitch)
  • soufflet - gusset
  • tissu - fabric
  • tissu fantaisie - literally translates to "fancy fabric", but is used to mean "novelty fabric" or "contrasting fabric"
  • tissu souple - "supple" or "pliant" fabric - I think they mean knit fabric, but maybe drapey wovens as well
  • tissu uni - solid color fabric
  • triplure - underlining
  • valeur - amount or width ("surpiquer valeur pied de biche" = "topstitch the width of the presser foot")
  • veste - jacket
  • volant - flounce or ruffle
  • zip - zipper; this is not the "official" word for zipper, which is "fermeture éclair", but is used by these patterns ("le zip invisible" = "invisible zipper")

You might also check out this visual chart of hand stitches, or les points de couture.