Showing posts with label au bonheur des petites mains. Show all posts

Wednesday, July 11, 2012

Au Bonheur Harem Pants


If you've been reading my blog for long, you probably know I like a harem-style pant. But, you may notice that I like my harem pants to be somewhat fitted through the hips. I am not a fan of a dropped crotch on my body.

I've had this Au Bonheur pattern for some time:


While I liked the detail on the legs of these pants, I was not completely loving the other aspects of the pattern. Then I saw these Kokomarina pants:


The silhouette of these pants inspired me to give the Au Bonheur pattern a try. I altered the pattern to raise the crotch. A lot. I think I raised it more than a foot, copying the crotch from another pattern. (I altered these awhile ago and I can't remember, for sure, which pattern I used.)


I made these using a drapey rayon from Fabrix. It looks grey in the photos but is more of an olive color. They are constructed so that they are, essentially, a partial leg inside of a partial leg. They are not attached beyond the mid thigh and my knees peep out occasionally as I move. It's a bit strange.


Besides raising the crotch, I shortened these to a crop length by cutting off about 4".

Once I had gotten these to the point where they were done, except for the bands at the hem, I was not that happy with them and set them aside for some weeks. I finally decided to go ahead and finish them. I liked them better with the bands. A bit.


My only real complaint is how wide these pants are through the hips. They are approx 8" wider than my actual hips. If I make these again (and I'm not sure that I will), I plan to alter the pattern further to make them more fitted in that area. There is no side seam, so it's an alteration best handled before cutting them out.


Thursday, February 16, 2012

Au Bonheur Jeans Funkiness!


I made the Au Bonheur jeans a third time. The first time, I tested the pattern in black ponte. The second time, I made a pair using stretch indigo denim.

This time I wanted to make a pair that showcased the funky aspect of this pattern. For this pair, I made the following changes:

  • The original pattern calls for contrasting fabrics for several of the pattern pieces. For the first two pair, I used the same fabric for the entire pants. For this pair, I created my own contrasting fabric using my needle felting machine (also called an embellishing machine).
  • I changed the back pockets. I started with the pocket shape from the Jalie Jeans and made a pocket design that incorporated a contrasting element and echoed the angle of the yoke.
  • I made this pair 1" longer.
  • I used white top-stitching thread.

Materials and Notions:

  • Stretch black denim from FabricMart, purchased a year ago. I don't remember the lycra content, but 5" of the fabric stretched to 7". I prewashed the denim many times.
  • White Guterman top-stitching thread (color #20).
  • Scraps of lining and double-faced cotton to finish the lower edge of the front knee gusset and the front and back pockets.
  • Frixion pens. I used these to mark the back of the denim to mark the darts, where the pocket backing would be exposed, etc. These worked GREAT! After I was done with the markings, they were easily removed with steam from the iron.

Conclusion:

I LOVE these jeans! I have been wearing the blue pair quite a bit and they are SO comfy. And they STAY UP! I just barely managed to get them entered into the jeans contest on Pattern Review. I had to drive to my DD1's place yesterday to use her Mac and struggle with an unfamiliar environment where I didn't have my tools or my passwords. It took me two hours, but I managed to get it done.

If you are a member of Pattern Review (either free or paid), you can VOTE, if you wish.

Pictures Galore!


So happy to get my computer back, I am dancing!


Needle felting the front knee gussets. The knee gusset on the right has the darts sewn in but not yet topstitched.


Front knee gusset, completed.


Back knee gusset, completed.


All of the needle felted bits. Notice the flowering tree in my back yard? In February? It really has been a beautiful spring this winter.


Back pockets. I started with the Jalie Jeans pocket shape and then drafted my own version.


Front pocket backing. I only needle felted the part that shows.


Yes, they are United Nude shoes.


A "Mom Jeans" butt? I am not sure...

Saturday, January 28, 2012

Au Bonheur Jeans

Table of contents:

The Usual Stuff

Last week I tested the Au Bonheur jeans pattern in ponte. The only problem I encountered was the gaping front pockets (though I didn't test the back pockets).

I decided to forge ahead with the denim version. I found in my stash a piece of stretch denim that I had purchased from Fabrix and washed/dried several times. Unfortunately, it turned out that I had less than 2 yards of the fabric, barely enough, but I was able to squeeze them out.

Materials:

  • Stretch denim from Fabrix. I believe it's 3-4% lycra. 5" stretches to 6.5", which translates to 30% stretch. The ponte stretches from 5" to 8.5", or 64% stretch. Because the ponte had more stretch, I cut the denim with 5/8" seam allowances at the inner leg and side seams, rather than 3/8". But I ended up sewing them with 5/8" seams, so I didn't need the extra ease.
  • The pattern calls for two rivets to secure the flaps on the back pockets, but I used 2 metal buttons, from Fabrix.
  • Topstitching thread. I used Guterman color #272, navy blue. Not sure I should have used blue, as it doesn't really show up.
  • 1" waistband elastic.
  • I did not use a zipper, or a waistband button, since I made the pants with a mock fly with an elastic waistband.

Alterations and Modifications:

I outlined the alterations and modifications on the previous post. There are a couple additional things I did for this pair:

  • The vertical pocket was gaping unattractively on the ponte pair. After much consideration, I decided to use an angled pocket. This echoes the other angles in the pants and creates much less gaping.
  • Closeup of fly front and angled front pockets
  • I wanted the look of a fly, without an actual fly front, so I used my favorite fly front tutorial, Debbie Cooks' Jeans Fly. I followed the instructions, but left out the zipper. This made the process so much easier. :) Since there is no zipper, the fly is quite flat.
  • Look Ma, No Zipper!
  • On the ponte version, I did not make the back pockets. I had just enough denim to cut one set of pockets. These feature a back flap and darts, so they are three dimensional. To be honest, I don't like the look of the flaps, but I didn't have enough denim to re-make them. I left them as-is for this pair, but if I use this pocket pattern again, I would leave off the flaps.
  • Back pocket pattern piece
    Left back pocket

The Dreaded "Mom Jean"

For a long time now, I've heard references to a horrible phenomena. One that women, past a certain age, who may or may not have borne children, should avoid at all costs.

The Mom Jean.

I've heard it referred to on numerous style shows, in numerous articles. But, to be honest, I had only a vague notion of what a "mom jean" was. Then, blogger Robin, of A Little Sewing, posted a 2009 article she found to Stitcher's Guild.

In this article, a woman took some mothers who were guilty of wearing "mom jeans" shopping for a better fitting, more youthful jean. This post generated a lively discussion on SG.

Evidently the size, position, and location of the back pockets has a large contributing effect to the "mom jean." Once I got to the point that the pockets were constructed and ready to be attached to the pants, I then carefully read the article.

Based on the article, as well as style shows I've seen, my understanding is that a Mom Jean has one or more of the following characteristics:

  • A light wash denim.
  • High waisted.
  • Muffin top.
  • Camel toe.
  • Pants that fit the butt poorly, contributing to a "una-butt" look, or a long flat butt look.
  • Pockets that are too high, or that are parallel to the back yoke and, therefore, point outwards to the "saddlebag" area, or that are too small, making the rear look big, or that are too far apart, also making the rear look big.

My take-home point from this is that the back pockets are important. I therefore spent some time playing with the placement of my back pockets, ignoring the suggested placement on the pattern. I moved them closer together, and made them parallel to the CB seam. There wasn't much else I could do as the pockets were already constructed and I was out of denim. Not that I cared that much, but I wanted to test the theories I had learned.

Do my jeans fit like a mom jean? Yeah, I think they do. Oh well. I don't really care that much. :)


What do you think? A "mom jean" sort of derriere? :)

Conclusion:

I do like the funkiness of these jeans, but I would change the back pockets in future pairs - I am not loving those flaps. I really like the angled front pockets much better than the vertical pockets on the original pattern. I also might try using a contrast top-stitching thread to highlight the interesting lines of the pattern.

Originally, I was going to enter these jeans in the jeans contest on Pattern Review, but now I'm not so sure that they would stand out enough.

More Pictures


Front knee


Back knee

Monday, January 23, 2012

Testing the Au Bonheur Jeans Pattern

(No, I did not make this silk jacket, I bought it second hand.)

I've been meaning to try this pattern since I bought it almost two years ago. Unlike some of the most recent Au Bonheur patterns I've made that use only 2 or 3 pattern pieces, these jeans require many pieces and I spent time translating the pattern and trying to get my head around the construction.

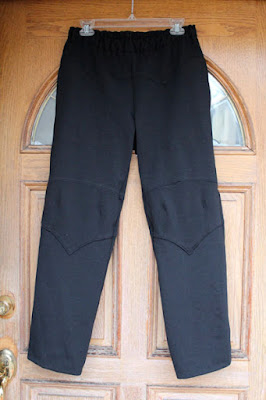
This pattern features top-stitching, contrast knee insets, front and back, front and back shaped yokes, a back patch pocket, front pockets with an inset vertical opening, a fly front and a contoured waistband. The front knee yokes and back pockets have darts to create unusual shaping. There is lots of top-stitching, some echoing seams and some more freeform/artistic.

I was unsure what size to trace off, so I finally decided to go with my hip size and I traced off a size 42, with no changes. I figured I could make any necessary changes after testing the pattern in black ponte. The alterations I made were minimal:

  • Omitted the back pockets - though I plan to include them in my denim version.
  • Omitted the fly front zipper - again, I plan to include this in the denim version.
  • Replaced the contoured waistband pieces with a rectangular elastic waistband. Not yet sure how I want to handle this in the denim version.
  • For the most part, construction was straightforward. However, when I sewed the front leg to the back leg, the pieces didn't match up. The front leg was approx 4" inches longer than the back leg. I chopped off the excess from the front hem and the resulting hem length was perfect for my 5'5" height. I could be wrong, but I think the pattern has a significant drafting error.
  • Omitted the more decorative top-stitching.

The only problem I had with the finished pants is that the vertical front pockets tend to gape, as you can see in the second photo below. This is a phenomenon I've seen on men's pants and it does not flatter the hips to have pockets that gape as you move. (As you can see in the third photo below, they do not gape if I stand straight and still.) Short of omitting the front pockets, or employing some sort of closure, such as snaps, buttons or a zipper, is there some other way to handle this gaping?

Closeup of front vertical pocket

When I move, the pocket gapes

Standing straight, no gaping

Input is welcomed. :)

I was surprised how well these pants fit! They have a good fit through the crotch, which has not been my experience on previous Au Bonheur patterns.

The back doesn't look so great on the hangar, but fits quite well. You can see the back knee inserts and the back yoke.

More Tablecloth Skirt Goodness

In other news, Tablecloth skirt pics continue to arrive in my inbox. The most recent offering is Kathryn O's beautiful striped version:

This, and all versions, are available in the Tablecloth Skirt Gallery (link at the top of the page). Thanks, and keep those photos coming!

Pattern Pics

Wednesday, January 18, 2012

Au Bonheur Knotted Tee

Worn with my Style Arc Laura Leggings.

It's high time I made another Au Bonheur pattern! I actually made this top over the three day weekend. It took longer to alter than to make - it's a quick and easy sew. I was planning to make a second one, a non-black version, easier to see on the blog, but I couldn't identify a fabric I wanted to use, so here's the black version. The fabric is a very stretchy rayon-lycra from Fabrix.

Even if you don't have a stable of Au Bonheur patterns, many of the creative ideas, such as the hem on this tee, can be applied to other patterns.

This pattern is a simple tee, with four knotted points at the hem. It is sleeveless with a scoop neck. The four points of the hem are formed thanks to a pattern piece they call the Coté. Coté translates to "side", but I would call this piece a gusset - to me a side piece would extend up to the armscye. But, and get this, the gusset is shaped like...

the Eiffel tower! How French is that?!?! So cute!

I traced off the largest size, a 54, and then made several changes:

  • I preserved the scoop neckline, but I traced the shoulder, armhole, and width for the front and back from the Style Arc Adele. This meant that I ended up with a bustline that had 4" of negative ease - it's less boxy than the original. I like negative ease with a highly stretchy fabric.
  • I used the long sleeve from the Adele.
  • I left the hem raw.
  • I used the same finish on the neckline that I used on this Liberty pullover.

  • I shortened the sleeves by 1.5" and hemmed them by hand.

Conclusion:
I really like this simple and easy tee! I definitely will make more, once I have identified more fabrics.

One other thing I wanted to mention. I created a separate page, French Sewing Resources and Au Bonheur Gallery. I want to keep these resources alive and, in fact, added more clarifications to the glossary when I made this top. This page is available at the top of every page in my blog, along with the Tablecloth Skirt page. Enjoy!

More Pictures