With cowl
Without cowl
I still have yet to make the Liberty as intended with the button closure, but a little over a year ago, I was inspired by Heather, who had the idea of converting the button-down Liberty to a pullover. It's basically a wonderfully funky t-shirt.
I had this grey/black ponte which is similar to Heather's luxury wool knit, and I cut it out a year ago and it sat. And sat. I don't know why I took so long to sew it up, because it's such a quick project.
Materials:
- Black/grey stripe ponte from FabricMart.
Alterations and Construction Notes:
- I used the same tracing for my last version of the top, which is a Large with an FBA. I converted the FBA to gathers at bust level. I usually ease the dart in a knit, but this knit is fairly stable, so I used gathers. I prefer it with an eased seam. :)
- The sleeves were too long in my last version, so this time I shortened the sleeves by 1". Then before attaching the sleeves, I shortened the shoulder by 1", tapered to nothing. Suddenly, the sleeves were 1" too short. (Rookie mistake.) Luckily the sleeve hem is very wide, so I was able to lengthen the sleeves by 1". (Note to self, I think I could shorten the shoulders another 1" next time.)
- I cut the neckline to be a bit wider. I finished the round neckline using a technique I had seen on a Marcy Tilton top.
Completed neckline
- I cut a 1.5" bias strip (so the stripes are on the diagonal).
- I folded it in half and pressed it.
- I then laid it against the neckline so that all 3 raw edges were even. I topstitched 1/8" from the folded edge of the bias strip, pulling slightly as I rounded the curves. (I could have pulled a bit more.)
The three raw edges
- I cut a 1.5" bias strip (so the stripes are on the diagonal).
- I made a separate cowl.
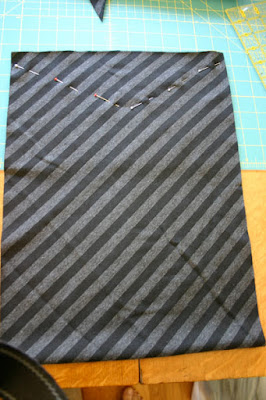
- I cut another bias rectangle, approx 12" wide and fairly long. (I didn't measure it.)
- After playing with it for awhile, I decided to sew the short edges together so that the cowl was a slight funnel shape - it narrowed closer to the head.
The pins indicate where I sewed the side seam. The narrowest point is the top of the cowl after it has been folded in half the long way.
- I folded the tube in half to encase the wrong side.
- There was a "point" where the seam met up, so I rounded the edges.
- I turned the raw edges to the inside and topstitched around the donut shape.
The finished cowl. Yeah, it's a bit different. ;)
The next time I make this pattern, I want to make a fresh tracing and do my "new style" of FBA. This is where I chop the pattern at the waist (or thereabouts) and do the FBA on the upper half. I then merge the pieces back together. I've been using this now for several garments and I LOVE it as it preserves the design on the lower half.


Love the neckline, love the cowl! I still have an old-fashioned cringing with the whole unfinished, raw edges, but I'm slowly getting over it - I'm definitely going to try this neckline. (although, knowing me, it might end up with a finishing bit folded over the raw edge.....give me courage lol)
ReplyDeleteHow does the cowl stay in place? Does it get fiddly to keep it cooperative?
Thanks, JillyBe! I haven't worn the cowl much beyond the photos, so I can't answer that question yet. :)
ReplyDeleteI'm still not comfortable with unfinished edges, either. Old school.
ReplyDelete