Wednesday, November 30, 2011

Blogger Meetup - Meeting ReAnn!

I had the pleasure of a mini-blogger-meetup last Monday!

ReAnn, an internet sewing friend for the last couple of years, was recently visiting San Francisco and we finally got to meet in person!

It was fun, fun, fun!

We hit fabric stores, such as Stone Mountain & Daughter in Berkeley, and Piedmont Fabrics in Oakland, which had just moved up one block three days prior to our visit.

We petted (and drooled over) fabrics!

Doesn't ReAnn have the most gorgeous smile?

We did our most serious damage at Fabrix in SF, but we were too busy shopping to capture the moment. Well, one of us did the most serious damage at Fabrix. I only bought one small piece of fabric. ahem

We snoop shopped. (Well, after a quick detour to FedEx. I'm just sayin'.)

We ate and we laughed!

It was so much fun to meet another sewing soul-sister. We've talked about it for a long time and finally both our schedules coincided. It was nice she came out west. As DD1 will be attending university in Oregon next year, I don't expect to be doing any traveling for some time to come. ;)

P.S. In case you wondered, ReAnn is wearing a really cool Shapes High Five top that she made from a white crinkle fabric purchased in San Diego on a recent road trip. Her beautiful coat and scarf are purchased. I'm wearing my new Au Bonheur tee, my Au Bonheur raincoat, and my latest Marcy Tilton pants (not blogged, Vogue 8712). My scarf is purchased.

Sunday, November 27, 2011

Au Bonheurs Asymmetric Tee and Thanksgiving Weekend Wrapup

Wow, I have been having way too much fun the last few days. Thanksgiving was lovely at a friend's house. I made the bread rolls and they also asked for an extra recipe of the bread dough so they could make cinnamon rolls over the weekend for their house guests. I was happy to comply and will, eventually, post the recipe over on my recipe blog (which is not very active in general).

Then, DD2 came to visit and we had fun cooking (made my first fudge of the season, also to be posted later), watching movies, walking, and driving. (She is about to get her driver's license and loves to just drive.) Then she went off Swing dancing so I even had some time to sew!! (Seriously, how many 16-year-olds love to Swing dance and play boogie woogie music?)

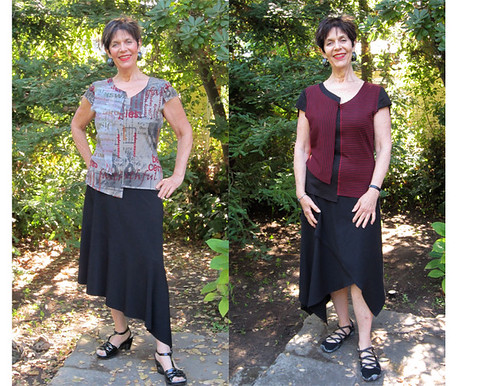
Since time was limited, I wanted to pick an easy pattern. I decided it was time to make the Au Bonheur asymmetric tee that The Amazing Dorothy made recently.

AB60005

It's sad that this company is now out of business, but I know some folks do have their patterns. This one goes up to a size 46, though the finished bust measurement is 41". This is not nearly enough for my 48" bust. However, I have recently worked out that in stretchy tees, I like a finished bust of 44", or about 4" of negative ease.

I needed an FBA, as usual, and decided to try a new-to-me technique, the pivot-and-slide FBA. You can see it explained on the Sharon Sews blog. I pivoted the top 1.5". This worked well at the side seam, but had an undesired effect in the armsyce by making it too wide. I will explain how I fixed that in a bit.

As I traced off the size 46, I straightened out the extreme waist shaping, as I do not have a tiny waist, and I removed the extra hip width, as I have narrow hips.

The top features asymmetric cap sleeves, which are very cute, especially on Dorothy, but I do not wear cap sleeves. I decided to take the sleeves from the Style Arc Adele top that I recently made. This meant that I had to transfer the armscye from the Adele top to the Au Bonheur top. This took care of the unwanted width added from the pivot-and-slide FBA and also narrowed the shoulder by about 3/4". Another good alteration for me as I narrow the shoulders of most patterns.

The pivot-sand-slide FBA also did not add length to the front. I need additional length to get up and over the boobs (cause it's a mountain, not a rainbow!), so I used the same alteration that I used for the Adele top, where I sliced the top horizontally at the bust point and added 1" across the front. This extra length is eased back in at the side seam.

Finally, I shortened the sleeves by 2".

I will not kid you, it felt like the alterations went on and on and took several days to accomplish in time snippets. I think that the alterations took longer than it too to cut and sew the top. But it was totally worth it!

I raided my stash to make this top. The stripe is a fabric from Marcy Tilton, purchased long ago. The polka dot fabric is left over from this Sandra Betzina dress. The solid black is left over from the Debra Zebra top.

I have a slight aversion to raw edges, so I serged all of the exposed raw edges. The top was very fast to sew together and I was happy with the fit. I left off the overlay on the right front, for two reasons. First, I was not sure if it would lay nicely over my bust. But, I mostly left it off because there was so much going on that the top didn't need any additional visual noise.

One thing I want to point out. If you look at the pattern, it appears that the center front seam is on the diagonal. This is not the way the pattern is drafted. It is drafted with the seam straight up and down along center front.

I will definitely be making this again! Now that it's altered to fit me, I can use it over and over and may even cut it more conventionally for a regular tee.

Tomorrow I am taking my last vacation day of the year to hang with an internet friend whom I have never met in person. More on that later. :)

More Pictures


ETA. This is too funny! I just realized that the back was supposed to echo the front, with two pieces, seamed at the CB, with asymmetric hems and necklines. I somehow missed this and traced only the back with the deeper neckline and cut it on the fold. I will trace it off for next time.

IMG_0229_smaller

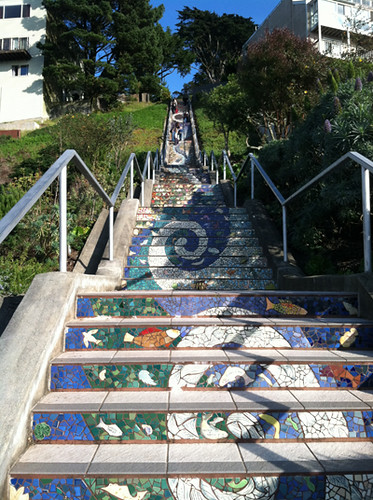
Walking up the Mosaic Steps

IMG_0216_smaller

The top of the hill.

Seam Allowance Ruler and Tablecloth Skirt Gallery

Here's a clever new tool! A woman named Claire Tharp had the idea of a french curve designed for adding seam allowances. It comes in two widths - 3/8" and 5/8". I have both widths and these rulers are very easy to use. Discounts are available if you are a member of ASG, Pattern Review, etc. The pricing and discounts are explained on her blog, SA Curve Ruler. There is also a video demonstration. Claire's Etsy site is ctharp1.

These rulers would fit perfectly into a Christmas stocking! ;) (And, no, I get nothing for this plug; mine were purchased and I think they are a useful product.)

I am currently working on a top that has no seam allowances included in the pattern so I am actually road testing the rulers.

Tablecloth Skirt Gallery

The pictures have been flooding in from folks who are making the Tablecloth Skirt. You guys are fast!

I am having fun seeing all of these versions of the skirt. If you look at the top of my blog, there is a permanent link to the Tablecloth Skirt Gallery. Drop me a line (email is in my profile) if you'd like me to include a photo your skirt! I also include a link to your blog, pattern review, or picture set, if you have something along those lines.

Thursday, November 24, 2011

Happy Thanksgiving!

If you celebrate, Happy Thanksgiving to you! I'm thankful for all of you, whether or not you celebrate. :D

Mary R was busy with gift sewing when she took a break to whip up the TableCloth skirt and send me photos. It looks great, Mary! I love seeing your projects, so please send me pictures - my email is in my profile at the top-left of the page. I am especially curious to see the seven Tablecloth skirts that neighborhood gal is going to make out of polyester organza this weekend. :)

It Seemed Like a Good Idea

I wore this yesterday when I ran some errands. I love me a funky scarf and this one is funky and fun. It's a loooong infinity scarf of rectangles made from a beefy, textured, felted sweater knit. What a great idea!

I am loving all of the crisp, snuggly weather! Yesterday, after getting my hair cut, I stopped at one of the best coffee establishments in San Francisco, Blue Bottle. I was actually there to pick up some beans as a gift, but I had a hot chocolate and a Fruit Brackle sort of dessert - it featured apples poached in brandy and a nut-based streusel.

Ah-maz-ing.

This place is very near Westfield Mall in Union Square, but a bit hidden, so check it out if you are in the area.

And now, I'm off to finish two recipes of bread rolls for Thanksgiving dinner.

Saturday, November 19, 2011

StyleArc - Adele Top

First, thanks to all of you for your enthusiastic feedback on the Tablecloth Skirt. Marec (on Pattern Review) suggested a sew-along. I've never even participated in a sew along, but I'll consider running one in the new year if there is enough interest.

I have very little time to sew in the next couple of weeks, between work, kids, cooking, and visitors. In fact, I'm busy tomorrow (Sunday), so I decided that today I needed a quick project I could complete in one day. But which easy project to choose?

Several weeks ago I decided that I wanted to make a Style Arc pattern I had purchased last June, the Seaside Sue top.

Seaside Sue Top

I was planning to make some changes, namely to raise the neckline and to add sleeves. When I pulled the pattern out to work on it, I saw that they had accidentally sent me the wrong size, it was a size 10 rather than an 18. I emailed Style Arc about the error, asking for the correct size. In my email, I told them I was planning to add sleeves to "winterize" it. (I've teased Chloe in the past, asking her, what have you got against sleeves? Since then, she has been releasing more sleeved top patterns.)

They quickly responded to my email and told me that the free November pattern was a sleeved version of Seaside Sue and that they would send it to me in another week when it was available, if I preferred. You betcha!

Adele Top

(It's not the first time I've asked them for something that was already in the works. Get out of my head, Chloe!)

Materials:

  • Green print rayon lycra jersey from Fabrix.
  • Black viscose spandex "Annabelle" jersey for contrasting neckband from Vogue Fabrics.
  • Twill tape to stabilize shoulder seams.
  • 1/2" Steam-a-Seam Lite 2 to stabilize hems.

Alterations and Modifications:

  • The finished bust measurement of the size 18 is approx 44". My bust is closer to 50" but this is a stretchy fabric. I held 22" of the fabric against my bust and decided that I didn't need to add width. This top is more flattering if it gently hugs the bust anyway, so I decided that the negative ease worked for me. But I didn't want the top to "ride up" in front, so I sliced the pattern at the bustline (front only) and added 1" horizontally. I did not alter the back because I just eased the extra 1" in at the side seam.
  • The sleeve was a bit narrow, so I widened it by approx 1-1/4".
  • The sleeve is too long - I shortened it by 1-1/2".
  • The pattern instructs you to interface the neckline. The contrast neckband is optional. If you left that off, you would need to interface/stabilize the neckline somehow. I left it off and used the contrast fabric, which functions as a ribbing.
  • I hemmed the top and the sleeves using Steam-a-Seam Lite 2.
  • I did NOT have to narrow the shoulders!!! What the heck??? I *always* have to narrow the shoulders! Always! On the "Big 4" I often narrow the shoulders a full 2", but even on Style Arc I have to generally narrow them 3/4"-1".
  • I did not modify the neckline. If you notice, it's higher than is shown on the drawing. Thanks to Sigrid for asking this question. :)

Conclusion:
Wow, do I LOVE this top!!! I LOVE the easy FBA! In fact, I think I want to revisit the funnel-neck tee and try this FBA instead of the other FBA I used.

I can easily see straightening the side seams and chopping the hem, making it a standard horizontal hem, to make this my go-to standard tee. It fits that well. LOVE LOVE LOVE.

More pictures

Closeup of side slit

Friday, November 18, 2011

Self Drafted - TableCloth Skirt (with Tutorial)

The outfit I'm planning to wear for Thanksgiving.

More than a year ago a cyber friend, ReAnn, sent me a link to this dress and asked if I knew how it might have been drafted.

I didn't.

Over time, this dress has shown up in various incarnations - with sleeves, without sleeves, with different fabrics. I have only seen it online, never in person, so I did not have a chance to study it. Then, a month or so ago I was looking again at the web page when, bam, I realized how it was drafted.

Gotta love that!

I quickly did some math, and whipped up a version using a worn out flannel duvet cover with rosebuds that my daughter had decided was no longer cool. I was happy to see that my idea did, indeed, work. Then I hung the muslin in a closet and forgot about it.

I needed to sew a quick skirt for a meeting this week and I decided that it was time to make a real version of this garment. I made it in one evening - it is so simple.

Materials:

  • A very lightweight, crisp fabric from Fabrix. I believe it's a nylon taffeta. It is two-sided, but I used the autumn-colored side. The other side is cream/black.
  • 1-1/2" Fantastic Elastic from Pamela's Patterns.

This skirt is made entirely from rectangles. It is basically a circle skirt, except it uses a square instead of a circle. I did not even cut out the fabric. I just measured and ripped. The only time I used scissors was to cut the circle for the waist.

The "TableCloth Skirt" name came from one of my sewing pals, Sarah. I was holding it out, showing the shape, similar to the following photo, and she declared, "It's like a tablecloth!"

Yes, indeed, if you need a quick Halloween costume, just wear a board underneath this skirt to hold it out and, voila, a table with a tablecloth.

The following layout shows the essential shape of the pattern.

There is a square piece of fabric (blue), with a waist hole cut out (yellow). Then there are four rectangles (green). There is also a rectangular waistband (not shown). (I made this with a elastic waistband, but you can put in a zipper if you want.)

Instructions:

  • Cut, or tear, a rectangle that is 44" by 44". (Note, I am 5'5". If you are taller or shorter, you may want to adjust the proportions.)

  • Calculate the circle you want to cut out for the waist. The math is not hard, but you can use a calculator. I googled "circle circumference calculator" and ended up using this one. I decided to add 2" to my waist measurement and plugged in the number. I needed a circle with a 6.5" radius. I created a quarter-circle template using printer paper.
    NOTE:: If your hips are larger than your waist, use that as your base so you can pull this on over your hips!

  • Fold the square of cloth into quarters. Pin the quarter-circle template to the center corner. (Make sure you pin it to the correct corner!) Cut out the waist.

  • Sew the waistband to the waist opening in whatever way you prefer. (I ripped a waistband piece that was 4.5" by 45" because I was using very wide elastic.) I stay-stitched the waist, clipped, and attached the waistband.
    NOTE: The waistband should be the length of the waist hole at the seam line (not at the cutting line), plus two seam allowances. I cut it longer by a few extra inches, just to be safe. After I stay stitch the waist and clip, the seam always seems to grow another inch or two. I don't sew the short edges of the waistband together until the waistband is mostly attached to the skirt. I leave a couple inches unsewn at the beginning, and the end, of the seam. I then mark where the waistband should be sewn closed. I sew it, press it open, and then stitch the last few inches to the skirt. I am also too lazy to leave an opening in the short seam for the elastic. After the waistband is completely sewn and topstitched to the skirt, I use my seam ripper to open the short seam, on the inside, for the elastic. I insert the elastic, fit it to myself, and sew the edges of the elastic together. I don't even stitch up the little opening. Now you know. :)

  • Cut, or tear, four more pieces of fabric that are 44" (or whatever size square you used) by 15" (again, modify as needed).

  • Hem the long edge of each of the four rectangles. (I like to hem it first, but you can wait if you want to see about the length.)

  • Sew the unhemmed long edge of each rectangle to one of the edges of the central square. (If you look at my crude diagram, you are sewing the green pieces to the blue center square.) I used 1/2" seam allowances. You want to start sewing 1/2" in from the edge and stop 1/2" from the other edge. If you are using a different width for the seam allowances, start and stop the seam by that amount.

  • The final step is to sew the four short edges of the rectangles together. (As shown by the arrows in the diagram.) This creates four corners.

That's it! Not counting the waistband or the hem, that is a mere EIGHT seams! If you want to recreate the inspiration dress exactly, sew the skirt to a cropped bodice. I'm not really a "dress" person, so I decided to make it as a skirt, but it would not be hard to do.

A few more pictures:

A little twirling action

A closeup of two of the corners

Wednesday, November 16, 2011

StyleArc - Debra Zebra tops

Like my new hat? Everything is more jaunty with a hat. :)
More Debra Zebra pics here.

More Style Arc goodness!

Many folks have made the funnel-necked tee from the Sept 2010 issue of Burda, most recently, Margy. This Style Arc funnel-neck tee is very similar and, bonus, and I didn't have to trace it! I've had this pattern for awhile and now that winter is coming, I'm ready for a funnel-necked top or three.

I made two tops in a few hours. With only 3 pattern pieces and 6 seams (total), you can whip these up very quickly.

Materials:

  • Top #1: Black Annabelle knit (94% viscose, 6% spandex) from Vogue Fabrics.
  • Top #2: Red/Pink Wool Jersey (97% wool, 3% lycra) from Fashion Fabrics Club.

Alterations and Modifications:

  • I started with a size 18, which is usual. This has a fairly relaxed fit.
  • Removed the hip curvature from the side seams.
  • 2" FBA. I eased the fullness from the dart into the side seam. I didn't sew it as a dart or gather it. I steamed out the fullness that was created by the easing.
  • Removed 1" from the shoulder.
  • The upper arm seemed narrow so I widened it by 1". To be honest, I don't think this was necessary.
  • This makes a long top. I shortened it by 2-1/2".
  • I did hem the sleeves and the top, but I did not hem the neckline.

Conclusion:

This is a great basic!!! I will be making more of these. Super quick, well fitting, and a great wardrobe staple.

More Pictures

This pic has been lightened.

Fashion Fabrics Club called this color red/pink but I would call it coral.

You can see my FBA. I always fit the side seams on my body - it always benefits from further tweaking.

Alteration to widen the sleeve.

Thursday, November 10, 2011

All Wales Welcome! National Corduroy Appreciation Day

I love corduroy and tomorrow, November 11, 2011, is Corduroy Appreciation Day. This date, 11/11/11, was chosen because, in numeric form, it resembles the wales in corduroy. And, it's on a Friday! There are many events planned all over the world a handful of events planned in a few cities. In 2111, it will be on a Wednesday, so don't expect quite so much hullabaloo next time, being a school night and all. :)

I wish I could properly celebrate the day, sewing some corduroy, for example, but at least 11 hours will be spent in a car, heading with DD1 on a college tour to Oregon. Though, doesn't Oregon seem like a proper corduroy-wearing state?

Let's hope so, because I will be wearing cords that day. In fact, in the photo above you see me wearing one of my favorite corduroy pieces, a jacket made from a corduroy that alternates wide wale and very wide wale. I found this garment on ebay many moons ago but, hey, one day I may knock it off.

I'm also wearing cream-colored corduroy Jalie Jeans, but these are going into the Goodwill bag, as they aren't nearly as comfy to wear as the Linda pants I made with the same fabric.

I know I have been quiet on the blogosphere, but my sewing has been proceeding very slow of late. I'm not sure if it's preferable to find other (sewing-related) things to blog about, or to wait until I have something to show.

The jacket I am working on is close to being done, but due to the impending road trip I can't work on it this weekend or I could finish it. It's been a bit challenging to fit, so I'm hoping it will turn out ok, but the jury is definitely out.

I also continue to walk at one to two hours a day, which also eats into my free time. And, in an effort to eat better, I am cooking and doing more food prep. (Kale smoothie, anyone?) For me, at least, a healthier lifestyle takes more time. :)

I hope you have a wonderful Corduroy Appreciation Day. May your wales be true and your nap smooth!

P.S. Inspired by the snow picture, I specifically looked for corduroy textures on this morning's walk. The best I could find was this bit of sidewalk, at a crosswalk near my home, in concrete. I would buy fabric like this!

Tuesday, November 1, 2011

The Autumn 6-Pack that Wasn't

You may recall that I decided to join the Autumn 6-pack on Stitcher's Guild. Most of us tweak the plan to suit our needs and my planned version of the 6-pack was actually 7 pieces: 3 bottoms, 3 tops, and a jacket that would go with everything.

I was making great progress, initially. My color palette was inspired by a beautiful piece of wool I purchased from Emma One Sock. This striped woven wool contains several shades of blue, plus grey, and cream and almost looks like a knitted fair isle.

I got stuck on the jacket. I "auditioned" a jacket pattern - McCalls 6294. I liked the jacket, but decided I didn't want to use my special wool for that pattern. I spent countless evenings making plans for the fabric, but I could not settle on a pattern.

What I did make, starting from the upper left and going clockwise:

  • Periwinkle blue rayon jacquard Liberty top (Sewing Workshop pattern, fabric from FabricMart).
  • Navy blue rayon lycra jersey Teagarden T (Sewing Workshop pattern, fabric from Emma One Sock).
  • Aforementioned McCalls jacket - the version I auditioned. (Yes, it goes with the other pieces, colorwise, but this was my test version.)
  • Midnight blue Marcy Tilton pants (Vogue pattern, fabric from Emma One Sock).
  • Charcoal no-wale corduroy Linda pants (Style Arc pattern, fabric from Fashion Fabrics Club.
  • Cream pinwale corduroys (Jalie pattern, fabric from FabricMart).

It's all good, though. I will get lots of wear out of the pieces I did finish. And I still have the gorgeous piece of wool. :)