Showing posts with label skirt. Show all posts

Friday, November 22, 2013

Style Arc Mindi Skirt


My latest Style Arc order arrived this week and, after mulling it over, I decided to start with the Mindi skirt. This pattern is designed for a regular woven fabric, but I used a stretch woven corduroy from my stash.

Because the fabric is busy, I left off the zippered patch pockets. The front features a Center Front zipper and I used a bold Riri zipper in red.

I purchased my usual Style Arc size for bottoms - a 6. The skirt was too small through the waist so I increased the waist and substituted a rectangular waistband for their curved waistband. The skirt was too big through the hips, probably because it is designed for a regular woven fabric. I removed 4" from the side seams (1" from the front and back pattern pieces). After the skirt was completed, I realized that I could have removed another 3" or 4" from the hips, but the waistband was already attached, so I am leaving it, for now.

The pattern is designed so that the zipper goes through the waistband but I don't need that feature, given my hip-to-waist ratio, so I simplified.

This is a great basic skirt! I am already planning another one, next time with the zippered pockets, but I don't have the necessary zippers in stash.

I have enough of the corduroy left to make a pair of fun winter pants. Those will be appearing soon. ;)

Sunday, January 13, 2013

Sandra Betzina Skirt - Vogue 1333


I made this skirt over Thanksgiving weekend, last November. I didn't blog it at the time, because I wanted to make another one using a different sort of fabric.

But I haven't gotten around to it yet.

I haven't sewn this week. Work was busy to begin with, and then we went into crisis mode and kicked into high gear. I worked Friday evening and pretty much all weekend.

So maybe it's a lucky thing I didn't blog this skirt before, so I have something to post.

This is a great pattern, and I am not sure why people aren't falling over themselves to make it. It's an updated version of a previous Betzina skirt pattern that I also loved (and made 5 or 6 times), Vogue 1018. This updated version has eliminated the 60 tucks, making it easier to sew. It has also replaced the waistband/zipper combo with an elastic waistband, which I also did on my versions of 1018.

I chose this wild graphic print from FabricMart, purchased more than a year ago. (More stash busting, yay!) But the fabric is, frankly, weird. It feels like a home dec fabric, with a strange coating on the back. I am not sure how much I like it in this design, which is why I considered making it again in a different fabric. The pattern calls for a knit, but this is a woven. I think this pattern works fine for wovens, if you have the right woven. (I used both knits and wovens when making this pattern's predecessor, Vogue 1018. Both work fine.)

You might be wondering: what the heck are you wearing with that skirt, Shams? I am wearing a Japanese jacket that I purchased used. Margy calls it my Porcupine Suit.

I took a walk this afternoon, after hours and hours of working. It was a sunny afternoon, so I enjoyed taking cell phone pics of the porcupine fabric. I especially love the shadows it creates.

Also, thanks so much for your feedback on my "Epic Fail" jacket. I really appreciate all of your supportive comments and suggestions. For now the jacket is going into a closet, but I may revisit it later, if the mood moves me.

Sunday, December 23, 2012

Christmas Sewing


I don't usually sew Christmas gifts. I often will knit Christmas gifts, but that didn't happen this year, for a variety of reasons. Several days ago I was evaluating the gifts I'd purchased for my daughters for Christmas and I realized it was scant offerings this year, especially considering that I didn't knit any hats, scarves, or wrist warmers.

So, at the last minute, I decided to sew something. I rarely sew for my daughters. Probably the biggest reason is to avoid frustration. They are both very choosy about style, fit, pattern, and color. Particularly about fit. It's just easier to buy them clothing or, better yet, let them buy their own.

But I decided to bite the bullet and hope for the best. I spent a lot of time anxiously considering various options. I wanted to use stash and/or remnants for everything. I measured each of them when they visited on separate occasions. (I know they are expecting jammies this year, so I hope they won't be disappointed.)

I was very surprised that the girls (at 20 and almost-18 years old) have virtually identical measurements, though the oldest is 2 inches taller. Yay! That was very considerate of them.

I poured through my small pile of Burda pattern magazines. I scoured my stash for multi-sized patterns that might accommodate them, but still be youthful and current. (Even if my girls shared my aesthetic, which they don't, most of my patterns are in a range that is too large for them.)

I wanted the outfits to believably mimic RTW and be coordinated - no point in sewing fashion orphans. I poured through various RTW websites intended for the young, such as Delias, Urban Outfitters, and Zara, to make sure I wasn't off base in my ideas.

In the end, I decided on a wrap skirt (#128) from the Sept 1994 issue of Burda (size 38) and a Jalie Sweetheart Top (size S). For the two skirts, I had some stretch denim remnants from my recent spate of skinny pants sewing, though I really had to work it to get the skirt out of the tiny piece of blue flocked fabric and ended up piecing the waistband. In my stash, I had some nice viscose/lycra (in black) and rayon/lycra (in eggplant) - each fabric coordinates with one of the skirts.

I made the skirts on Thursday and Friday evenings, after work. I made the two tops on Saturday. What quick, satisfying sewing! (So this is what it's like to just sew right from the envelope!) From my stash I had snaps (I love to use my SnapSetter tool) and closures for the skirts. I had tried sewing the black denim skirt with contrast gold top-stitching, but didn't like the result and spent an hour ripping it out.

Amusing aside: I had one small spool of eggplant thread in my stash. I'm sure this old style Dual Duty spool was from my mother's cache. I neglected to notice as I was winding the bobbin that it used up almost the entire spool. Not wanting to head to the fabric store two days before Christmas for a spool of thread, I sewed most of the top using a "close enough" brown thread in the needle and saved the eggplant thread for where it would show, such as the hems, top-stitching, and attaching the bust elastic. I have more of the eggplant fabric, so I'd better buy more of this color!

We celebrate our Christmas on the 24th, so I am crossing my fingers that these outfits will fit and they will like them! (Though, in full disclosure, I only attached the snaps and skirt closures to the right side of the skirts. This way I can have them put them on, mark the correct positions, and quickly attach the other halves.)

I was happy with both patterns and think that the Jalie top is especially cute. It's a bit fussier to sew, with it's 1/4" seam allowances and small pattern pieces, than a normal tee, especially with these flimsy non-stable knits, but is not too bad.

The only change I made on the Jalie pattern was to the little band on the front. Because of the vertical elastic, the band on top flopped a bit, so I sewed out a small wedge of fabric so it would lie flat. The photos show what it looks like:

For the skirt, I omitted the pocket and contrast top-stitching.

I hope you have a nice Christmas, if you celebrate. For me, I have the week off between Christmas and New Years. My sewcation begins on Dec 25th as the kids spend the day with the other side of the family.

Ready, set, SEW!

Friday, April 13, 2012

The Garment Formerly Known as Tablecloth Skirt


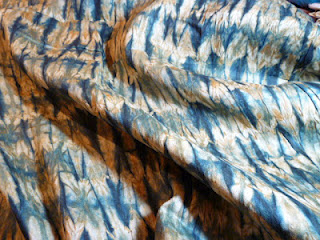
In early February, Rhonda (of Rhonda's Creative Life) posted a picture of a piece of fabric that a friend had gifted to her. This friend had purchased the fabric in Africa — it was a cotton jacquard that had been tie dyed with indigo and kola nut dyes. I drooled all over it, and Rhonda generously gifted it to me.


The first thing to do was to follow the instructions on the handwritten label and give the fabric a vinegar soak to set the dye. I used the bathtub and an entire bottle of white vinegar to give the fabric two soakings. What surprised me was that the water turned quite brown, both times — I had expected the indigo blue to bleed, but it was the kola nut brown. After two soakings, each followed by a thorough rinsing, I machine washed and dried the fabric. Afterward, I thought the fabric looked very much the same as before, the blues and browns didn't visibly change, so it truly was "extra" dye remaining in the fabric.

Rhonda approved of my idea of sewing the fabric into my tablecloth skirt. In fact, several weeks ago she asked me to write a guest post on her blog about the skirt for Fabulous Free Pattern Friday, which was posted today.

For this version of the skirt, I cut the center square a bit larger, so the resulting rectangles are a bit more narrow. The larger the center square, the fuller the skirt and the larger the hemline. The corners are less pronounced.

I am really going to enjoy wearing this version of the skirt, so many thanks again for this thoughtful gift, Rhonda! Again, check out Rhonda's blog for my guest post with details on how to sew the garment-formerly-known-as-the-tablecloth-skirt. (Too many people assume that this skirt is made from a tablecloth, so I do regret that name.)

More Pictures


Monday, December 5, 2011

Tablecloth Skirt - Hexagonal Edition

This is a long-ish post. Here are some quick links:

Why a Hexagon?

When I posted the review for my Tablecloth skirt on Pattern Review, one of the comments I received was from one of my favorite sewists, rivergum. Rivergum thought that the inspiration skirt was possibly based on a hexagonal shape, rather than a square shape.

I found myself wondering what the skirt would be like when created with a 6-sided polygon, 6 rectangular extensions, and 6 corners. I couldn't let it go, so I finally decided to try it out myself.

Obviously, creating a large hexagon is a bit more complex than creating a square, but it's really not hard. I love math, but you don't need to know math to make this work, so don't let that intimidate you.

If you have not read the basic Tablecloth Skirt tutorial, please familiarize yourself with the basic version, based on a square.

Creating a Large Hexagon Pattern

I made my hexagon using a circle with a 23" radius. Note that I felt that the completed skirt was short. I would have preferred a circle with a 25" or 26" radius, but I didn't know that until the end, since I didn't muslin this. :) (In my photos, I pulled the skirt down a tad, since the tunic is long enough.)

Supplies:

  • A ruler or yardstick the length (or longer) of your desired radius.
  • A piece of paper that is large enough for a circle with your desired radius. So, if you are making a circle with a 25" radius, you need at least a 50" by 50" piece of paper. I used pattern paper, pieced together. In the past, I have used the back side of wrapping paper, newspaper, etc. Just tape it together to make it big enough.
  • Writing implement. I used a Sharpie permanent marker.
  • A large surface to work on. I used the kitchen floor.
  • Making the circle: If you have a giant protractor, wonderful. I've never seen one this size, so I used my 24" Olfa ruler. You can use a yardstick to measure out increments, or you can tie string (the length of the circle's radius) between a writing implement and a nail, or a pushpin, etc. Whatever works. (I just now googled "making a large circle" and found many useful links, including some youtube videos.)

Instructions:

  • Tape your paper together to make a piece large enough. Set it on your surface.
  • Mark the center point.
  • Use your preferred technique to make a circle. I put the eraser from an unsharpened pencil into the hole in the Olfa ruler intended for hanging it on the wall. (I turned the pencil around for the picture - I used the eraser end which provides more traction.) I then held the marker in the center of the other end of the ruler (for a total length of 23"). I then rotated the ruler around the pencil, holding the marker in place, and walked around the center point. Voila, a 46" circle. (Again, in hindsight, I would have preferred a 50" circle.)
  • This next step marks the corners of the hexagon: Make a starting mark anywhere on the circle. Measure from that mark, the length of your radius (in my case, 23"), to the next point on the circle that intersects that distance. So, I measured from the first mark 23". Where 23" hit the circle, I made a second mark. (You are measuring straight across, not along the circle's curve.) Move the ruler to the next mark and measure another 23" to the next mark. And so on. If you have done this right, you will end up exactly at the same mark where you started, after creating 6 marks, total. Isn't math great? :)
  • Connect up the marks with straight lines. You now have a hexagon! Cut it out on the straight lines and you now have your basic pattern piece.
  • Note that I do not cut the waist circle out at this time. I do that directly into the fabric.

Creating the Rest of the Pattern

Since the hexagon has 6 sides, you will need 6 identical rectangles - one to sew to each side. The width of the rectangle will be the radius of your original circle. In my case, the rectangle was 23" by 15" (I used the same length as I used on the square skirt.) You can rip these rectangles, if your fabric allows that. My fabric, a cotton lycra, did not like to be ripped, so I rotary cut the rectangles directly into the fabric using measurements (no pattern pieces).

Again, I leave the waist construction up to you. Some folks do better with a zipper, other folks sew the skirt to knit ribbing. I prefer an elastic waist casing. Refer to the original post on the square skirt for my tips on calculating the waist hole. I used the same waist hole that I used for the square skirt.

Cutting Out the Skirt

Supplies:
  • For this skirt, I used a cotton lycra woven from Fabric Mart in a giant polka dot pattern. It was a wide fabric and I used less than 3 yards for the total skirt. (My hexagon measured 40" by 46".)
  • Elastic for waist. I used 1.5" waistband elastic from Pamela's Patterns.

I first cut the hexagon from the fabric. I then removed the paper pattern and folded the hexagon into quarters - the corner point is the center of the hexagon. I laid my waist hole pattern onto the corner, pinned, and cut it out.

I cut the 6 rectangles and the waistband, another rectangle, from the remaining fabric.

Constructing the Skirt

I used the same construction as for the square skirt. To summarize:

  • Complete the waistband.
  • Hem the long edges of the six rectangles.
  • Sew the six rectangles to the hexagon. The stitching for each seam begins in by the width of the seam allowance (I used 3/8") and ends before the end by the width of the seam allowance.
  • After all the six rectangles are sewed on, press the seam allowances open.
  • Sew the short edges of the rectangles together, again, starting the seam exactly at the point where the other seams begin and sewing all the way to the hem.
  • Press the short seam allowances open. I then serged the edges of all the seams, but you can finish them how you prefer.

Voila! Skirt completed.

Pictures

Conclusion

As you can infer from looking at the diagram of the square skirt versus the hexagonal skirt, this creates a skirt with more fullness at the hem. I think I like the lesser fullness of the square skirt better. Also, the corners are less pronounced in the hexagonal version. Of course, the busy print of my skirt hides the detail a bit, but I think I prefer the square skirt version - it is a bit more dramatic, or at least more "funky" and I prefer the funkitude. :) But this creates a nice skirt too. Next time I will add paper strips around the hexagon pattern to create a larger overall hexagon.

If you create either version of this skirt, please let me know so I can include your pictures in the Tablecloth Skirt Gallery. I have gotten a big kick out of watching the creative versions that have been produced.

Friday, November 18, 2011

Self Drafted - TableCloth Skirt (with Tutorial)

The outfit I'm planning to wear for Thanksgiving.

More than a year ago a cyber friend, ReAnn, sent me a link to this dress and asked if I knew how it might have been drafted.

I didn't.

Over time, this dress has shown up in various incarnations - with sleeves, without sleeves, with different fabrics. I have only seen it online, never in person, so I did not have a chance to study it. Then, a month or so ago I was looking again at the web page when, bam, I realized how it was drafted.

Gotta love that!

I quickly did some math, and whipped up a version using a worn out flannel duvet cover with rosebuds that my daughter had decided was no longer cool. I was happy to see that my idea did, indeed, work. Then I hung the muslin in a closet and forgot about it.

I needed to sew a quick skirt for a meeting this week and I decided that it was time to make a real version of this garment. I made it in one evening - it is so simple.

Materials:

  • A very lightweight, crisp fabric from Fabrix. I believe it's a nylon taffeta. It is two-sided, but I used the autumn-colored side. The other side is cream/black.
  • 1-1/2" Fantastic Elastic from Pamela's Patterns.

This skirt is made entirely from rectangles. It is basically a circle skirt, except it uses a square instead of a circle. I did not even cut out the fabric. I just measured and ripped. The only time I used scissors was to cut the circle for the waist.

The "TableCloth Skirt" name came from one of my sewing pals, Sarah. I was holding it out, showing the shape, similar to the following photo, and she declared, "It's like a tablecloth!"

Yes, indeed, if you need a quick Halloween costume, just wear a board underneath this skirt to hold it out and, voila, a table with a tablecloth.

The following layout shows the essential shape of the pattern.

There is a square piece of fabric (blue), with a waist hole cut out (yellow). Then there are four rectangles (green). There is also a rectangular waistband (not shown). (I made this with a elastic waistband, but you can put in a zipper if you want.)

Instructions:

  • Cut, or tear, a rectangle that is 44" by 44". (Note, I am 5'5". If you are taller or shorter, you may want to adjust the proportions.)

  • Calculate the circle you want to cut out for the waist. The math is not hard, but you can use a calculator. I googled "circle circumference calculator" and ended up using this one. I decided to add 2" to my waist measurement and plugged in the number. I needed a circle with a 6.5" radius. I created a quarter-circle template using printer paper.
    NOTE:: If your hips are larger than your waist, use that as your base so you can pull this on over your hips!

  • Fold the square of cloth into quarters. Pin the quarter-circle template to the center corner. (Make sure you pin it to the correct corner!) Cut out the waist.

  • Sew the waistband to the waist opening in whatever way you prefer. (I ripped a waistband piece that was 4.5" by 45" because I was using very wide elastic.) I stay-stitched the waist, clipped, and attached the waistband.
    NOTE: The waistband should be the length of the waist hole at the seam line (not at the cutting line), plus two seam allowances. I cut it longer by a few extra inches, just to be safe. After I stay stitch the waist and clip, the seam always seems to grow another inch or two. I don't sew the short edges of the waistband together until the waistband is mostly attached to the skirt. I leave a couple inches unsewn at the beginning, and the end, of the seam. I then mark where the waistband should be sewn closed. I sew it, press it open, and then stitch the last few inches to the skirt. I am also too lazy to leave an opening in the short seam for the elastic. After the waistband is completely sewn and topstitched to the skirt, I use my seam ripper to open the short seam, on the inside, for the elastic. I insert the elastic, fit it to myself, and sew the edges of the elastic together. I don't even stitch up the little opening. Now you know. :)

  • Cut, or tear, four more pieces of fabric that are 44" (or whatever size square you used) by 15" (again, modify as needed).

  • Hem the long edge of each of the four rectangles. (I like to hem it first, but you can wait if you want to see about the length.)

  • Sew the unhemmed long edge of each rectangle to one of the edges of the central square. (If you look at my crude diagram, you are sewing the green pieces to the blue center square.) I used 1/2" seam allowances. You want to start sewing 1/2" in from the edge and stop 1/2" from the other edge. If you are using a different width for the seam allowances, start and stop the seam by that amount.

  • The final step is to sew the four short edges of the rectangles together. (As shown by the arrows in the diagram.) This creates four corners.

That's it! Not counting the waistband or the hem, that is a mere EIGHT seams! If you want to recreate the inspiration dress exactly, sew the skirt to a cropped bodice. I'm not really a "dress" person, so I decided to make it as a skirt, but it would not be hard to do.

A few more pictures:

A little twirling action

A closeup of two of the corners