Sunday, January 17, 2010

Vogue 1018 - Sandra Betzina Skirt (#4)


I am calling this skirt #4, though actually, it's #3 for my wardrobe, as the last one was a Christmas gift for a dear friend. I made hers out of a black wool jersey I had special ordered, which showed off the tucks very nicely. She tells me that it hangs fine, but it does tend to pick up lint.

I decided I would also like to have one of these skirts in black, so I made myself one out of a poly knit. This one is not lined. Not sure I have much else to say about this version, other than I am planing on including it in my 2010 Swap on Stitcher's Guild. It's a nice basic. :)


I finally got started on the Au Bonheurs raincoat. I needed some specialized hardware/tools that took me awhile to round up. At this point I have the pockets, sleeves, and hood all completed, but not attached. I haven't yet cut out the front/back of the coat, because I keep dithering on the size to make, and how much to modify the shoulders, which are very wide on the pattern, but I think the sleeve should sit right at the shoulder point. Hopefully I can get that decided and cut on Sunday, though I have been sewing very slowly this weekend.

It's going to rain all next week and I would like to have the coat done, but there is a lot of fiddly work left, like the two zippers, several more grommets, and the new-fangled snaps from snapsource.com I bought when Sandra Betzina came to talk. (These are her favorite snaps.) I also have to keep switching the thread/bobbin colors between red and black to accommodate the reversible fabric. I hope it will all be worth it. :)

Wednesday, January 13, 2010

Art for Me!

Some of you may recall I got back to sewing last August to deal with stress, and the fact that the kids are growing up and starting to move on. Well, life has continued to be stressful of late, so I am sewing as fast as I can. :)

Then today I had SUCH a treat! My dear friend, Renée, dropped by and we finally exchanged Christmas gifts! You might recall the clothing that I made for her. I gave her clothes, but she gave me ART! The most gorgeous art! For me! :)

First, she gave me a to-die-for pincushion/thread holder that she made. Did I mention that she is the felting queen? I did a bit of felting years ago, learning about the same time that she was learning. Felting never became something I excelled – I lacked the artistic knack – though I remember one year, at San Francisco State, I gave a class in how to make felted eggs with little chickens peeping out. The process of felting exacerbated my tendinitis – just looking at her work can make my hands tired. :) But Renée took it many levels further and beyond!

Here is it!!! Look at those mushroom pins! I heart this pincushion and it will have pride of place by the chofa with the Ott light. :)


Then, she gave me a book called Shibori Knits. It has some incredibly beautiful projects. I experimented with shibori years ago, back when I was into quilting. The idea of performing that technique on a knit is fascinating.


Finally, she made me the most gorgeous nuno-felted scarf! Nuno is the process of felting wool fiber onto silk. Can you believe this scarf? It is so soft to the touch and the colors are amazing. I can't wait for a cold day to wear it!!!


Renée does not sell her work, but wow, she sure could. I feel so lucky to know her and to be on the receiving end of some of her art!!! Just hanging with her is the best method I know of de-stressing. :)

Saturday, January 9, 2010

Report -- Sewing Workshop Open House


I wore my new Au Bonheur skirt with my black Salsa top. Over it I wore my Plaza jacket, which I took off for the photos. DD1 took these photos at the end of the day, so I am a bit rumpled. In this top photo it was a bit windy, which blew the skirt awry, but DD1 liked this photo the best. :)


Ahhhhhhh.... Today was a fun day. A very fun day. I attended the open house at The Sewing Workshop. The last one I attended was approximately 17 years ago, back when it was owned by Linda Lee. Quite a few teachers spoke and I was particularly interested in Bill Jones's class. He teaches how to embellish synthetic fabrics (like poly chiffon) by cutting it with a soldering iron. That looked like a very fun activity. I just might have to dig out my soldering iron, purchased back when I used to cut Mylar stencils for quilting. :)

I also won a door prize! A generous length of fabric from Satin Moon and a Sewing Workshop purse pattern that I did not own. I don't generally wear pink, so I need to figure out what to do with this very pretty fabric:


I also bought three gorgeous fabrics from a woman who was selling vintage pieces. I kept to the cheaper pieces that I can cut into without guilt.

No sewing today, but it was totally worth it. :)

Thursday, January 7, 2010

Technique -- Drafting a Knot-Front Top

This tutorial describes how to start with a well fitting dolman sleeve top and use it as a basis to draft a knot-front top, similar to this design from Burda World of Fashion, May 2004:


Drafting Instructions

  1. Start with a well fitting dolman sleeve top.

  2. Hold the pattern up to your body and decide where you want the knot. Make a mark, shown on the following diagram as point A. The knot is located at this point and this is where the seam will be.

  3. From point A, end the CF line approx 2 1/2" above that point. This may mean drawing a higher neckline, or it may mean lowering it. The image above shows the neckline being raised (see the dotted line). The new neckline is marked by point C. The distance from point A to point C is 2 1/2".
  4. Draw in the seam from CF to the side seam/underarm. Precisely where to end this seam at the underarm is a judgment call, but the Burda pattern places it about where I have shown.

  5. Mark point D, about 2 1/2" inches from CF on the new seamline.

  6. Trace off the two pattern pieces: upper front and lower front. Make sure you maintain point D on both pieces.

  7. Adjust the CF line on the upper front: extend the neckline 1/4" from CF and taper that line back to the original CF. The drawing shows the original CF line with a dotted line. The solid line is the new CF line. This adds a bit of extra fabric at the neckline to accommodate the twist.
  8. Mark point E on the lower front. If you look at the photo of the Burda top, they located point E so low that it exposes the bra. (She must not be wearing a bra, but trust me on this one.) I suggest you make that point much higher, maybe 1.5" from the top of the pattern piece.
The back dolman pattern piece is left unchanged. You can now add seam allowances to the paper pattern, if you like. Or you can add them as you cut out the pattern (which is what I do). Either way, make sure to add seam allowances to the CF of the lower front, which now is a seam. The CF of the upper front is cut on the fold.

Cutting Instructions

This pattern assumes a knit fabric, since the fit of the original t-shirt assumes a knit fabric. The stretch needs to go around the body. It might be hard to find a fabric wide enough to cut the back and upper front pattern pieces on the fold. In that case you can shorten the sleeves, or you can use a 4-way stretch and cut the pattern across the grain. (I believe this is exactly why Burda didn't provide the pattern in a larger size.)
  • Back: Cut one on fold.
  • Upper front: Cut one on fold. Make sure you transfer mark D with a snip in the seam allowance.
  • Lower front: Cut two. Make sure you transfer marks D and E with snips in the seam allowance.

Construction Instructions

I have made this top a few times now and I found I prefer a different order to the instructions as those provided by Burda, which are pretty terse. (One of the reviews of this pattern on Pattern Review shows the Burda order.)

This is how I construct it:

  1. Finish the neck edges of the front and the back.
  2. Sew the CF seam on the lower front, from the hem to point E. Press the seam open.
  3. Sew the left bottom front to the left upper front, stopping at point D.
  4. Twist the upper front 360 degrees.
  5. Preserving the twist, sew the right bottom front to the right upper front, stopping at point D. It should look something like this:

  6. Form the knot: Place the top corner of the right front under the twist. Twist the top corner of the left front over the twist. Line up the CF to CF, right sides together, and stitch on the sewing machine as far as you can go to point E.

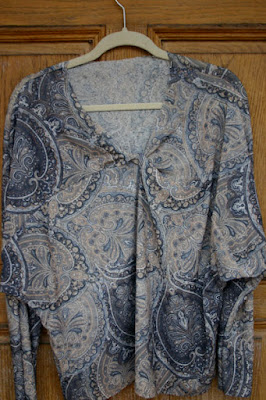
  7. The finished knot should look something like this:

    (This is my muslin, so I have not finished the neck edge.) The front is now completely constructed. The final steps are the same as they would be for any t-shirt.
  8. Sew the shoulder seams.
  9. Sew the underarm/side seams.
  10. Hem the sleeves and bottom.
Here is my first muslin:


This created a nice v-neck, but was a bit lower than I wanted. For a second draft, I would raise the location of the knot even higher. I would also move the seam a bit -- make it more horizontal over the bust.

That's it! It's pretty easy to draft this pattern and I hope my instructions haven't daunted or confused you.

If you make a top following these instructions, please let me know!

Technique -- Drafting a Dolman Sleeved Top

For some time now I have been saying that I wanted to draft a knot top, similar to #111, from Burda World of Fashion, May, 2004. You can see that design here:


This top features a high knot, rather than a knot at the bustline, as you more commonly see. That style is too revealing for many women, such as myself. Some women solve the problem by wearing a camisole, or by using modesty panel, but Burda's design makes that unnecessary.


Unfortunately, this issue is not easy to obtain and, even if you do manage to get your hands on a copy, the pattern is provided only in sizes 34 to 40.

In order to draft this pattern, you need to start with a well-fitting dolman sleeve pattern. This tutorial explains how to draft a dolman sleeved pattern. It is assumed that these pattern pieces do not have any seam allowance. Cut away seam allowances from your original t-shirt pattern. At the end, you can add the seam allowances back.

  1. Start with a well-fitting long-sleeved t-shirt pattern.

  2. Lay the top on a large piece of paper, and trace around the shoulder, center front, hem, and side seam. The dotted lines indicate the lines we don't really need.

  3. Extend the shoulder line.

  4. Fold the sleeve in half, the long way. Lay the should point against the shoulder, lining the fold against the lengthened shoulder line.

  5. Trace around the sleeve hem, and the sleeve. Join the sleeve to the body with a curve. The higher the curve, the tighter the fit under the arm. If you make it too high, the top may pull at the bust. If you make the curve too low, it may be too baggy. Make a best guess and you may have to tweak the curve when you make your muslin.

  6. The final pattern. Repeat this process for the back.


If you are going to test this pattern, make sure to add seam allowances. If you are going to use this pattern to make a knot top, do not add seam allowances yet.

Next, I will post instructions on how to create a knot front top.

Tuesday, January 5, 2010

Vogue 1018 - Sandra Betzina Skirt (#3)


This Sandra Betzina skirt is one of the first patterns I sewed last August when I returned to sewing. It has been one of my favorite patterns this year. I made it twice, both from printed fabrics, and I have worn both many times: the first skirt, from a lightweight Japanese striped woven, and the second skirt, from a sheer cotton plaid.

A DF (dear friend) admired both versions of the skirt, so I decided to make it for her for Christmas. She is taller than I am, so I had to size it up a bit. Previously, I modified the pattern by omitting the zipper and converting the skirt to an elastic waist with a rectangular yoke. I added the length to the top of the skirt, rather than at the bottom or by lengthening the yoke. She loves black (who doesn't?), and I wanted to make it in a knit. The pattern recommends lightweight jersey, so specially I ordered a lightweight wool jersey blend from Gorgeous Fabrics.

I liked the puckered effect of the tucks in the jersey. However the knit tends to stick to itself – I hope this won't make it difficult to wear. I lined the skirt with a lightweight sheer fabric – I thought it might flow better. (Originally I was going to leave it unlined so as not to add to the weight.)

Side One (there's no real front or back)


Other side


Detail of puckered texture


I still plan to make this again for myself, also in black. I think three versions of this skirt in my wardrobe should be sufficient, even for me. :)

Friday, January 1, 2010

Skirt with Twisted Drape -- Avec Poche (With Pocket) :)

I got enough feedback to convince me to make the pocket. Thanks to everyone who weighed in! I think you folks were right – the skirt is better with it. The instructions for the pocket were very confusing so I just made it up as I went along. I finished the pocket with a purple piped edge at the opening, and a bias binding around the outer edge, neither of which were in the original instructions.

Not the greatest photo, but it had started raining on my photographer. Those are raindrops on the lens. I am wearing it with my Teagarden T.