Monday, January 23, 2012

Testing the Au Bonheur Jeans Pattern

(No, I did not make this silk jacket, I bought it second hand.)
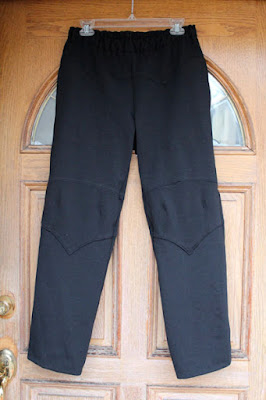
I've been meaning to try this pattern since I bought it almost two years ago. Unlike some of the most recent Au Bonheur patterns I've made that use only 2 or 3 pattern pieces, these jeans require many pieces and I spent time translating the pattern and trying to get my head around the construction.

This pattern features top-stitching, contrast knee insets, front and back, front and back shaped yokes, a back patch pocket, front pockets with an inset vertical opening, a fly front and a contoured waistband. The front knee yokes and back pockets have darts to create unusual shaping. There is lots of top-stitching, some echoing seams and some more freeform/artistic.

I was unsure what size to trace off, so I finally decided to go with my hip size and I traced off a size 42, with no changes. I figured I could make any necessary changes after testing the pattern in black ponte. The alterations I made were minimal:

  • Omitted the back pockets - though I plan to include them in my denim version.
  • Omitted the fly front zipper - again, I plan to include this in the denim version.
  • Replaced the contoured waistband pieces with a rectangular elastic waistband. Not yet sure how I want to handle this in the denim version.
  • For the most part, construction was straightforward. However, when I sewed the front leg to the back leg, the pieces didn't match up. The front leg was approx 4" inches longer than the back leg. I chopped off the excess from the front hem and the resulting hem length was perfect for my 5'5" height. I could be wrong, but I think the pattern has a significant drafting error.
  • Omitted the more decorative top-stitching.

The only problem I had with the finished pants is that the vertical front pockets tend to gape, as you can see in the second photo below. This is a phenomenon I've seen on men's pants and it does not flatter the hips to have pockets that gape as you move. (As you can see in the third photo below, they do not gape if I stand straight and still.) Short of omitting the front pockets, or employing some sort of closure, such as snaps, buttons or a zipper, is there some other way to handle this gaping?

Closeup of front vertical pocket

When I move, the pocket gapes

Standing straight, no gaping

Input is welcomed. :)

I was surprised how well these pants fit! They have a good fit through the crotch, which has not been my experience on previous Au Bonheur patterns.

The back doesn't look so great on the hangar, but fits quite well. You can see the back knee inserts and the back yoke.

More Tablecloth Skirt Goodness

In other news, Tablecloth skirt pics continue to arrive in my inbox. The most recent offering is Kathryn O's beautiful striped version:

This, and all versions, are available in the Tablecloth Skirt Gallery (link at the top of the page). Thanks, and keep those photos coming!

Pattern Pics

Sunday, January 22, 2012

Saturday Night Notes

I hope everyone is having a nice weekend!

We finally got some rain in San Francisco - it's been a dry winter, so far. And, of course, rainy days encourage one to stay inside and get creative.

I've been working on another Au Bonheur pattern and have the "muslin" (black ponte) version almost finished. This pattern has one squillion pieces - something is not quite right and I haven't yet figured it out. So stay tuned.

I've also been doing some dusting and cleaning on the blog: I've deleted 11 blog posts. Don't worry, I am not deleting anything that people would care about - I doubt anyone would even notice had I not mentioned it. This effort has allowed me to delete some of my Picasa photos, freeing up quite a bit of space. (In the early days of my blog I was storing pictures at very high resolution unnecessarily.) I've also reorganized some of my Picasa albums.

All this cleaning feels good. :)

From time to time I think about some of my favorite blogs that don't seem to have a lot of visibility. I think about highlighting them, then I worry about all the other blogs I might overlook. This is one of the reasons I don't participate in blog awards - it's too stressful. Nevertheless, last Tuesday I started thinking of which blogs I would like to highlight, planning a post on the subject and making a mental list.

At the top of that list was a great blog, Rhonda's Creative Life. So, I am musing along these lines on Tuesday, and then, on Wednesday, Rhonda published a post highlighting my blog! I decided to wait a bit before posting about hers.

Let me tell you why I like Rhonda's blog:

  • Every Friday (or thereabouts) she posts a free pattern or tutorial. These usually involve a piece of clothing created using simple shapes. She has posted some very interesting and cool designs. In fact, one of her designs was highlighted in the January 2011 issue of Threads, called the "Spin Around Top." (I couldn't find an online link to the article.)
  • She highlights blogs and other resources on Wednesdays.
  • Beginning this March, she is highlighting a sleeve pattern every Saturday. Based on her preview, it seems that she will be using sleeves from vintage patterns. It looks to be quite interesting.
  • In January, she posted an invitation to folks interested in following the Artist's Way, which includes daily morning pages and weekly artist dates. I was interested, but haven't made the time.

I recommend adding Rhonda's Creative Life to your blog list!

I'm tickled, because in May, I will have a chance to meet Rhonda. She invited me to come see the Haute Couture Fashion Show in Chicago and I'm planning to attend. I'm really excited to visit Chicago and to meet some fabulous sewists!

I was sewing recently with the television tuned to PBS, and I saw an episode of the Red Green Show. I thought this "Handyman Tip" on making cutoff shorts was cute. Enjoy!

Wednesday, January 18, 2012

Au Bonheur Knotted Tee

Worn with my Style Arc Laura Leggings.

It's high time I made another Au Bonheur pattern! I actually made this top over the three day weekend. It took longer to alter than to make - it's a quick and easy sew. I was planning to make a second one, a non-black version, easier to see on the blog, but I couldn't identify a fabric I wanted to use, so here's the black version. The fabric is a very stretchy rayon-lycra from Fabrix.

Even if you don't have a stable of Au Bonheur patterns, many of the creative ideas, such as the hem on this tee, can be applied to other patterns.

This pattern is a simple tee, with four knotted points at the hem. It is sleeveless with a scoop neck. The four points of the hem are formed thanks to a pattern piece they call the Coté. Coté translates to "side", but I would call this piece a gusset - to me a side piece would extend up to the armscye. But, and get this, the gusset is shaped like...

the Eiffel tower! How French is that?!?! So cute!

I traced off the largest size, a 54, and then made several changes:

  • I preserved the scoop neckline, but I traced the shoulder, armhole, and width for the front and back from the Style Arc Adele. This meant that I ended up with a bustline that had 4" of negative ease - it's less boxy than the original. I like negative ease with a highly stretchy fabric.
  • I used the long sleeve from the Adele.
  • I left the hem raw.
  • I used the same finish on the neckline that I used on this Liberty pullover.

  • I shortened the sleeves by 1.5" and hemmed them by hand.

Conclusion:
I really like this simple and easy tee! I definitely will make more, once I have identified more fabrics.

One other thing I wanted to mention. I created a separate page, French Sewing Resources and Au Bonheur Gallery. I want to keep these resources alive and, in fact, added more clarifications to the glossary when I made this top. This page is available at the top of every page in my blog, along with the Tablecloth Skirt page. Enjoy!

More Pictures

Sunday, January 15, 2012

Sewing Workshop - Hibiscus Top

It was blustery and sunny today, making it tricky to get good pictures. But more pictures here.

I traced off the Sewing Workshop Hibiscus shirt over a year ago. I knew that a swing silhouette is not good for me, but I wanted to make it work.

Probably because of this, I traced a medium, which is too small for me, but would also have less volume at the hips. At the time, the only FBA techniques I knew would have added *more* volume at the hips, and would have distorted the lower panels. Unable to solve this problem, I reluctantly put the tracing away.

Last week Martha, of Now Sewing, made her first Shirt of the Month for 2012 and she made a beautiful Hibiscus. This inspired me to pull out the tracing and apply FBA knowledge I have acquired in the year since making the tracing.

This time I chopped off the left and front bodice patterns 1" below the bust point, did the FBA, and re-attached the bodice bottom. Other alterations followed.

I have not been feeling shirt collars lately, so I omitted the collar. Note that I did not shorten the sleeves and they are a good length - this pattern has short sleeves. Also, I widened the upper sleeve, but not the lower sleeve - it is fairly close fitting below the elbow.

Alterations and Modifications:

  • 3" FBA.
  • Widened the back 5/8" (1-1/4" total).
  • Narrowed the shoulders by 1-1/2".
  • Widened the upper sleeve by 1-1/4.
  • Removed most of the swing shaping, which meant modifying the side seams (front and back), bottom facings, and bottom panels.
  • Omitted the collar and stand and finished the neckline with a 1/4" bias band.

Materials:

  • A wonderful homespun striped cotton fabric purchased over a year ago from The Spirit of Cloth in San Diego. I'm sad that this store closed before I had a chance to visit again.
  • 4 3/4" buttons from my grandmother's button box. They were the only buttons that were the right size, the right color, and that I had enough of. I did not want to go to the fabric store. :)

Conclusion:

I'm not completely sure how I feel about this top. It's less flattering than I'd hoped. I thought that if I didn't make it too long, used an open neckline, and removed most of the swing shaping, that it would be a good top for me, but the pictures say otherwise: it looks ok, but not great.

More Pictures


Can you see the pocket on the lower left? It's hiding amongst the well matched stripes. :)

Sunday, January 8, 2012

RTW-inspired Navy and White Check Shirt

More pictures

First, I thank all of you for the wonderful comments and feedback you left on my Marcy Tilton top, both on the blog post and the review. I am really overwhelmed!

Marcy Tilton featured pictures of Margy's tops on her blog. What a nice surprise! Also, Vogue patterns asked if they could feature my top on their Facebook page (which hasn't posted yet). It seems that this top, with my machinations, struck a chord with many.

I have tops on the brain. There are no less than two separate year-long top sew-alongs on Stitcher's Guild - one for "top of the month" and one for "shirt of the month". I have not joined either, formally, but my mind seems to be in "top" mode so it's possible my sewing mojo has signed up on its own accord. (I try to follow the mojo where the mojo leads.)

Several months ago I was in a boutique and I saw an interesting blouse, very briefly. It had a hanging front band, which I loved. I looked at it for maybe 5 seconds and moved on. I didn't take notes or draw pictures, or even try it on, so I can't remember that much about it, other than the hanging front band. I can't even remember what color it was. I believe it was a Kedem Sasson top, but am not even 100% sure about that.

Often I see interesting details in RTW and forget about them, but not this time! I decided to use a pattern I had as the basis for this top. Butterick 5034, recently out of print, is a good basic pattern.

Somewhere along the way I had cut the tissue paper pattern as a size 16. Now why did I do that? I am not a size 16. I am a size 18, and I still need a hefty FBA, in most patterns. But I can deal with a 16 if I widen the back and pay even closer attention to the FBA, so that's what I decided to do. (And it helped that this is not a fitted pattern.)

I wanted the front of the top to be shorter than the back, and I wanted side slits. At first I planned a regular shirt collar, but in the end I went with a plain neckline, finished with a bias strip. Since the front band extends below the hem, I had to use separate front bands, rather than a cut-on facing which folds to the inside.

Materials:

  • Drapey navy/cream check fabric from Fabrix. I think this is another rayon/poly blend and is very crepe-like. It ravels like crazy, but has a great drape.
  • 11 5/8" mother-of-pearl buttons from Fabrix.

Alterations and Modifications:

  • 3" FBA.
  • Widened the back by 1" (2" total).
  • Narrowed the shoulders by about 1.5".
  • Shortened front to 2" below the waist. Marked the waist point because I wanted to stop the side seam at the waist, leaving side slits.
  • Shortened the back to 4" (or so) below the front.
  • The upper sleeve measured narrow, so I widened it by 1".
  • Folded out (removing) the cut-on facings. Instead, I cut two front bands 2.5" wide and several inches longer than the front. I used 1/4" seam allowances for the front bands, so the finished band is 1" wide.
  • Originally I was going to use a standard shirt collar, but, while sewing, I decided not to. Instead, I stay-stitched the neckline at 5/8" and trimmed off 3/8", leaving a 1/4" seam allowance. I cut out a bias strip 1-1/4" wide and longer than the neckline. I sewed it at 1/4", wrapped it around to the inside, folded the raw edge under, and hand stitched. I really like wearing this sort of easy, casual finish.

I decided to finish the front bands by sewing them together, at the bottom, wrong sides together. I trimmed close to the stitching, turned them right side around (after pressing), and top-stitched close to the edge.

When it came time to put on the buttons, I raided the button box. I didn't have any fabulous buttons, but I did have the ubiquitous mother-of-pearl buttons that I have used for other projects. These cost 10 cents each at Fabrix, so I stocked up. (I probably would have preferred navy buttons.)

During construction, I put the blouse on many times. (Don't you love to sew wearing a bra and PJ bottoms?) I realized that the blouse is loose enough that I could pop it on and off over my head, so I decided not to use buttonholes. The buttons are merely sewn through both bands. All but the top two - those are sewn to the left band only. I never planned to wear it buttoned all the way up anyway.

I know, it's pretty cheeky of me to cheat and leave off the buttonholes. But I won't tell if you won't tell. :)

Conclusion

I really like this top! It will be great in warm weather. I made it a tad too short in front, so it won't be the top to wear to a revival meeting, or a sporting event, or anywhere one might want to throw up one's arms, unless one wants to exhibit one's belly button. I will definitely make this again.

By the way, I wrote this blog entry last night, as I often do, but waited to post it until I could take photos in daylight. I accidentally hit "post" instead of "save". Once that happens, even when the post is deleted from the blog, it can't be removed from blog readers.

More Pictures


Worn with my cream corduroy Linda pants

On New Years Day (morning) I took a walk and discovered this abandoned New Years top hat on the side of the street. I love to take shadow pictures and that morning I was wearing a skirt. After taking a few pictures, I picked up the hat and was walking along when a man, walking his dog, asked if it had been a good party. :)


Tuesday, January 3, 2012

Vogue 8709 - Take 2

Conclusion, with more pics

In the fall of 2010, Vogue came out with this Marcy Tilton swing top. I liked the top very much, especially the peplum with the cool pockets and the draped back, but was pretty sure it wouldn't look that great on me. Swing tops are not flattering on my figure.

So I resisted, though I did buy the pattern when during a BMV sale. I pretty much buy all Tilton and Betzina patterns as a matter of course. :)

Then Peggy made one, and I loved it on her. I was well aware that Peggy's tall statuesque figure was quite different than mine, but I could no longer resist, so last May, I made one. It is a fairly intricate pattern, and I wasn't sure how to alter it, so I made a size 22, almost out of the envelope. (I usually start with a size 18 and FBA up.)

Version #1. Click the picture to read the blog post.

I loved it, at first, because I was blinded by the pattern's coolness. But I had to finally admit that the style, as it was, really didn't work on me. I have said, many times, that a swing shape just doesn't suit me and the photos don't lie. I'm embarrassed to admit that, not only does it look like a maternity top on me, enhancing my butterball shape, but it appears that my boobs are about to jump into the pockets, perhaps to feed diminutive babies hiding in there. I wore it exactly once, then the top went into the closet and languished.

Fast forward.

I was talking to Margy last week during the holiday break. She had also made this top (with much better success) and wanted to make another, incorporating some changes sparked by something she had seen on Marcy's site.

Margy's first version. So much cuter on her!

Margy suggested a mini sew-along - we would both work on the same pattern over the 3-day New Year's weekend.

Materials:

  • A wonderfully drapey fabric from Fabrix. It is woven with black and cream threads, giving an overall appearance of grey. I am not sure if it's rayon, poly, or a blend. The threads are minimally twisted and fluff out when they unravel from the fabric.
  • For the buttons, I had some "button stacks" I bought from a vendor at PIQF two years ago. Each button stack consists of 3 buttons in graduated sizes. The buttons are purely decorative.
  • 5/8" clear snaps from Britex, positioned under the buttons.
  • Fusible interfacing, from Fabrix, for the front plackets.

Auditioning buttons. I ended up using the stacked buttons on the left. The color in this picture is a bit off - the metal is silver in real life.

Final button and snap configuration

When I made the original version, I used a size 22 and made only one change to the pattern: I lowered the darts by 2". For this revised version, I made significant additional changes:

  • Removed the swing shaping from the left and right fronts.
  • Removed the swing shaping from the left front placket.
  • Lengthened the bodice by 2" - this affected the back, left front, right front, left front placket, and right front placket.
  • Widened the back bodice by 2".
  • Straightened out the side seam of the back bodice, at least somewhat.

During construction, I made even more changes:

  • Additional fitting of the side seams and the center back seam. Removed 2" or 3" from the bottom of the CB seam, tapered to nothing at the bra line.
  • Fitted the peplum to the modified bodice, removing about 4" to 5" from the width, prior to cutting it out.
  • Inspired by the version Marcy shows on her website, I cut the collar with a lowered neckline and finished it with a pleated strip of the fabric selvedge.
  • Marcy Tilton's gorgeous version in apricot taffeta. The neckline on my top was inspired by hers. (Is it my imagination, or do I spy fish-eye darts in this version to make it more fitted?) Click the top picture to see this version discussed on her website.

Collar

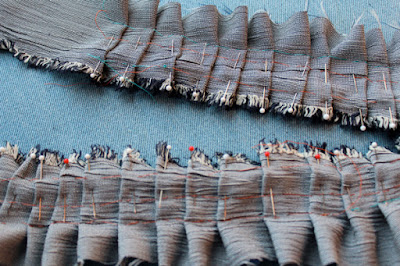
I wasn't sure how to make the collar. When I tried pleating the fabric directly to the neckline, it did not work for me. My fingers were too clumsy and the fabric too "sproingy." So I then pleated the fabric on it's own. I cut the strip roughly twice as long as the finished neckline (plus a little extra) and much wider than needed. I then pinned in the pleats, not attempting to make them even in depth or distance - I liked the random effect.

I held it up to the top to adjust as desired. I then did three rows of basting. The first row was at the desired seamline. Then, I did a row of basting on each side, to help tame the "sproinginess." I finally basted it to the neckline, along the seamline. I did a second row of basting on the inside of the seam allowance. There is a lot of handwork in this collar. :)

The pleated strip. I removed the pins after all three rows of basting were completed.

The pleated strip has been basted to the neckline. On top of that is the bias strip which finishes the inside neckline edge.

Conclusion

I love this top! I think I will wear this one a lot. Make sure you check out Margy's second version, my partner in crime. Her modifications show how versatile this pattern can be. Buy it before it goes away!

And, just to drive the point home, here are both tops, side by side.

Did I lose weight? Noooo. Did I get taller? Noooo. Did my hair turn red? Well, yeah. :)

Also, did you know that Marcy started a blog? I hope she adds a proper feed for the blog, so we can subscribe to it, and be notified of updates. There is lots of good information on her site, especially in the Marcy's closet, t-shirt gallery, pairing pattern and fabrics, and tutorial areas. It's interesting to see what people are pinning from her site.

More Pictures