Showing posts sorted by date for query stitch nerd. Sort by relevance Show all posts

Monday, May 30, 2016

Sewing for Hot Weather


Well, it's time. If you have been reading my blog for awhile, you may remember back when DD1 went off to college in Oregon. In fact, it was four years ago. She graduates in the next couple of weeks. I'll be heading to Oregon for the occasion and it appears that the weather may be in the 90s.

The 90s.

ICK.

My least favorite weather to dress for is hot weather. And my least favorite sewing is clothing for hot weather. That, and home dec. ;)

I think I've figured out what I'll be wearing for the occasion, though my first try wasn't completely successful.

TOC:


Tank Dresses

When I visited Hawaii in 2014, I made a tank maxi dress. I used Style Arc Annie's Cami pattern and lengthened it to full length, flaring it to 60" at the hem. I was surprised at how much I enjoyed wearing that tank dress with my black voile tie top.

For that dress, I used a fabric that I received in a free FabricMart bundle. There was a problem, however. Every time I wore that dress, it sagged out around my bottom. My rear isn't that big—but the fabric was poor quality. After wearing the dress a few times and being annoyed by the bubble butt effect, I got rid of it.

I thought maybe the outfit I made for Hawaii would be a suitable outfit to wear to DD1's graduation if the weather is hot. I ordered 2 yards of a colorful viscose/lycra jersey from Marcy Tilton. (I can just barely squeeze a tank dress out of 2 yards if it's 60" wide. I can get away with a bit less if the pieces can be cut without regard to direction.) I also dug a black & cream, rayon/lycra, ikat print, jersey from my stash.

I made the pattern exactly the same as before, except I cut the dress 1" longer, based on the notes in my blog post. I made the black and white dress in a few hours on Friday evening, and the colorful one in a few hours on Saturday morning.

At least summer clothes can be a fast sew. ;)

I like these dresses, and they will be great to wear in hot weather, but once I saw the photos, I realized that these outfits are wrong for the graduation. They are too casual and the black tie top is too... heavy looking. It's very lightweight, but it doesn't look lightweight.

Back to the drawing board. I'm working on another ensemble.

Meanwhile, these dresses will come in handy. I am spending a week in NYC this summer. The fact that I'm going in the summertime shows you how determined I am to visit NYC, given my dislike of hot weather.

I like how nothing shows at the armhole - no bra peeking through.

I finished the neckline and armholes with self made binding: I cut 1-3/4" strips from selvedge to selvedge (the stretchiest direction). I pressed them in half and then "walked" them along the pattern, stretching more where I want a closer fit (at the bottom curve of the front and back armhole, or at the bottom curve of the neckline, for example) and stretching less where I want less of a body hugging effect. I cut them to that length, and sewed them into "rings" with a 1/4" seam, pressed open. I divided the openings, and the binding rings, into quarters, and pinned them at the one-quarter markings, placing the seam at CB. I sewed the bindings to the dress with a 1/4" seam allowance, stretching more in some areas, and less in others. The finished bindings show from the right side.

Necklaced purchased maybe 5 years ago, by Teresa Goodall


Floaty Top

On Sunday afternoon I was inspired to whip up a hot weather top. Not to wear to the graduation, but maybe when traveling to Oregon. In any case, it will be useful for one of the rare hot days we have in San Francisco or Mountain View.

Last summer (maybe when Patti F was visiting?) I purchased a wiggly, tie-dyed, striped, 100% rayon challis from Satin Moon. I finally had a flash of inspiration on how I wanted to use it: McCalls 7194, an asymmetric top. I made this top before using a very different fabric - a knit with holes. This fabric has zero stretch but beautiful drape.

I liked that this pattern would put the stripe on the bias, at least the way that I use it. I left a slit in the side with the long seam. I omitted the sleeves and finished the neckline and arm holes with self made bias binding. (Cut the stripes 1-1/2" wide, on a 45° bias, folded in half and pressed, and sewn to the openings with 1/4" seams. Then turned to the wrong side and topstitched in place.) I finished the hem and side slit with micro seams. I also matched the stripes at the side seams.

This top is floaty and easy to wear. The high quality rayon challis does wrinkle but, in my experience, the wrinkles tend to fall out quickly, especially when the garment is cut on the bias. (I love wearing the bias cut top I made from a rayon challis border print. And the wrinkles really do fall out.)

I'm wearing it here with bare arms, but I also ordered a 3/4-length sleeved, ivory mesh, Sleevey Wonder, so that's also an option.

Pinwheel earrings by Eccentric Designs


Frocktails

I was recently invited out after work for Frocktails.

Have you heard of Frocktails?

Well, let me enlighten you. The term originated in Australia in late 2015. Sewers were invited to wear a self made frock to a cocktail event. Voila, frock + cocktails = frocktails.

I became aware of the event, and a subsequent Frocktails event, on Instagram.

Savage Coco, pattern designer, invited me for drinks at a club in the Financial District. At first I thought she was using the word "Frocktails" loosely—she's wicked witty—but when she mentioned that she would be wearing this dress, I abandoned my idea of wearing my favorite Presto top (her pattern) and jeans. I had to try harder.

I don't own many frocks, but I dug into my closet and found McCalls 6028, made from Scuba knit and wool doubleknit. Luckily it was a chilly day in San Francisco, as I don't have any warm weather frocks. I topped it with my purple donuts coat and my metal thingie cowl.

Meeting SC was perfectly delightful! She sews beautifully, is wonderfully witty, and very glamorous. I look forward to many more Frocktails get togethers! You can follow Savage Coco Patterns (or me) on Instagram.


Pressing Tools

I've blogged before about my collection of much loved pressing tools, particularly those from Stitch Nerd.

I still wanted a contour custom ham. And when I saw this wonderful quilting cotton at Britex, I bought one yard and sent it off to Stitch Nerd to sew into a contour ham and a pressing mitt.


I seem to be alternating sewing for my Paris wardrobe and for hot weather. I expect that to continue, though I have many items in the queue for Paris, so I can't take my eye off that deadline. In fact, I am working on another layer for Paris right now. It's requiring a lot of hand sewing, and I'm not yet sure how much I like it, but I feel it's worth taking a creative risk. The worst thing that can happen is that it doesn't make the cut for Paris. Or maybe I lose a little fabric. ;)

Join me on Patti's Visible Monday and have a great week!

Sunday, February 21, 2016

New Garments, Meetups, Free Downloads, and More


This post contains enough material for 6 or 7 posts. There's also some eye candy, so saddle up!


Palmer Pletsch Short Coat

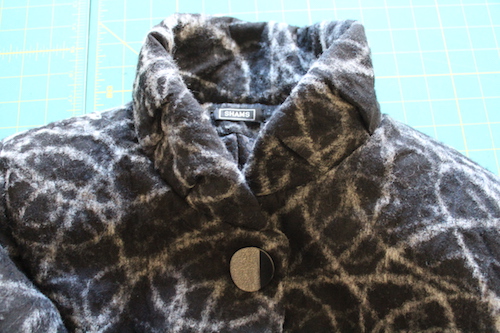
I have been auditioning patterns for my Paris wardrobe. The Minoru was my first pattern audition, and I loved it. Now I'm auditioning a jacket pattern by Palmer Pletsch, McCalls 7024, which is now out of print. (It's a shame, as this is really an excellent pattern!)

This pattern features front and back princess seams, button front, curved front hems, two-piece sleeves, hem slits in the sleeves, no side seams (it uses side panels), French darts, back waist gathering, lining, and view B has a great, pleated stand-up collar. That's what really drew me in - that great collar.

I made a size 18, which is my usual size. But I will note that, despite the pattern being labelled as "semi fitted" that it has more room than I expected. I lowered and increased the bust dart, but only in the vertical direction, as I didn't need additional width in the bust. This is highly unusual for me.

Other alterations and modifications: I shortened the sleeves by about 5/8" and reduced width at the front hip. I narrowed the shoulder by 5/8". As my fabric was a thick wool, I eliminated the channel for gathering the back waist. I also eliminated the cording in the collar. The pattern calls for in-seam pockets and/or a decorative pocket flap, which I replaced with slanted welt pockets. I also added a hidden inside pocket.

I had trouble deciding which fabric to use. I pulled at least five fabrics, each time thinking I had made a decision, only to change my mind. In the end, I chose a wool fabric that I bought at the now-closed Santa Fe Fabrics in New Mexico. The base fabric is a lightweight knit that is embellished with lots of yarn and thread. I prefer the reverse side of the fabric. You can see the front of the fabric on the inside pocket:

The inside pocket uses the "right side" of the fabric. You can also see the polka dot lining I used in the sleeves, after running out of the black lining fabric I used in the body of the jacket.

I fused the front and back facings, and the sleeve facing, with ProSheer Elegance Light from Pam Erny at Fashion Sewing Supply. It's a wonderful interfacing.

The pattern doesn't call for interfacing the collar, but I interlined it with fleece. The tucks are sewn into the collar, but only on the outside layer. I like the more substantial collar created by using the fleece.

It's a bit hard to see, but the sleeves feature hems with a slit

This is also a bit hard to see, but the welt pocket crosses the princess seam and is just below the French Dart

I was finishing the jacket on Presidents' Day, when I ran out of lining fabric. I decided to brave the stampede at Britex—at least those who show up for the big Presidents' Day Sales event. I purchased some beautiful Italian buttons and polka dot lining fabric, all for 30% off.

The buttons are large, so I closed the jacket with snaps, rather than make bound buttonholes (which are tricky in this uneven fabric) or giant standard buttonholes

While standing in the line to pay—it snaked up to the second floor—I met Lynora, a blog reader who was visiting SF from Washington D.C. I'm sorry that I didn't take a pic (I was busy spilling the contents of my bag down the stairs) but it was nice to meet you, Lenore!

I'm always glad to see Kirby, the Britex dog!

McCalls 7024

I love the fit of this jacket! Love love love. I may well end up using this pattern for a Paris garment.


Tisavel Fur Vest

I started this vest ages ago. I can't even remember when, exactly.

I purchased this beautiful Tisavel synthetic fur from Emma One Sock a year or two ago. (By the way, I recently learned that animal activists dislike the term "faux fur" because some manufacturers label rabbit, raccoon, or dog fur as "faux fur". They prefer the term "synthetic fur".)

At first, I was going to use this fabric for a cowl, but I decided I wanted to make a vest from it.

I used a pattern that I've used three times now, Burda 7852.

I wanted to use special fur techniques and I received very good advice from Rhonda Buss, who has industry experience sewing with real fur.

Most advice for sewing fur (either real or fake), is to choose a design with few seams. I actually don't believe that. I've observed many fur garments that feature intricate seaming. It's more work, of course, but it's quite doable. My pattern features princess seams and bust darts, so it had plenty of seams.

The first difference comes when cutting out the fur. You cut it from the wrong side with a blade of some sort. You want to avoid cutting the hairs. I used a box cutter.

Once I finished cutting out the pieces, I took them outside and shook them vigorously. This removed most of the loose fibers. After this step, I did not have problems with excessive fibers when sewing.

When sewing real fur, you cut the pattern pieces with no seam allowance, or a scant seam allowance. That's what I did, though Rhonda felt that this was overkill for a fake fur garment. But I'm stubborn that way. :)

The seams are all abutted, and stitched with a closely spaced buttonhole sort of stitch. By hand. My technique was similar to this:

Yes, I sewed the darts and all of those seams by hand. This definitely is a bit of overkill for a fake fur, but it creates thin, malleable, invisible seams. I loved the result.

I interlined the collar with fleece which makes for a cuddly soft collar.
You can just make out some of the tiny little seams in this pic

I finished all of the raw edges with bias binding. I lined the vest, constructing the lining on the machine, then sewing it to the bias tape by hand.

Sewing the bias binding to the raw edge. You can also see the finished shoulder seam.

At first, I wanted to finish the vest with a double-ended zipper, but I could see that the fur was going to get caught in the zipper, so I used hooks.

Except that I am not a fan of the Dritz fur hooks offered at most sewing stores. They are pretty huge - too large for my shorter length fur, so I ordered some cute hooks on Etsy:

I sewed 7 sets of hooks to the front

I made a cutting error on the back lining. So I fixed it with a nice little patch:

I used side seam pockets. This is not my favorite style of pocket, but it's the most practical for a fur fabric.

Tisavel is a high-end synthetic fur. I haven't seen any on the Emma One Sock site lately, but I did see some on fabric.com.

The best feature of this vest is the collar. The soft fur is sooo luscious next to my neck! In fact, when I wear this vest, I can't stop petting myself. :)


Meeting Debra

Last week I met up with Debra S, a reader of my blog and a friend of one of my favorite bloggers. (If you haven't been reading Wendy's blog, West Zen Studio, you should!)

Anyway, Debra was in town for a few days and we scheduled lunch at my workplace in SF.

It was loads of fun!

I just loved the top that Debra was wearing. She made it after attending DOL in Taos, New Mexico. She told me that it was a Mizono pattern and I'm pretty sure that it's Vogue 1274.

She and a friend painted the design on the tweedy fabric, a silk linen blend she bought in Taos.

It had a wonderful drape, due to the silk/linen blend. To complement the hand painted bicycle motif, she found some gear shaped buttons on ebay.

Debra also made me a lovely gift! She pieced felted sweater knits to make wrist warmers to match my Minoru!

So thoughtful!

Thanks for these lovely warmers, Debra! I wore them today.


And thanks for a lovely meet up!

Mini Blogger Meetup

Jilly, Laura, me and Erin

The same week I had another lunchtime blogger meet up! Erin, from Seamstress Erin, was visiting from up north. She used to live in San Francisco and had hosted several local gatherings for sewing bloggers. Jilly of JillyBe Joyful, and Laura of Lilacs and Lace, joined us for lunch.

It was so nice to see everyone and catch up!

Erin is 6 months pregnant and she's positively glowing!

Erin knitted her beautiful sweater

She loved the shag ombre pillows on one of our office sofas

And before I leave the subject, let me give you a quick update on Jillian. She had her liver transplant in January. Other than extreme tiredness, she's doing well on the health front. But money is a constant concern, as she's not yet allowed to work. If you can help, she would be tremendously grateful.


Pressing Tools

I don't talk about it a lot, but pressing is a critical part of my garment-making process. Proper pressing (or lack thereof) can make or break a project. (Note that ironing, a back-and-forth motion, is not the same as pressing, an up-and-down motion, generally applied with pressure.)

I have a large collection of pressing tools, but I wanted to highlight a few in this post. One of these days, I'll create a separate page dedicated to my many pressing tools. In my copious spare time. <ahem>

I learned about the Shoulder Stand from Ann Steeves, in one of her Pressinatrix posts. She learned about it from Pam Erny. The stand is sold by LH Designs, on Etsy. This is the only item sold by LH Designs and it's frequently out of stock, so I kept checking back from time to time. It took a few years, but I finally scored one in December.

It's very well made! I used it to press the curve on the bottom hem of my Palmer Pletsch jacket and it's a rock solid tool.

My friend Luanne Seymour, a very creative person on many fronts, used to teach classes on sewing bags and fabric collage at FabMo. I took two of her classes some years back and was enamored with her point presser.

I have a standard point presser—the kind that you see in most every sewing store. It's a good, basic tool and I use it all of the time. This one was smaller, featured inlaid wood, and was sanded to incredible softness. Luanne's husband, whose hobbies include custom cabinetry, made her beautiful point presser.

I asked if he'd be willing to make one for sale. He was busy at the time.

Last December, I was making a number of bags using silk tie remnants and it reminded me of the point presser. In January, I asked Luanne if her husband would be willing to make one for sale. This time he said yes!

I love my dainty point presser! Thanks, Steve!

I first blogged about my custom handmade sewing hams in 2011! (Wow, time flies.) Since that time, Stitch Nerd has been endorsed by Marcy Tilton, written up in Vogue Pattern Magazine, and has been mentioned by numerous bloggers.

I had in mind, for a long time, to order a larger "professional" sized ham. Last year, I did just that. I love my large ham! It molds to my bust darts better than my smaller hams.

Gee, I wonder why that is. :)

She makes a great product!


Free Book Downloads from the Met

I first blogged in November 2012 that you can download free, high quality catalogs from the Metropolitan Museum of Art, but this info is making the rounds again, so I thought I'd repost it.

Go to the Metropolitan Museum of Art's site to download some wonderful books, such as the book on Dior pictured above.


Kenneth King News

I'm sure that you know who Kenneth King is, right? I have two bits of news about Kenneth. First, he just published an Embellishment CD. Here's the table of contents:

It will be available any day now. If you order before March 10th, you get a $2 discount off the normal price of $24.95. I just ordered my copy. If you also want a copy, his website has his contact info.

Also, if you live in the San Francisco Bay Area, this March he is teaching a series of one-day workshops for PenWAG in San Jose. I can't attend, but they sound great!


Marcy Tilton's New Site

I hesitated to mention that Marcy Tilton unveiled a new website over a week ago because, well... it's old news. Then I learned that other sewist friends of mine hadn't noticed.

How is this possible? Don't they check her site daily, like I do? :)

So, if you haven't seen it yet, be prepared for gorgeous, large photos and a slick, clean design. She's still hammering out some of the details. She welcomes feedback—you can email her directly, but she's also responding to comments on Stitcher's Guild.

I gave her some feedback that she's already addressed. I love the new site!


Fin

Here's a fun side note. Hugh Jackman made a visit to my SF office last Friday. He was there to promote his new movie, Eddie the Eagle. Our office overlooks the Bay Bridge. At the end of the event, Hugh was fascinated by the scintillating lights on the bridge.

Hugh Jackman

Here's the 25,000 LED light show that he was admiring! (It's now a permanent feature.)

I'm heading to the snow this week. A few weeks ago, it was 20°F in Whistler, Canada, and now it's 40°F. That's rather disappointing, but I'm still eager to see the snow!

While I'm in Whistler, some of you lucky folks will be attending Puyallup. I hope you have a great time! I look forward to seeing pics and updates on social media!

And that's my catch-up post! Have a great week!