Wednesday, June 23, 2010

No Jacket for YOU! (Reprise)

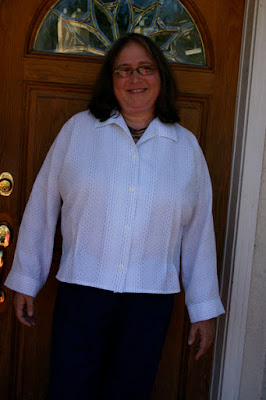
As you probably know, I have been on a quest for a great jacket pattern. I have been looking for something a bit fitted, or at least not greatly oversized. I really thought this Sandra Betzina jacket would work for me! A sew group friend made this jacket. I loved it on her and thought it had great potential for me, though her body type is quite different.

My first challenge was the FBA. I needed to add about 2" of fullness and distribute it through the three front darts. Based on my tissue fit of the pattern, it looked like my bust apex was located in the direction of the middle dart. Once I figured out how to slice the pattern to adjust all three darts, I added fullness to all three, but put most of it in the middle dart. I made up a muslin. (I actually used muslin for once!) I tried it on and ... it wasn't quite right. First, my bust apex actually fell between the first and middle dart, but that didn't completely account for my dissatisfaction with the muslin – I wasn't quite sure what I didn't like about it.

Last Friday morning I attended a local ASG meeting. The host, and several friends attending, are good at fitting and have a great eye, so I took my muslin along. The ten or so women remaining after the meeting quickly concluded that the three downward darts were the problem – it just wasn't a good look for me. They suggested either 3 or 5 darts that angle upwards and fan outwards. They agreed that the fit of the jacket, especially the back, was otherwise good.

I sliced and diced the pattern further, creating five upward darts that were 3/4" of an inch apart at the side seam, and fanned them to 1 1/4" apart at the tips. I decided to use black ponte for muslin #2, because I was pretty sure it would be wearable. (HAH)

When I tried on the second muslin (the basic shell was constructed, though only one sleeve was attached), I wasn't happy. Part of the problem was caused when I sewed the 10 darts: I didn't stabilize them, so they were a bit distorted. But aside from that, they just weren't quite working.

Last night I took the second muslin to my sew group meeting. The general consensus of the group was that this jacket isn't for me, though, the overall silhouette is good.

At this point, I'm going to rethink the project. Since, except for the front of the jacket, the overall design and silhouette works for me, I may just change the front to use a princess seam. Or not. Maybe I will just move on to the next pattern. We'll see. :)

The five upward pointing darts. I topstitched them, adding to the wobbliness. If this had been the only problem, I could have fixed it in my next version by stabilizing the darts, but it wasn't the only problem.

Harputs

On the tangentially related subject (of jackets), yesterday I had an appointment near Union Square, so I decided to dash into Britex to see if they carried a notion a friend has been looking for. I was one or two doors away from Britex, when two jackets in a store window caught my eye and stopped me in my tracks. These jackets were absolutely beautiful and very unusual. Though I didn't have much time, I couldn't resist and I entered Harputs.

Besides selling garments from other designers, such as Yohji Yamamoto and Commes des Garcon, Harputs sells their own line of clothing. The incredibly friendly folks who work there were very excited to show me their line of clothing, which is manufactured right on the spot, upstairs, and designed by the people who work there. They have only been in this location for about 8 months. (The previous tenant of the space, evidently, was Prada.) The pride in their work was evident and the workmanship was beautiful.

I was fascinated by several of their designs, but I was particularly interested in the jacket I'd seen in the window. Their garments have cute names and are designed to be worn in a myriad of ways. But this jacket, which is a newer design and is not shown on their website, has three armholes, or rather, two sleeves and one armhole. I can't remember the name of the piece, but the right side is a fairly conventional jacket, and the left side is more of a wrap. When you slip the third armhole over the opposite arm (over the more conventional half of the jacket), the jacket front forms a soft cowl. It was absolutely gorgeous and they can make the jacket in any size, and customize it to fit, since they manufacture it right there. The price for this piece ranges from $650 to $780, depending on fabric, though all the samples I saw were black. My favorite was the black lightweight wool, underlined with a cream linen - I think it might have been a linen/rayon blend based on the wonderful drape.

I was also entertained by Lulu, Harputs' very cute mascot (a French Bulldog), who loves to visit Britex, next door, for doggie treats. :)

For more information on Harputs, check out this review, as well as yelp, but be aware that they are referring to their previous location on Fillmore. Oh, by the way, I get nothing from nobody, when I post reviews. Nada. :)

Friday, June 11, 2010

Vogue 8397 - Marcy Tilton Pants (View A)

I've been trying so hard to put a moratorium on sewing black for spring and summer but, oh well, what the heck. I still have scads of black ponte and I love to use it to test out some of the wonderful pants patterns that are available.

Today, we have Vogue 8397, a Marcy Tilton pattern that has been out for years, since 2005, I think. This pattern offers three very different pairs of pants. I recently used View C to try out a variation that Marcy posted on her website, but this time, I made View A, which is for knits only. Because this pattern has been out for years, there are many reviews on Pattern Review, but only three for view A. Most of the sewists used a fairly drapey fabric, such as jersey, but I decided to try it out using my firmer ponte knit, though I wasn't at all sure that it would work.

According to the pattern, the finished measurement for a size 12 at the hip is 43". I decided this sounded right for me, so I cut out a size 12 from the hip down to the hem, tapering out to larger than a size 14 at the waist. (This multi-sized pattern goes to 14 at its largest size, so I made it bigger – maybe more like a 16.) I traced the Trio crotch curve onto the pattern. Other than that, I made no changes. I even used the original length for the size 12, so this pattern may run a bit short.

The pants were very quick to stitch up, even with the top-stitching. (But then I like to top-stitch.) And I love them! Love love love. Definitely another keeper.

Worn here with another new top. This is my fourth Teagarden T, made from a diagonal knit. I love this pattern too! It's "my" version of a t-shirt.

Mini Britex Report

I had to go to the financial district in San Francisco today. I rarely go to the financial district, though I very often go to the nearby shopping district (Union Square). In fact, the last time I was there was several years ago when I went to the Brazilian Consulate to get a visa. But I love the financial district. It's so... alive... with all the worker bees rushing to and fro with such intense focus. I also love to observe what they are wearing, which varies from the well dressed and well coiffed women sporting gorgeous shoes, to scruffy IT types with worn jeans and overstuffed Timbuk2 bags. It's a feast for the eyes.

The company I work for has an office in that area and I had to go in for two reasons. First, to prove I am a U.S. citizen, but also to get a new photo badge. I just got a new haircut last night and, to gird myself for the photo, I decided to wear my red Teagarden T and black ponte Trios.

It didn't help. The photo was atrocious anyway. Afterwards, it was such a gorgeous day, I walked the few blocks to Britex.

I have mentioned before how Britex can make me very grumpy, mostly because of the prices. But they have been carrying a nice selection of printed knit fabrics lately. In fact, some of the fabrics are the same that are sold by Marcy Tilton and Christine Jonson, though for much higher prices. Today, though, it was nice that at least six employees recognized the fabric from my top, which I purchased from Britex, as well as the fabric from my tote, also purchased from Britex. The employees love to see their fabrics sewn up – they really know their inventory – and they were very friendly as a result.

I did end up buying one piece. A beautiful knit mesh for (gasp) $30 per yard. See, this is why I get grumpy, but I guess it's what you should expect when buying fabric from a store directly across from Neiman Marcus, two doors from the Betsy Johnson boutique, and around the corner from Dior.

I will either use the fabric to make this Marcy Tilton tunic or this Very Easy Vogue tunic. The photos for both (especially the Very Easy Vogue) are rather unflattering, but I really do like that top. I have worn the turtleneck version so much that I need to toss it. It's become very pilled and worn, but has been a great top to throw on, both at home and when I run errands.

I have mentioned that I want to make myself jackets, especially jackets that are a bit more fitted. I am working on altering this Sandra Betzina jacket with three front darts (10 darts total). I have identified that I need to add 2" to the front, distributed between the three darts, with most of the fullness in the middle dart, but I haven't quite figured out how I will do that yet. I'm hoping to get a good fit, and that this can become a TNT pattern for me.

Sunday, June 6, 2010

A Red Letter Day!

I posted my last blog entry in the wee hours of the morning and, when I woke up, I noticed that it was my 100th post and I now had 100 followers! I really really want to thank all of you who read, and post comments, on my blog. I started the blog, mostly as an experiment, and I have found I really enjoy it. Let me warn you that some personal chatter follows but, if you want, you can skip directly to the sewing bit.

There are so many benefits to blogging my sewing projects. First and foremost, I refer to my past entries all the time to remind myself how I made a particular project – especially any modifications I made, or what size I cut out, etc.

Then there are the photos. I am NOT a photogenic person. Most folks who have met me tell me I look better in person and I am mighty glad to hear it, given the atrocious pictures I take. My daughters, and particularly my youngest, tells me I am really hard to photograph because I look so stiff and... weird. It reminds me of that Friends episode when Chandler and Monica were trying to get a good engagement photo. Every time the photographer pointed the camera at Chandler, his expression became self conscious and strange, so they finally published an "engagement" photo of Monica and Joey. I can relate. It is almost impossible to find a photo of me before I started sewing because I hated photos of myself and usually was the one behind the camera.

But let me tell you about the upside of these photos. Wow, you might think you look a certain way in a mirror, even a full length mirror. But you can't really see the whole effect the way you can in a photo. All of a sudden, you can really see proportions, color, cut, etc. The photos have had a huge effect on my sewing. They have caused me to re-think my style, and what looks good on me, and have had a direct impact on what I sew. They are pretty powerful, even though I can't tell you how often I cringe when I look at them.

Finally, the biggest benefit of blogging is the community. I have met so many people and had so many great email exchanges because of my blog and my involvement in the Stitcher's Guild community. I have developed some close friendships as a result. How wonderful is that?!? I also belong to a truly wonderful sewing group, who really puts up with my foibles. Several of them read this blog and I love keeping in touch with them that way.

So, I really want to thank all of you. I know I am not as funny and adorable as The Selfish Seamstress, nor as clever and urbane as Male Pattern Boldness, and I do sometimes feel that I really need to push the bar to produce a blog worthy of anyone who might read it, so know I am grateful that you do read, and post. :)

You might know that I don't really participate in blogger awards. But I realize that those awards, in part, are a way of feeling more connected to the blogger. I try to keep my professional life and my hobby life very separate, but here are ten "facts you may not know about me", just for fun.

  1. By profession, I am a technical writer. I write primarily about the Java programming language. I like to think I can, at least, explain a process, or a product, in a clear manner.
  2. I have a degree in computer science from UC Berkeley.
  3. I do most of my writing, including the writing for this blog, directly in HTML. I am not a big User of Tools.
  4. Following my divorce, I enrolled in San Francisco State in the Masters program for Clothing and Textiles. I had a lot of undergraduate work to complete (since my original bachelors was in a very different discipline) but I had to drop out of the program about 18 months into it, because it conflicted with work. Shortly thereafter, the masters program in that department was axed. That was an extremely happy time in my life, even though I was twice the age of most of the students.
  5. I have been a vegetarian since the age of 17, when my mother unadvisedly said, "I wonder how long THAT will last!" when I told her. I love you mom, and rest in peace, but it has been 34 years, and counting. :) I was the healthiest (and weighed much less) for the few years I was vegan, but I have slipped off that mountain.
  6. I love to travel, but have done very little in the last 17 years (note: my eldest is 17), apart from a trip to Brazil 2 or 3 years ago. I once hiked the Inca Trail to Machu Picchu – a 5-day trip on foot. After that I spent two days rafting the Ollantaytambo River, which had some class four rapids. I hate roller coasters, but I love river rafting.
  7. I like to spell and don't really use a spellchecker. I have a friend who thinks that there is a spelling gene. You either have it or you don't. She doesn't. :)
  8. One of my current favorite TV shows is Drop Dead Diva. The new season begins tonight!!!
  9. The nickname 'Shams' came about when I copied my then-fiance's favorite underwear. It was a brand called Chams that his mother bought from Marks and Spencers in London. When they changed the style, he didn't like the new underwear as well, so I copied the older style and made him several pair. He wore them to shreds. I even mimicked the style and color of the original label, but I changed Chams to Shams.
  10. In real life, my first name is Sharon. But I really like my nickname Shams and will happily answer to that. :) Have you ever noticed that there are many Sewing Sharons?

And Now for the Sewing-Related Bit

There is a thread on Stitcher's Guild discussing the pattern that I blogged about last night - Vogue 8248. I posted the photos of my black and white tops and Kathryn gave me some great insight. I just love it when someone with a good eye weighs in!

Kathryn pointed out that the wide "cuffs" on the white blouse were throwing off the balance of the top. For me, that was a "D'OH!" moment. I know the reason the pattern is drafted this way, however. This is a dolman style top, where the sleeve is cut as one with the front (or back). This type of sleeve doesn't have the fitting advantages of a set-in sleeve. If the cuff is very fitted, it's hard to, say, reach forward. However, this cuff is overly generous at the wrist, resulting in an unflattering line, so I took my remaining two buttons and made a pleat in each cuff. Sorry, I don't have photos, but I think you get the general idea. I didn't make it so tight that I can't slip it over the wrist.

I will try wearing the top this way and, if I find it is too restrictive for comfortable movement, I will just chop the sleeves off at the elbow. :)

Thanks so much, Kathryn!!! And if you haven't seen her blog, I Made This!, CHECK it out! She is AMAZING. I am in awe of her creativity, mixed with her facility with problem solving, and this beautiful package is encased in her truly generous spirit.

Vogue 8248 - Very Easy Vogue Blouse

I recently realized I need more basic blouses and this Very Easy Vogue caught my eye. It features dolman sleeves and fisheye darts, front and back. I particularly liked the notch-less collar on View A and decided it would be a good opportunity to use the technique demonstrated on Louise Cutting's Insider Techniques, Volume One DVD (published by Threads), on how to modify the draft of a collar to eliminate bulk at the center front and to cut the collar as one piece.

Nancy Zieman, Sandra Betzina, and others also teach this technique, and it's a good one. (I've been told that Nancy Zieman was the first to teach it years ago.) In fact, Sigrid recently posted a tutorial on this technique called Cutting a Collar in One Piece. And here is a Power Sewing video that shows the technique. (Just hit the Play arrow to view.)

I made the top twice. First, I used a white cotton shirting from Michael's with blue threads, in various shades, running through it. I made this top with long sleeves, as shown in View B. The second version was made from a black cotton voile from Fabrix. This fabric has wonderful woven black dots and I bought all that was left, but it was only about one and a half yards and 56" wide. Through painstaking placement, I managed to squeeze a short sleeved version from the limited yardage.

Based on the finished measurement at the bust, I used a size 20 (the largest size) and added a bust dart. (On a more close-fitting pattern, this is my standard size.)

Here is a complete list of the changes I made:

  • Changed the draft of the collar to use a single pattern piece for upper and lower collar.
  • Added a bust dart.
  • Omitted the fisheye darts on the back.
  • Replaced the fisheye darts on the front with four short tucks.
  • Added 1/4" to the side seam at the waist (for a 1" total increase).
  • Removed fabric from the side seam at the hip. (Not sure how much.)
  • Finished the side seam with slits (on the black top only).
  • Drafted a back facing.
  • On the white top, I topstitched most of the seams.
  • On the black top, I used French seams for the shoulders and center back.
  • Shortened both tops about 3". (I couldn't have squeezed out the black top if I hadn't.)

I did experience one problem when constructing the white top. The notch-less collar is designed so the top of the collar is narrower than the bottom. The bottom edge, which is wider, is sewn to the neck of the blouse. I accidentally made the collar upside-down, so I sewed the top of the collar (which is narrower) to the neck edge. This was very challenging to ease, as you can imagine, but I just thought that the pattern was poorly drafted. When the top was almost finished, I realized my error. Luckily, the poorly eased neck seam is hidden under the finished collar, and I didn't love the top (or the fabric) enough to rip it and out make a new collar, so I left it as-is. I made the collar correctly for the black version. If you look at both collars carefully, you can see that the angle of the collar on the white top is different than the angle on the black top, but I think it's quite wearable.

Here they are:

The first version, with the upside down collar, made from a slightly stiff, slightly crisp, white cotton fabric from Michaels.

On a hangar.

Collar closeup. You can see the reverse side of the fabric, with the threads running through it, just below the back facing.

Second version, with short sleeves, made from black cotton voile. I am wearing this with my cream linen/rayon/silk Trio pants.

On a hangar. The black cotton voile has more drape than the white shirting. Also, you can see the collar is right-side up.

Hem closeup. You can see the side slit right through the fabric. I may need to wear a tank under this one. :)

Saturday, May 29, 2010

No Jacket for YOU!

I really need jackets. And coats too. Really really. I have been admiring this Marcy Tilton jacket pattern, then admiration turned to covet when I saw Dorothy's, Dolcevita's, and sew2little's versions on PatternReview. I was concerned about the horizontal seam that runs just under the bustline, but, hey, I was able to modify the Heart's A'Flutter top to fit me, wasn't I?

After studying the pattern and looking at the finished measurements, I decided cut out the pattern tissue in a size 22. This pattern appears to be a bit more close-fitting than other Marcy Tilton tops, because I would usually use a smaller size. I pinned the tissue together for an initial trial, before adding the bust dart.

Yowza. My bust point was far lower than the pattern. In fact, I would have to lower the horizontal seam across the front by SIX inches and the back would require further alterations. Maybe it would be easier to get a bust reduction. ;)

Oh well. I don't really want to spend the whole weekend adjusting the pattern, though I think this design could be very flattering if I could get the fit right. Meanwhile, I'll admire it on the Dorothy's of the world and I'll have to find another use for my stretch denim and Riri zipper.

By the way, I've met Dorothy and she's even more gorgeous in person! :)

On another note: I have had a couple reports that folks are having trouble leaving comments on my blog. I have it set to accept comments from anyone, even anonymously, so I am confused. Is this happening to others? If you aren't able to leave a comment, please let me know via email. Not sure what I can do, other than complain to the overlords, but I would like to know.

Thursday, May 27, 2010

Sewing Workshop - Haiku Jacket

Buying fabric online has its inherent risks, but I mostly have been happy with my internet purchases. I like great denims, and when I saw this reversible denim on Gorgeous Fabrics, I loved it. It was called Reversible Soleil Denim, a perfect name for the stylized suns on the reverse side of the fabric and I had several jacket/coat ideas for it.

I bought the fabric, well before Christmas, on sale. When it arrived, I was a bit surprised how thick and stiff it was. The description on the website didn't clue me in. Think of the stiffest pair of jeans you have ever struggled to hem.

This denim is stiffer.

I have never before seen, or sewn, denim as stiff as this. But, it is gorgeous. :)

For several weeks, I threw the fabric into every dark load of laundry. I washed and dried it at least ten times. I abused it at much as possible, by throwing in tennis shoes, for example, but any softening was negligible. This denim wouldn't work for the designs I had in mind so, after showing it to a couple of friends, I reluctantly put it away.

One friend had mentioned she thought it might be a suitable fabric for the Haiku or Haiku Two jacket, from Sewing Workshop. That wasn't how I envisioned the project, so I forgot about it. When I recently unearthed it, I was determined to use it for a jacket of some sort. (I really need jackets!) I went through all of my patterns and, wouldn't you know, I decided to use the Haiku pattern, largely because it would feature the wonderful reverse side on the lapel. I guess she was right, after all. :)

The Haiku Jacket is officially out of print, but copies are still available through independent sellers, such as Vogue Fabric Store, and it shows up occasionally on ebay. The reason I chose the Haiku, instead of the Haiku Two (which I also own and is still in print), is because it is longer and less flared – it had more of the silhouette I wanted.

This is an older Sewing Workshop pattern, meaning the sizing is very generous. It is difficult to measure the flat pattern, but I was pretty sure that the small would work for me, so I made a muslin of the small. Other than being a tad long (which I decided to leave as-is), the Small was a perfect fit. In the Big 4 patterns, I generally wear an 18 or 20 on top, and usually add an FBA, so a Small (without FBA or any alterations) is generous indeed. And how rare is it for me to make something out of the envelope without any alterations at all???!! Pretty nice. :)

While this isn't a hard pattern to sew, exactly, it uses flat felled seams throughout, which was a challenge in this stiff fabric. However, the flat fell seam was an appropriate finish for denim, so that is what I used. Anyone who has sewn much with Sewing Workshop patterns is familiar with their wide hems made using oak tag templates and their generous use of mitered corners. This pattern was created before those techniques were adopted, but I used them anyway. The miters were especially important to minimize bulk in this very dense fabric and I used them on the bottom of the pockets, as well as on the bottom of the back facing.

The changes I made were minimal:

  • I omitted all interfacings (not needed!)
  • I omitted the rectangular reinforcements sewn on the inside at the top of the pockets.
  • I sewed the sleeve facings on inside out, so when I roll back the cuffs, you will see the reverse of the fabric.

Trying to sew seams that went across flat felled seams involved many layers of the thick denim. This is a good time to get out one of those "hump jumpers" or "thing-a-ma-jigs", if you have one, which I don't. When my presser foot was in the air, going over these thick spots, I folded a denim remnant several times and placed it behind and under the presser foot. A much cheaper, and more convenient, solution. I also made heavy use of my tailor's clapper during construction to tame the fabric, which was fairly resistant to laying flat when pressed. I was hoping to complete the jacket without breaking any sewing machine needles but, towards the end, when I was sewing the very challenging flat fell seam along the shoulder/top of sleeve (which is the last flat fell seam I had to sew), I broke the needle when going over many layers of the denim. Though I only lost one machine needle, many straight pins died in the construction of this jacket.

Detail on the inside, showing some of the flat fell seams and the sleeve facing.

Even before hemming the jacket, which I did early in the process of construction, I realized that the design was going to expose a bit of the solid blue denim at the bottom of the turned back lapel. I saw a few possible solutions to this problem, none of which excited me:

  1. Hem normally, causing the blue to show at the bottom of the lapels.
  2. Hem in the reverse direction, causing the suns to show at the bottom of the jacket, all the way around (except at the lapels).
  3. Bind the hem, which still presents the artifacts of the first two solutions, depending on which side of the fabric the binding uses.
  4. Don't hem the jacket, but use a zigzag or serged edge. (Though my serger is currently capable only of the regular overlock stitch.)
  5. Where the lapel folds back, change the direction of the hem. This didn't thrill me either, since I would have to slice the denim the width of the hem – it wouldn't be a clean finish.

After due consideration, I used the first option, but I am not loving that bit of solid blue that shows at the bottom of the lapels. Do any of you have a better suggestion? I even considered hand tacking on a bit of the "sun" fabric to cover up the solid blue - sort of a informal applique. When I looked through the Haiku gallery on the Sewing Workshop page, looking for other possible solutions, I realized that the posted samples either used a fabric where the front and back are virtually the same, or else didn't use the folded back lapel. Since I mainly chose this pattern to feature the reverse fabric on the fold-back lapel, this is a bit of a disappointment.

Despite the stiffness of this fabric, I do like the finished jacket. It's perfect for throwing on and running errands or taking a walk and, hopefully, it will soften up over time. I may make this pattern again, but next time would use a drapey fabric that is the same (or mostly the same), front and back.

This is one of those very rare times when I like the garment better on me than on the hangar. Unfortunately, I have no photographers available at the moment, so it will have to wait until another day.