Sunday, August 30, 2009

Self Drafted -- Grey Sweatshirt with Holes


In general, I don't care for light grey on me (it can wash me out and emphasize my grey hairs), but this fabric spoke to me.  It is full of lovely distressed "holes" so I bought it and snarfed it away.  (In fact, another 6 yards are slated to be curtains in my teenager's bedroom.  :) )  When I saw a beautiful sage green sweatshirt in a boutique, it gave me ideas.  My top is quite different, but it was inspired by the $180 boutique sweatshirt.

I drafted a very simple pattern.  I started with Marcy Tilton's top (Vogue 8582) because I had just used it and I knew it fit me well.  (I highly recommend this pattern!)  I copied off the neck and shoulder lines and marked the width of the top.  I extended the shoulder line to the length of a long sleeve, measured the finished length I wanted, and connected the lines with a gentle curve.  Voila, a dolman pattern I knew would fit me.


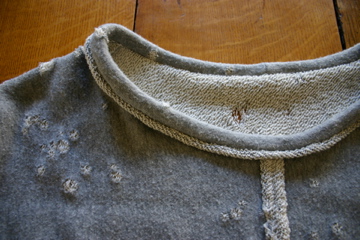
You can see the dolman line here:


Because of a trick I learned years ago, I was able to draft a single pattern piece.  The only difference between the front and back was the neck curve, so I drew both on the pattern, cut the paper pattern on both lines, but didn't completely cut through the front neckline at CF.  I left a little "hinge", reinforced with tape, so I can cut both front and back by moving that little piece up or down on the fabric.


This top features:
  • The Reverse Binding for Single Knits (posted earlier today) at the neckline.
  • A similar technique at CF.  I cut a 1" S/A at CF and sewed the fabric, wrong sides together, letting the fabric curl at CF.  Later I decided 1" was too much and I trimmed it down a bit.  Probably 5/8" S/A is be best.  (This worked because I cut the top with the selvedge along the hem of the top -- 90 degrees off from the usual grainline.  So the knit runs vertically rather than horizontally.)
  • A floating pocket.
  • A back that is a few inches longer than the front.   (Still deciding if I like this.)
Floating pocket:


That's it.  I just love this sweatshirt and plan to make up several more in different fabrics - it's very quick to sew,  comfortable to wear, and flattering on my challenging shape (which I fondly refer to as "potato on toothpicks").  My only challenge came from using raw edge techniques with this particular fabric.  I think this fabric is what we used to call (years ago) a French Terry.  The right side is the usual interlock fabric, but the wrong side is a knit terry with little white loops.  While the raw edge of the grey (interlock) is well behaved, the terry side drops bits of white string and ravels badly.  I tried a couple techniques to tame it (like Fray Check), but in the end, I sewed down my little rolled "tubes."  I suspect that, over time, the terry side would stop dropping lint and behave, but I didn't want to take that chance.

Technique -- Reverse Binding for Single Knits

I will be posting two blog entries today.  This entry illustrates a technique I copied from very high-end ready to wear (RTW).  In fact, I saw it used on a sweatshirt priced at $180.  (And a beautiful sweatshirt it was, for several reasons.)

You may be familiar with the standard technique for binding raw edges using a strip of bias (in wovens) or across-the-grain (in a knit).  This technique turns that idea around - literally.

You need a single knit to use this binding.  How can you tell if you have a single- or a double-knit fabric?  If you gently pull the edge as it comes off the bolt, a single knit rolls towards the front.  A double knit does not roll.  You want to take advantage of the fabric's natural inclination to roll.

On this sweatshirt I used this binding on the neckline, but you can use it anywhere.  For example, a sleeve, hem, or pocket.


Step 1:  Cut a strip of your single knit about 2 1/8" wide and longer than you need.  (It can be wider and you can cut it down later.)  In my photo, the strip is on the left and the "garment" is represented by the larger piece of fabric on the right:


Step 2:  Sew the right side of the strip to the wrong side of the garment with 1/2" seam allowance (S/A).  If you are navigating around curves, such as on a neckline, you will want to gently stretch the binding as you go.


 Step 3: Wrap the binding around to the front of the garment.


Step 4:  Pin in place.


Step 5:  From the wrong side of the garment, stitch in the ditch.  As you sew, make sure that the raw edge of the binding (underneath) remains flat and does not get caught.


The finished edge will naturally roll towards the padded binding.


I'd love to see your applications of this technique.  :)

Friday, August 28, 2009

Vogue 8582 - Marcy Tilton top


Yet another swingy, long top with an assymetric hem.  Hmmm...  am I getting into a rut?  Please bear with me and I will try to do better next time.

This pattern, by Marcy Tilton, is really wonderful.  It features two different neck variations and each is lovely and worth checking out.  Views A and B feature a "twisted ribbing".  I saw this on one of Marcy's garments on her website a few years ago.  I emailed her and asked her how it was done.  At the time she told me she wasn't sure how she was going to release the technique.  Some time later, the technique was featured in her pattern and I'm so glad she chose this way of sharing it.  :)   I haven't made this version yet, but I have read the instructions and will be getting around to it at some point.

View C is a turtleneck with a twist.  Literally.  You sew the right side of the neck tube (one edge only) to the right side of the neck and turn the unsewn edge of the tube to the inside (wrong sides together).  But, instead of pinning in the usual way, you slide the edge a couple inches over.  As a result, the whole neckband is twisted.  This yields in a draped, "slouch" turtleneck which gracefully frames the neck.  You know how turtlenecks can sometimes have a mind of their own - they can sit there, all obstinate and stiff, well, not this one.

I made view C, with a couple of modifications.  First, I decided to put the floppy hip piece on both sides.  I like the original design, where it's only on one hip and the other side seam has a slit, but I had lots of fabric and just felt like it.  I made the second modification when I was sewing up the arm/side seam.  I felt it was too wide at the wrist so I used a 2" seam allowance there and tapered it back to the 5/8" at the elbow.  The resulting line is more flattering on me.

The fabric I used was a very cheap poly jersey.  Nasty stuff - it should have a huge sign posted on it in the store that says, "Do not even THINK of sewing this fabric unless you have a working serger!!"  I don't have a working serger at the moment, but the fabric was $2 per yard and I liked the color and drape.  Oh well.  The seams are on the inside, so their ugliness is hidden, but the only way to hem this nasty stuff without a serger (for me, anyway) is by hand.  So that's what I did.  At first I was going to leave the edges completely raw, but I played with the fabric after washing it and I didn't like how the raw edges behaved.  Raw edges can be dandy (and very high end) in more stable knits.

I've seen this same top in a boutique for about $170, made out of the same fabric, with serged hems.

Here's the top:


And here's the slouch neck:


Though I find this sort of top somewhat flattering on me and easy to wear, I promise my next garment will have different lines.  :)

Thursday, August 27, 2009

Inspiration Shopping

I just love to inspiration shop.  My job has been stressful recently, so I took a day off today.  After some productive, early morning, fabric shopping, I visited my favorite boutique for some inspiration.  Whenever I feel blah or uninspired to sew, I know it's time to go shopping for clothes.  I can get my vibe back pretty quickly that way.  Just one new construction tip or shape idea can perk me right up and get the juices flowing again.

Oooh, there were some fabulous items, mostly in the $200-$300+ range - outside of my current budget.  I favor loosely structured garments made from yummy fabrics and cut in interesting ways.  Luckily there are many designers these days that are creating wonderful pieces.  Designers like Eileen Fisher, Citron, Cynthia Ashby,  Babette, Steel Ponies, Bodil, Sympli, Dressed to Kill, to name a few.  I have certainly purchased my share of nice clothes (especially when I'm not in sewing mode) but it's so much more fun to use their inspiration to create my own pieces.  I also tried on a few styles I've seen in the pattern books - I'd had the suspicion that some of these for me and I was right!

Last week I went to the Haight to hit a fabric store there for some elastic.  I discovered that store had closed a year ago (sigh) so I decided to visit some clothing stores.  The Haight is full of edgey clothing shops for the teen and twenty-something crowd and I found some pieces with fabulous details.  Beautiful draping, interesting shapes, gorgeous fabrics.

Today, after my shopping spree, I went to a coffee shop to reflect and made some notes, both for today's and last week's outing, before the details leave my memory forever.  I came home and finished a top (I will post after I get some photos) and then hit the fabric piles, to study and think about what I want to do next.

I have some ideas I'm excited about.  I can't wait to get to my machine this weekend.  :)

Wednesday, August 26, 2009

Vogue 1018 - Sandra Betzina Skirt


Oooh, I just love this Sandra Betzina skirt.  It's funky and asymmetric and I love funky and asymmetric.  I had close to 5 yards of this very unusual fabric.  It's very lightweight, drapey, 100% polyester in a scrumptious stripe with polka dots.  It feels similar to a very lightweight ripstop nylon. I think of it as a novelty seersucker because it has that quality to it.  It also has a chenille yarn that runs through the stripe.  You can see a closeup of the fabric here:


I wanted something special for this fabric and I hoped this skirt would be perfect. It's basically an a-line skirt with a drape and the fabric has some tucks sewn into it to create interesting texture and hang.

I did make one significant change to the pattern. It has a shaped, fitted yoke and I hate skirts with a rigid fit at the waist/hips. So, I added about 10" to the pattern at the waist to convert it to an elastic waistband. (I didn't want to just cut a larger size because I don't like to be drowned in too much fabric -- I cut the pattern in a size to fit my hips.) I did cut the drape in a larger size because I wasn't quite sure how to just enlarge that. It worked ok, I guess. (I cut the skirt in a size D and the drape in a size G.) The new yoke is a rectangular piece and I didn't even measure it -- I just cut it out and sewed it to fit. You can see the elastic waist here:


The only other modification I made was to change the grainline on the drape. I cut that so that the stripe would parallel the front edge of the drape. I wanted that bold stripe to be featured in the design

I did line it with navy sandwashed rayon fabric. So soft. I wasn't going to, but the skirt fabric was a little too lightweight, I felt.

Here it is:


Tuesday, August 25, 2009

I'm back!

I am back to sewing clothing for myself!  It's been a hiatus of close to 20 years.  Yes, twenty years.  I used to be an obsessive sewist and particularly loved to make designer and wearable art type of clothing.  Then I married, had two kids, gained weight, and my creative interests shifted, first to quilting, then to kids clothing and crafts, knitting, and felting.  Ten years later, I divorced, went back to work, gained more weight, and stopped sewing altogether, except for Halloween costumes (for my kids) and school plays, ballet performances, etc.

Well, my kids are now teenagers, and don't need (or want) my creative skills anymore.  I've had many passions in my life, but this is the big one.  At first, I wasn't that inspired about returning to sewing, partly because sewing didn't feel as fun at my current age/weight, but after a bit of "inspiration shopping" at some lovely boutiques, and some insanely crazy fabric shopping, I got over that. 

I am hooked, once again.  :)

Once I get some photos uploaded, I will start blogging.  :)