TOC:

This pattern is brilliant!
When I saw another blogger (Art Attack) make up this top and post it to Pattern Review, I scurried over to Savage Coco to buy it. I am not a huge fan of PDF patterns—all that cutting and taping—but, in this case, it was totally worth it!
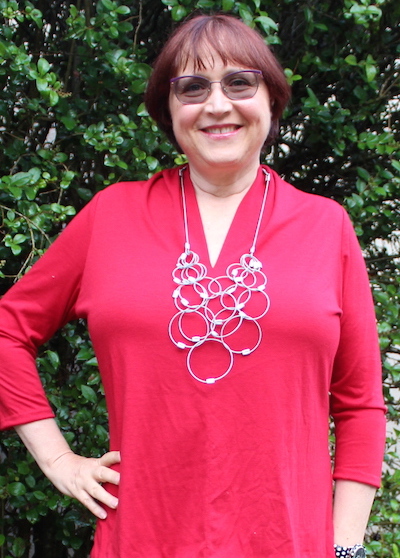
This pattern is reminiscent of my very favorite knit top pattern, The TeaGarden Tee (originally an Issey Miyake design), which I have made at least 13 times. (In fact, I'm wearing one as I write this post.) But the Presto top is more updated: it features set in sleeves with no gussets or bulk under the arm. It has a neckline very similar to the TeaGarden, which covers a bit of the neck, but also features a center front seam with a V as deep, or as shallow, as you want.
In addition, the Presto top uses two layers of fashion fabric in the front, so it's an excellent use for those thin knits that you don't know what to do with. (You can use two layers on the back if you'd like, but I did not.)
If you use a droopy knit, like my rayon lycra knit, it softly bunches at the neck. I find it pleasing. If you use a knit with a bit more body, such as some sweater knits, you can fold the neckline for a shawl collar effect.
Finally, once you understand how it goes together, it's wicked fast to sew.
Best of all, it flatters both the uber busty and the normal busted.
So I made two!
I have only two quibbles with the pattern:
- It's only graded to an XL, which is designed for a 44" to 48" bust. The XL pattern measures 44" at the bust, so it's designed with zero-to-negative ease. (I like negative ease in my knit tops.) My bust is 48", so I made the XL with no adjustments and it fit my bust well with no FBA required. If you want more ease than 44" provides, you'll have to grade it up.
- The pattern instructions include no diagrams or pics. The construction is unusual (it reminds me a bit of Christine Jonson's V-Neck Tee), but I had to read the instructions several times before I figured out how to put it together. Once I understood it, it was quite simple.
I made the pattern exactly as designed, with a single modification—I removed 1" from the shoulders. This is typical for me in all patterns. Also, I typically remove excess fabric at the hipline (because I have small hips for my bust size), but I did not for either of these tops. I thought I might like it with a bit more fabric at the hips - maybe it would look "swingy" and balance the bust.
Nope. It just makes me look larger than I am. When I make this top again (and I WILL), I will remove the excess fabric from the hipline. But that is due to my shape, and not a problem with the pattern.
The pattern has three-quarter length sleeves. I quite like this length, but it would be easy to lengthen the sleeves or add bands for additional length.
I LOVE this pattern! (And, in case you wondered, I paid for it.)


Have you seen the Zirkel pin magnet yet? My friend Susi brought it to my attention, so I ordered a red one. (I've seen it in red, white, and black.)
It's kinda fun, so I made a little video to show you how it works. Yeah, I know... I'm not that gifted at making videos. ;)
The best feature of this video is that it's about a minute long...
I've been using this magnetic pincushion for about a week and would only add: if you often pick up and move your pincushion, this one is a bit awkward with all of those pins sticking out over the edge. Other than that, I'm happy with it.