
One thing that can drive me a bit batty is loading a page with a lot of images and those images draw very slowly. Watch the images slowly render... cachunka, cachunka, cachunka.
Maddening.
Especially because all of that extra resolution is completely wasted.
So I thought I'd offer some tips on how to resize your images to make them more online friendly. Please let me know if this post is of interest to you, as I have ideas for other posts of this type.
TOC:
Generally, slow image rendering happens when a picture is saved at a much higher resolution than is needed. You can greatly improve the performance of loading a page if you reduce the size of your images so that they are closer to the resolution that you need, and not a lot more.
(Note that this info is also useful for emailing images. It's much better to size an image down so that it fits into a mail window, rather than sending a huge picture that is impossible to see without opening it into another app.)
There are two ways to change the size of an image. You can:
- Reduce the default resolution in your camera—This means that the pictures that your camera takes will have a smaller file size. More of them will fit onto your camera memory card, and they will will upload faster to your computer.
- Reduce the resolution in post production—after you have uploaded your images to your computer.
I don't use the first option. I want my photos at the highest resolution. For example, if Vogue Patterns ever comes calling and wants to feature you in their Star Blogger column, you need print resolution, which is much higher resolution than is required for online images. For this reason, before I alter an image, I make a copy of it. I never alter the original image, in case I need it later at the highest resolution.
My camera is a Canon Digital Rebel Ti3, which takes images at very high resolution. My computer is a Macbook Pro, so I will explain how to modify the resolution of your images using a tool available, for free, on any Mac. (But I include a link to info for those of you who are using Windows.)
The following screenshot shows the info for the original image of my Fly London shoes. You can see this info if you select the image in the Finder and then select File > Get Info (command-I).
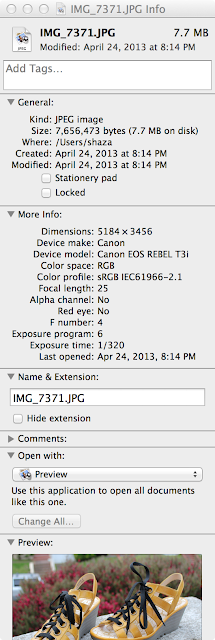
As you can see, the original image, at 72 DPI (screen resolution is 72 DPI), is SEVEN-POINT-SEVEN MEGABYTES and it is 5184 pixels by 3186 pixels. That is a big file. Imagine a page full of 7.7 MB images. It's very slow for the browser to load all of those huge images and all of that extra resolution is completely wasted. You don't need it. Most laptops, for example, are somewhere around 2000 pixels across by 1200 pixels high. So an image that is over 5000 pixels across is serious overkill.
So, how do you decrease the resolution and what resolution do you decrease it to?
Resizing Images
On the Mac, you can change the resolution of an image using Preview. (Here are instructions using Paint for Windows.)
- Open a copy of the image in Preview, which is an app included on every Mac.
- Select Tools > Adjust Size... This brings up a window:

- To the right of the Width and Height text fields, select Pixels. (I prefer to work in pixels, rather than percentages, where you are guessing about the number of pixels.)
- Make sure that Scale proportionally and Resample image are both checked. "Scale proportionally" means that you only have to enter one dimension, such as the width, and it will alter the height to maintain the same aspect ratio. "Resample image" means that you want the file to be modified. If you don't check this it will not actually make the file any smaller, but will only alter the header information.
- Enter the desired pixel width in the Width field. I usually change the width to 400 pixels. The maximum image width that Blogger likes is 400 pixels, at least for the template that I use. Any wider and the image (at full size) starts to creep into the sidebar.

- To see what this image will look like at its maximum size, select View > Actual Size (command-0). Is the image still too big? You can resize it further. View > Zoom to Fit (command-9) will fit the image into the Preview window.
- Save the file and exit Preview.
For comparison, examine the modified image using Get Info:
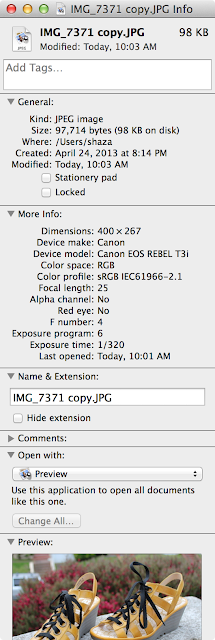
As you can see, the modified image is 98 KB, which is, approximately, ONE TENTH of a megabyte, or .098 MB. This is SEVENTY EIGHT TIMES smaller than the original image. It will render much more quickly.
Drawing an image at different sizes
Now, let's say that you want to draw your image at a specific size without making the image smaller. For example, I save copies of my images at 400 pixels wide, but I might want to post them on another website at an even smaller size. Maybe I want to display an image at 200 pixels, or 288 pixels. You can make a copy of the image and re-size it, as I describe above, but I typically don't. In this situation, you can just display an image at a smaller size without modifying the actual pixels. (Drawing a 400 pixel image at 200 pixels is not going to greatly impact performance of the browser, unless there are a lot of them.)
Most photo sites, such as Picasa, let you select a pixel size for displaying an image.
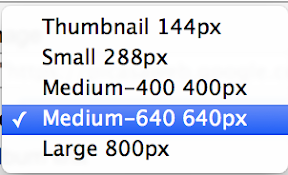
When you select one of these sizes, Picasa is not actually changing the size of the image file. It is providing you with a snippet of HTML code that tells the browser at what size it should display the image. Here is a sample of HTML code for displaying an image:
<img src="https://blogger.googleusercontent.com/img/b/R29vZ2xl/AVvXsEhvkqAQzgMhBiyAAAPQ-WzRX1MzTvMbGLDdbabAma9BXfCMqpSIkJBPCXanwb5spRXx8vy3lBTgvrIjDzMeOiW_X1mxm-GTwrDpTWE0mFnIEeD2RrcgBFtA7JuMKp7GybpnA8jvs5bDlag/s800/IMG_7371%2520copy.JPG" height="267" width="400" />
Let me break this down a bit.
To display an image in HTML (which is the language of the web), you specify the following:
<img src="location of the file on the web" />
That's the bare minimum you need for displaying a picture. For example, say you want to display an image from the BMV website. You can go to the BMV website, and find a page that contains the picture you want to display. For example, go this page, right click over the image on the page, and select Copy image location. The location of that picture is now in your copy/paste buffer.
You can replace the "location of the file on the web" text, so that the HTML snippet looks like this:
<img src="http://voguepatterns.mccall.com/filebin/images/product_images/Full/V1426.jpg" />
When you paste this snippet of HTML into the browser page that you are editing and update it, you will see this:

But this HTML displays the image at its maximum size. To display an image at a smaller size, you can add width and/or height attributes, like this:
<img src="location of the file on the web"
width="number of pixels" height="number of pixels" />
(You can specify the dimensions in pixels or as percentages, but I'm using pixels here.)
So, if I add the following to the HTML snippet:
<img src="http://voguepatterns.mccall.com/filebin/images/product_images/Full/V1426.jpg"
width="100" />
I only specified the width (of 100 pixels), because a browser is smart enough to calculate a height that will maintain the same aspect ratio. The image will now display like this:
Maybe I want to try it at 288 pixels wide:
<img src="http://voguepatterns.mccall.com/filebin/images/product_images/Full/V1426.jpg"
width="288" />
Which looks like:
You can display an image at any size that you want, so long as it's the same size or smaller than the actual image. Trying to display an image at a larger size than the actual image will only result in a blurry mess. The browser can't add pixels that aren't there.
I hope this isn't as clear as mud. :)
I am spending the weekend on detail work: making pockets, and hand sewing. I'm a happy camper, and maybe I'll have something to show next week.
Have a great weekend!


