Friday, September 11, 2009

Self Drafted - Tube Skirt


I have two daughters, DD1 and DD2. In fact, DD1 is my usual photographer and both are my best supporters. I had some fabric left over from this project that she coveted because it was so soft. Luckily, it doesn't take much fabric to make something for her so I whipped up this little tube skirt.


I know, hardly worth a post, but I so rarely make anything for my kids these days and she does rock the skirt. :) She was rushing off to school (tests!) and then 4 hours of ballet and wasn't in the mood for photos, so I appreciate that she played along for old mom, though I'd have preferred one without the hoodie. ;)

On the sewing front, I have two skirts half completed. For the first, I am not loving the fabric made up in that skirt - it's a bit too "homespun" and I will probably save it as a summer skirt. For the other, I ran out of fabric! I am off to the store today hoping they have some more. (They had a bit more a week ago, but the bolt was getting low.) If they are completely out, I am really stumped on that one as it's a 16-gore skirt. Maybe I can make an 8- or 10-gore skirt for DD1, except it's not a style she generally wears. (And, to be honest, it's not a color I generally wear either so chalk that up for two summer skirts...) And, then I started a top with a front tucked panel and I am not too happy with how that is going. I carefully (or so I thought) sewed all these tucks and then I realized they are ever so slightly skewed and it shows. I'm trying to decide what to do about that.

Hmmm...

Monday, September 7, 2009

Slit Style Circle Skirt Revisited

Some folks were curious for more information on my slit waist circle skirt. I didn't make pattern pieces for this skirt. The fabric had a very strong grainline (it is woven from coarse threads) and the pattern pieces are rectangular so I was able to cut directly into the fabric after calculating a few measurements. I did take some notes, but when I looked for them tonight, they were nowhere to be found. Luckily, I have the skirt and a tape measure. :)

Here is a rough (VERY rough and not to scale) diagram of the skirt. For the record, I am 5'5" tall, so YMMV (your mileage may vary) if you are a different height.


And here is how I created it:

1. I cut a rectangle 66 1/2 by 17 inches. This is the piece that extends from side to side and contains the waistband.

2. Locate the precise center point of the rectangle - this is the CF/CB point. If you fold the rectangle in half the long ways, the fold is the side "seam" (it's not actually a seam, but you can think of it that way). Cut a straight line along that fold, starting at the middle, or CF/CB. If you want to make the waist the size of your exact waist, you will have to add a vertical slit (shown on the diagram). This is how my original skirt is made. If you want to make the skirt larger than your waist (because you are using elastic), you can omit the vertical slit. To calculate the length of the slit, divide your waist opening by two. So, if your waist is 30 inches, you might want to add another 10 or so inches for gathering (and so you can get in and out of the skirt). Half of 40" is 20". So, you will cut 20" across the fold, centered at the middle point. (I start at the middle, cut 10" to one edge along the fold, then return to the center point, and cut 10" in the other direction for a total of 20." This ensures that the skirt is centered on the waist.)

3. Cut your waistband. Mine was 3 1/4 inches wide (calculated using a 1/2" S/A for attaching the waistband and using 1" elastic) and I cut it extra long and trimmed it to fit as I went along. I made a four-part waistband because I wanted the elastic confined to the sides. I won't go into that detail here, but there are patterns that use this technique.

4. Attach the waistband to the slit opening. This might sound tricky, but if you've sewn a continuous placket into a cut slit on a sleeve hem, you've done this before. In this case, you just follow the process at both ends of the slit.

(If you aren't sure how to proceed, google the subject and you can find a tutorial.)

Here is a view of my skirt with the waistband attached. The puckers are caused by the elastic which has already been inserted into the waistband.


And here it is again, folded along the side "seam". You can see I channel stitched the portion of the waistband that has no elastic. I did this to give it more body. I didn't use interfacing because a) I didn't have any and b) I don't want the waistband to be particularly stiff. The channel stitching was sufficient (for me).


5. Attach any trim, if desired. This is where I attached the fabric selvedge. You can actually see that in the picture above where the rectangle is laid out flat.

6. Attach an inseam pocket, if desired. I held the skirt up to my body and decided on the pocket location. If you've ever sewn an inseam pocket into a pair of pants or a jacket, it's the same concept, except the pocket is a rectangle shape. Here is a Inseam Pocket tutorial, if you need help.

6. Cut two skirt bottom pieces. Mine were 66 1/2" (the width of the skirt) by 24". Sew one to the front and one to the back.

7. Try on the skirt. The corners of the square are most likely "dusting" the floor. Mark where you want to cut them off.

8, Take off the skirt and lay it out flat. Draw a curve on one corner to shorten it to the point you have marked. Cut off the excess fabric.

9. Use the trimmed corner piece that you cut off as a "template" and round off the remaining three corners.

10. Hem the skirt. (I folded the edge 1/4" twice and stitched by machine.) The hem is uneven by design. :)

11. Wear and enjoy. I'd love to hear your experiences if you make a skirt using these instructions.

Note, if you don't want the inseam pocket or any sort of decoration, you can make this skirt as one big square.

Thursday, September 3, 2009

Self Drafted -- Full skirt

Back in the 80s (or maybe early 90s) I bought a skirt and top at a boutique in San Francisco.  Some friends and I were hiking Coit Tower and wandering around that part of the city and we stumbled into this tiny little boutique.

This fabulous skirt was made from a coarsely woven rayon with good drape and was a bit knobbly. (The fabric was purple but had little black knobblies on the thread -- not sure the exact name of this type of fabric.)  The skirt was quite full and the top was cropped and boxy.  I loved that outfit and wore it to death.  I once studied the skirt's design and was surprised to see that it was basically a giant rectangle with a "slit" waist.  I've never seen that design, before or since.  It's basically a circle skirt, but not your usual circle skirt.

I wonder what happened to that outfit.  It certainly wouldn't fit me anymore, but I don't remember letting go of it either.  As much as I loved it, it had a few features I didn't like, namely, the top was too short, too boxy, and featured a boat neck.   (I have narrow shoulders so a boat neck doesn't fit me well.)  The best part of that outfit was the unusual skirt, but it had a non-stretch waistband, and I definitely prefer an elastic waistband.

I had some inexpensive fabric that reminded me of that outfit, from so long ago.  I think the fabric a poly/rayon blend but it has nice drape and a similar weave.  This fabric is fairly "sproingy", so I knew it wouldn't take to pleats or gathers well, but it behaves if you stitch it down.  This fabric absolutely refuses to wrinkle, which is nice, and it came through the washer/dryer like a champ.

I decided to copy the skirt, from my dim memory.  I'm not 100% sure I have it right, but I think it's pretty close.  I put on a partial-elastic waistband -- the elastic is confined to the sides.  I didn't want the fullness of the skirt to fall over the tummy area.  There is a horizontal seam that runs the full width of the skirt.  I decided to highlight that seam by "piping" it with the selvedge of the fabric (I love a good selvedge trim :) ) and I inserted a pocket in the seam.  (The original skirt had no pockets.)

I blogged earlier today about the cut/drape of the skirt, so you can refer to that for the details. Here is my final "copy":


Here you can see the shape of the skirt.  The corners have been rounded off so they don't drag on the ground:


The side drape:


The inseam pocket:


The final skirt reminds me, visually, of Sandra Betzina's OOP skirt, Vogue 2933.  This is interesting, since the two skirts are completely dissimilar how they are made.  When walking in a regular circle skirt, the fabric at the hem can get "in the way" of your legs, but not this skirt.  It is wonderful to walk in, because the fabric is primarily at your sides.  I just love to wear it. 

I am wearing this skirt with a grey sweater.  Originally, I was planning to make a matching top from the remaining fabric, but now I'm concerned it would be "too much" when worn together.  I have another couple yards of the fabric, and I just finished drafting a top, but I doubt I will wear them together.

And this is totally unrelated, but check out this amazing fabric in my stash.  It looks like a Yohji Yamamoto fabric, but I have no idea.  I am mulling and mulling over how to use it. It gives me fabrigasms. :)

Technique -- Draping Circle Skirt Fullness

Who isn't familiar with the dramatic effect of a full circle skirt? This is the skirt shape with the least amount of fabric at the waist and the most at the hem. Swoosh, swoosh, swoosh, so feminine. I made each of my daughters a dress with a circle skirt when they were young, but after one trip to the bathroom, the youngest declared, never again, would she wear a circle skirt. :)

Years ago, I wore to death a modified circle skirt (though I didn't realize it for a long time), that was very unusual in the way it was cut. I felt like a genius when I figured out how it was made and why it hung the way it did. I wasn't, of course, but I still want to pass on what I learned. :)

For a traditional circle skirt, a waist hole is cut out of the fabric, like so:


On the body (or, in the case of this demo, on the toilet paper tube) the resulting fullness is evenly distributed around the tube.


However, in this skirt I owned so long ago, the waist hole was cut differently. Instead of being cut as a round, or oval, shape, it was cut as a slit, like so (square on the left):


Now, this has a very different effect when worn on the body (or tube).


The front and back of the skirt fall straight, like a pencil skirt. The fullness falls to the sides of the skirt. This is a very flattering line for those who don't want fullness over the belly but don't mind it over the hips. Of course my TP tube demo uses a stiff fabric which is not very flattering, so I cut another in a knit fabric to show the drape better:


I made myself a skirt using this design to replace that one I had (and misplaced) so many years ago. I will post it when I can get some photos of it.

Oh, I should add, I was recently studying out of print (OOP) patterns, seeing what I have missed all these non-sewing years. I was surprised to find a Donna Karan pattern that uses this very design - Vogue 2540. Interestingly enough, according to the pattern reviews (I haven't seen it first hand), Donna's pattern just sews the waist elastic directly to the skirt opening). I put a waistband on my skirt which isn't that hard to do and results in a nicer finish.

Sunday, August 30, 2009

Self Drafted -- Grey Sweatshirt with Holes


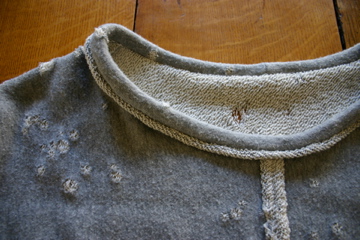
In general, I don't care for light grey on me (it can wash me out and emphasize my grey hairs), but this fabric spoke to me.  It is full of lovely distressed "holes" so I bought it and snarfed it away.  (In fact, another 6 yards are slated to be curtains in my teenager's bedroom.  :) )  When I saw a beautiful sage green sweatshirt in a boutique, it gave me ideas.  My top is quite different, but it was inspired by the $180 boutique sweatshirt.

I drafted a very simple pattern.  I started with Marcy Tilton's top (Vogue 8582) because I had just used it and I knew it fit me well.  (I highly recommend this pattern!)  I copied off the neck and shoulder lines and marked the width of the top.  I extended the shoulder line to the length of a long sleeve, measured the finished length I wanted, and connected the lines with a gentle curve.  Voila, a dolman pattern I knew would fit me.


You can see the dolman line here:


Because of a trick I learned years ago, I was able to draft a single pattern piece.  The only difference between the front and back was the neck curve, so I drew both on the pattern, cut the paper pattern on both lines, but didn't completely cut through the front neckline at CF.  I left a little "hinge", reinforced with tape, so I can cut both front and back by moving that little piece up or down on the fabric.


This top features:
  • The Reverse Binding for Single Knits (posted earlier today) at the neckline.
  • A similar technique at CF.  I cut a 1" S/A at CF and sewed the fabric, wrong sides together, letting the fabric curl at CF.  Later I decided 1" was too much and I trimmed it down a bit.  Probably 5/8" S/A is be best.  (This worked because I cut the top with the selvedge along the hem of the top -- 90 degrees off from the usual grainline.  So the knit runs vertically rather than horizontally.)
  • A floating pocket.
  • A back that is a few inches longer than the front.   (Still deciding if I like this.)
Floating pocket:


That's it.  I just love this sweatshirt and plan to make up several more in different fabrics - it's very quick to sew,  comfortable to wear, and flattering on my challenging shape (which I fondly refer to as "potato on toothpicks").  My only challenge came from using raw edge techniques with this particular fabric.  I think this fabric is what we used to call (years ago) a French Terry.  The right side is the usual interlock fabric, but the wrong side is a knit terry with little white loops.  While the raw edge of the grey (interlock) is well behaved, the terry side drops bits of white string and ravels badly.  I tried a couple techniques to tame it (like Fray Check), but in the end, I sewed down my little rolled "tubes."  I suspect that, over time, the terry side would stop dropping lint and behave, but I didn't want to take that chance.

Technique -- Reverse Binding for Single Knits

I will be posting two blog entries today.  This entry illustrates a technique I copied from very high-end ready to wear (RTW).  In fact, I saw it used on a sweatshirt priced at $180.  (And a beautiful sweatshirt it was, for several reasons.)

You may be familiar with the standard technique for binding raw edges using a strip of bias (in wovens) or across-the-grain (in a knit).  This technique turns that idea around - literally.

You need a single knit to use this binding.  How can you tell if you have a single- or a double-knit fabric?  If you gently pull the edge as it comes off the bolt, a single knit rolls towards the front.  A double knit does not roll.  You want to take advantage of the fabric's natural inclination to roll.

On this sweatshirt I used this binding on the neckline, but you can use it anywhere.  For example, a sleeve, hem, or pocket.


Step 1:  Cut a strip of your single knit about 2 1/8" wide and longer than you need.  (It can be wider and you can cut it down later.)  In my photo, the strip is on the left and the "garment" is represented by the larger piece of fabric on the right:


Step 2:  Sew the right side of the strip to the wrong side of the garment with 1/2" seam allowance (S/A).  If you are navigating around curves, such as on a neckline, you will want to gently stretch the binding as you go.


 Step 3: Wrap the binding around to the front of the garment.


Step 4:  Pin in place.


Step 5:  From the wrong side of the garment, stitch in the ditch.  As you sew, make sure that the raw edge of the binding (underneath) remains flat and does not get caught.


The finished edge will naturally roll towards the padded binding.


I'd love to see your applications of this technique.  :)

Friday, August 28, 2009

Vogue 8582 - Marcy Tilton top


Yet another swingy, long top with an assymetric hem.  Hmmm...  am I getting into a rut?  Please bear with me and I will try to do better next time.

This pattern, by Marcy Tilton, is really wonderful.  It features two different neck variations and each is lovely and worth checking out.  Views A and B feature a "twisted ribbing".  I saw this on one of Marcy's garments on her website a few years ago.  I emailed her and asked her how it was done.  At the time she told me she wasn't sure how she was going to release the technique.  Some time later, the technique was featured in her pattern and I'm so glad she chose this way of sharing it.  :)   I haven't made this version yet, but I have read the instructions and will be getting around to it at some point.

View C is a turtleneck with a twist.  Literally.  You sew the right side of the neck tube (one edge only) to the right side of the neck and turn the unsewn edge of the tube to the inside (wrong sides together).  But, instead of pinning in the usual way, you slide the edge a couple inches over.  As a result, the whole neckband is twisted.  This yields in a draped, "slouch" turtleneck which gracefully frames the neck.  You know how turtlenecks can sometimes have a mind of their own - they can sit there, all obstinate and stiff, well, not this one.

I made view C, with a couple of modifications.  First, I decided to put the floppy hip piece on both sides.  I like the original design, where it's only on one hip and the other side seam has a slit, but I had lots of fabric and just felt like it.  I made the second modification when I was sewing up the arm/side seam.  I felt it was too wide at the wrist so I used a 2" seam allowance there and tapered it back to the 5/8" at the elbow.  The resulting line is more flattering on me.

The fabric I used was a very cheap poly jersey.  Nasty stuff - it should have a huge sign posted on it in the store that says, "Do not even THINK of sewing this fabric unless you have a working serger!!"  I don't have a working serger at the moment, but the fabric was $2 per yard and I liked the color and drape.  Oh well.  The seams are on the inside, so their ugliness is hidden, but the only way to hem this nasty stuff without a serger (for me, anyway) is by hand.  So that's what I did.  At first I was going to leave the edges completely raw, but I played with the fabric after washing it and I didn't like how the raw edges behaved.  Raw edges can be dandy (and very high end) in more stable knits.

I've seen this same top in a boutique for about $170, made out of the same fabric, with serged hems.

Here's the top:


And here's the slouch neck:


Though I find this sort of top somewhat flattering on me and easy to wear, I promise my next garment will have different lines.  :)