Sunday, June 6, 2010

A Red Letter Day!

I posted my last blog entry in the wee hours of the morning and, when I woke up, I noticed that it was my 100th post and I now had 100 followers! I really really want to thank all of you who read, and post comments, on my blog. I started the blog, mostly as an experiment, and I have found I really enjoy it. Let me warn you that some personal chatter follows but, if you want, you can skip directly to the sewing bit.

There are so many benefits to blogging my sewing projects. First and foremost, I refer to my past entries all the time to remind myself how I made a particular project – especially any modifications I made, or what size I cut out, etc.

Then there are the photos. I am NOT a photogenic person. Most folks who have met me tell me I look better in person and I am mighty glad to hear it, given the atrocious pictures I take. My daughters, and particularly my youngest, tells me I am really hard to photograph because I look so stiff and... weird. It reminds me of that Friends episode when Chandler and Monica were trying to get a good engagement photo. Every time the photographer pointed the camera at Chandler, his expression became self conscious and strange, so they finally published an "engagement" photo of Monica and Joey. I can relate. It is almost impossible to find a photo of me before I started sewing because I hated photos of myself and usually was the one behind the camera.

But let me tell you about the upside of these photos. Wow, you might think you look a certain way in a mirror, even a full length mirror. But you can't really see the whole effect the way you can in a photo. All of a sudden, you can really see proportions, color, cut, etc. The photos have had a huge effect on my sewing. They have caused me to re-think my style, and what looks good on me, and have had a direct impact on what I sew. They are pretty powerful, even though I can't tell you how often I cringe when I look at them.

Finally, the biggest benefit of blogging is the community. I have met so many people and had so many great email exchanges because of my blog and my involvement in the Stitcher's Guild community. I have developed some close friendships as a result. How wonderful is that?!? I also belong to a truly wonderful sewing group, who really puts up with my foibles. Several of them read this blog and I love keeping in touch with them that way.

So, I really want to thank all of you. I know I am not as funny and adorable as The Selfish Seamstress, nor as clever and urbane as Male Pattern Boldness, and I do sometimes feel that I really need to push the bar to produce a blog worthy of anyone who might read it, so know I am grateful that you do read, and post. :)

You might know that I don't really participate in blogger awards. But I realize that those awards, in part, are a way of feeling more connected to the blogger. I try to keep my professional life and my hobby life very separate, but here are ten "facts you may not know about me", just for fun.

  1. By profession, I am a technical writer. I write primarily about the Java programming language. I like to think I can, at least, explain a process, or a product, in a clear manner.
  2. I have a degree in computer science from UC Berkeley.
  3. I do most of my writing, including the writing for this blog, directly in HTML. I am not a big User of Tools.
  4. Following my divorce, I enrolled in San Francisco State in the Masters program for Clothing and Textiles. I had a lot of undergraduate work to complete (since my original bachelors was in a very different discipline) but I had to drop out of the program about 18 months into it, because it conflicted with work. Shortly thereafter, the masters program in that department was axed. That was an extremely happy time in my life, even though I was twice the age of most of the students.
  5. I have been a vegetarian since the age of 17, when my mother unadvisedly said, "I wonder how long THAT will last!" when I told her. I love you mom, and rest in peace, but it has been 34 years, and counting. :) I was the healthiest (and weighed much less) for the few years I was vegan, but I have slipped off that mountain.
  6. I love to travel, but have done very little in the last 17 years (note: my eldest is 17), apart from a trip to Brazil 2 or 3 years ago. I once hiked the Inca Trail to Machu Picchu – a 5-day trip on foot. After that I spent two days rafting the Ollantaytambo River, which had some class four rapids. I hate roller coasters, but I love river rafting.
  7. I like to spell and don't really use a spellchecker. I have a friend who thinks that there is a spelling gene. You either have it or you don't. She doesn't. :)
  8. One of my current favorite TV shows is Drop Dead Diva. The new season begins tonight!!!
  9. The nickname 'Shams' came about when I copied my then-fiance's favorite underwear. It was a brand called Chams that his mother bought from Marks and Spencers in London. When they changed the style, he didn't like the new underwear as well, so I copied the older style and made him several pair. He wore them to shreds. I even mimicked the style and color of the original label, but I changed Chams to Shams.
  10. In real life, my first name is Sharon. But I really like my nickname Shams and will happily answer to that. :) Have you ever noticed that there are many Sewing Sharons?

And Now for the Sewing-Related Bit

There is a thread on Stitcher's Guild discussing the pattern that I blogged about last night - Vogue 8248. I posted the photos of my black and white tops and Kathryn gave me some great insight. I just love it when someone with a good eye weighs in!

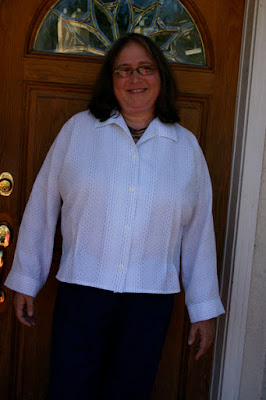
Kathryn pointed out that the wide "cuffs" on the white blouse were throwing off the balance of the top. For me, that was a "D'OH!" moment. I know the reason the pattern is drafted this way, however. This is a dolman style top, where the sleeve is cut as one with the front (or back). This type of sleeve doesn't have the fitting advantages of a set-in sleeve. If the cuff is very fitted, it's hard to, say, reach forward. However, this cuff is overly generous at the wrist, resulting in an unflattering line, so I took my remaining two buttons and made a pleat in each cuff. Sorry, I don't have photos, but I think you get the general idea. I didn't make it so tight that I can't slip it over the wrist.

I will try wearing the top this way and, if I find it is too restrictive for comfortable movement, I will just chop the sleeves off at the elbow. :)

Thanks so much, Kathryn!!! And if you haven't seen her blog, I Made This!, CHECK it out! She is AMAZING. I am in awe of her creativity, mixed with her facility with problem solving, and this beautiful package is encased in her truly generous spirit.

Vogue 8248 - Very Easy Vogue Blouse

I recently realized I need more basic blouses and this Very Easy Vogue caught my eye. It features dolman sleeves and fisheye darts, front and back. I particularly liked the notch-less collar on View A and decided it would be a good opportunity to use the technique demonstrated on Louise Cutting's Insider Techniques, Volume One DVD (published by Threads), on how to modify the draft of a collar to eliminate bulk at the center front and to cut the collar as one piece.

Nancy Zieman, Sandra Betzina, and others also teach this technique, and it's a good one. (I've been told that Nancy Zieman was the first to teach it years ago.) In fact, Sigrid recently posted a tutorial on this technique called Cutting a Collar in One Piece. And here is a Power Sewing video that shows the technique. (Just hit the Play arrow to view.)

I made the top twice. First, I used a white cotton shirting from Michael's with blue threads, in various shades, running through it. I made this top with long sleeves, as shown in View B. The second version was made from a black cotton voile from Fabrix. This fabric has wonderful woven black dots and I bought all that was left, but it was only about one and a half yards and 56" wide. Through painstaking placement, I managed to squeeze a short sleeved version from the limited yardage.

Based on the finished measurement at the bust, I used a size 20 (the largest size) and added a bust dart. (On a more close-fitting pattern, this is my standard size.)

Here is a complete list of the changes I made:

  • Changed the draft of the collar to use a single pattern piece for upper and lower collar.
  • Added a bust dart.
  • Omitted the fisheye darts on the back.
  • Replaced the fisheye darts on the front with four short tucks.
  • Added 1/4" to the side seam at the waist (for a 1" total increase).
  • Removed fabric from the side seam at the hip. (Not sure how much.)
  • Finished the side seam with slits (on the black top only).
  • Drafted a back facing.
  • On the white top, I topstitched most of the seams.
  • On the black top, I used French seams for the shoulders and center back.
  • Shortened both tops about 3". (I couldn't have squeezed out the black top if I hadn't.)

I did experience one problem when constructing the white top. The notch-less collar is designed so the top of the collar is narrower than the bottom. The bottom edge, which is wider, is sewn to the neck of the blouse. I accidentally made the collar upside-down, so I sewed the top of the collar (which is narrower) to the neck edge. This was very challenging to ease, as you can imagine, but I just thought that the pattern was poorly drafted. When the top was almost finished, I realized my error. Luckily, the poorly eased neck seam is hidden under the finished collar, and I didn't love the top (or the fabric) enough to rip it and out make a new collar, so I left it as-is. I made the collar correctly for the black version. If you look at both collars carefully, you can see that the angle of the collar on the white top is different than the angle on the black top, but I think it's quite wearable.

Here they are:

The first version, with the upside down collar, made from a slightly stiff, slightly crisp, white cotton fabric from Michaels.

On a hangar.

Collar closeup. You can see the reverse side of the fabric, with the threads running through it, just below the back facing.

Second version, with short sleeves, made from black cotton voile. I am wearing this with my cream linen/rayon/silk Trio pants.

On a hangar. The black cotton voile has more drape than the white shirting. Also, you can see the collar is right-side up.

Hem closeup. You can see the side slit right through the fabric. I may need to wear a tank under this one. :)

Saturday, May 29, 2010

No Jacket for YOU!

I really need jackets. And coats too. Really really. I have been admiring this Marcy Tilton jacket pattern, then admiration turned to covet when I saw Dorothy's, Dolcevita's, and sew2little's versions on PatternReview. I was concerned about the horizontal seam that runs just under the bustline, but, hey, I was able to modify the Heart's A'Flutter top to fit me, wasn't I?

After studying the pattern and looking at the finished measurements, I decided cut out the pattern tissue in a size 22. This pattern appears to be a bit more close-fitting than other Marcy Tilton tops, because I would usually use a smaller size. I pinned the tissue together for an initial trial, before adding the bust dart.

Yowza. My bust point was far lower than the pattern. In fact, I would have to lower the horizontal seam across the front by SIX inches and the back would require further alterations. Maybe it would be easier to get a bust reduction. ;)

Oh well. I don't really want to spend the whole weekend adjusting the pattern, though I think this design could be very flattering if I could get the fit right. Meanwhile, I'll admire it on the Dorothy's of the world and I'll have to find another use for my stretch denim and Riri zipper.

By the way, I've met Dorothy and she's even more gorgeous in person! :)

On another note: I have had a couple reports that folks are having trouble leaving comments on my blog. I have it set to accept comments from anyone, even anonymously, so I am confused. Is this happening to others? If you aren't able to leave a comment, please let me know via email. Not sure what I can do, other than complain to the overlords, but I would like to know.

Thursday, May 27, 2010

Sewing Workshop - Haiku Jacket

Buying fabric online has its inherent risks, but I mostly have been happy with my internet purchases. I like great denims, and when I saw this reversible denim on Gorgeous Fabrics, I loved it. It was called Reversible Soleil Denim, a perfect name for the stylized suns on the reverse side of the fabric and I had several jacket/coat ideas for it.

I bought the fabric, well before Christmas, on sale. When it arrived, I was a bit surprised how thick and stiff it was. The description on the website didn't clue me in. Think of the stiffest pair of jeans you have ever struggled to hem.

This denim is stiffer.

I have never before seen, or sewn, denim as stiff as this. But, it is gorgeous. :)

For several weeks, I threw the fabric into every dark load of laundry. I washed and dried it at least ten times. I abused it at much as possible, by throwing in tennis shoes, for example, but any softening was negligible. This denim wouldn't work for the designs I had in mind so, after showing it to a couple of friends, I reluctantly put it away.

One friend had mentioned she thought it might be a suitable fabric for the Haiku or Haiku Two jacket, from Sewing Workshop. That wasn't how I envisioned the project, so I forgot about it. When I recently unearthed it, I was determined to use it for a jacket of some sort. (I really need jackets!) I went through all of my patterns and, wouldn't you know, I decided to use the Haiku pattern, largely because it would feature the wonderful reverse side on the lapel. I guess she was right, after all. :)

The Haiku Jacket is officially out of print, but copies are still available through independent sellers, such as Vogue Fabric Store, and it shows up occasionally on ebay. The reason I chose the Haiku, instead of the Haiku Two (which I also own and is still in print), is because it is longer and less flared – it had more of the silhouette I wanted.

This is an older Sewing Workshop pattern, meaning the sizing is very generous. It is difficult to measure the flat pattern, but I was pretty sure that the small would work for me, so I made a muslin of the small. Other than being a tad long (which I decided to leave as-is), the Small was a perfect fit. In the Big 4 patterns, I generally wear an 18 or 20 on top, and usually add an FBA, so a Small (without FBA or any alterations) is generous indeed. And how rare is it for me to make something out of the envelope without any alterations at all???!! Pretty nice. :)

While this isn't a hard pattern to sew, exactly, it uses flat felled seams throughout, which was a challenge in this stiff fabric. However, the flat fell seam was an appropriate finish for denim, so that is what I used. Anyone who has sewn much with Sewing Workshop patterns is familiar with their wide hems made using oak tag templates and their generous use of mitered corners. This pattern was created before those techniques were adopted, but I used them anyway. The miters were especially important to minimize bulk in this very dense fabric and I used them on the bottom of the pockets, as well as on the bottom of the back facing.

The changes I made were minimal:

  • I omitted all interfacings (not needed!)
  • I omitted the rectangular reinforcements sewn on the inside at the top of the pockets.
  • I sewed the sleeve facings on inside out, so when I roll back the cuffs, you will see the reverse of the fabric.

Trying to sew seams that went across flat felled seams involved many layers of the thick denim. This is a good time to get out one of those "hump jumpers" or "thing-a-ma-jigs", if you have one, which I don't. When my presser foot was in the air, going over these thick spots, I folded a denim remnant several times and placed it behind and under the presser foot. A much cheaper, and more convenient, solution. I also made heavy use of my tailor's clapper during construction to tame the fabric, which was fairly resistant to laying flat when pressed. I was hoping to complete the jacket without breaking any sewing machine needles but, towards the end, when I was sewing the very challenging flat fell seam along the shoulder/top of sleeve (which is the last flat fell seam I had to sew), I broke the needle when going over many layers of the denim. Though I only lost one machine needle, many straight pins died in the construction of this jacket.

Detail on the inside, showing some of the flat fell seams and the sleeve facing.

Even before hemming the jacket, which I did early in the process of construction, I realized that the design was going to expose a bit of the solid blue denim at the bottom of the turned back lapel. I saw a few possible solutions to this problem, none of which excited me:

  1. Hem normally, causing the blue to show at the bottom of the lapels.
  2. Hem in the reverse direction, causing the suns to show at the bottom of the jacket, all the way around (except at the lapels).
  3. Bind the hem, which still presents the artifacts of the first two solutions, depending on which side of the fabric the binding uses.
  4. Don't hem the jacket, but use a zigzag or serged edge. (Though my serger is currently capable only of the regular overlock stitch.)
  5. Where the lapel folds back, change the direction of the hem. This didn't thrill me either, since I would have to slice the denim the width of the hem – it wouldn't be a clean finish.

After due consideration, I used the first option, but I am not loving that bit of solid blue that shows at the bottom of the lapels. Do any of you have a better suggestion? I even considered hand tacking on a bit of the "sun" fabric to cover up the solid blue - sort of a informal applique. When I looked through the Haiku gallery on the Sewing Workshop page, looking for other possible solutions, I realized that the posted samples either used a fabric where the front and back are virtually the same, or else didn't use the folded back lapel. Since I mainly chose this pattern to feature the reverse fabric on the fold-back lapel, this is a bit of a disappointment.

Despite the stiffness of this fabric, I do like the finished jacket. It's perfect for throwing on and running errands or taking a walk and, hopefully, it will soften up over time. I may make this pattern again, but next time would use a drapey fabric that is the same (or mostly the same), front and back.

This is one of those very rare times when I like the garment better on me than on the hangar. Unfortunately, I have no photographers available at the moment, so it will have to wait until another day.

Friday, May 21, 2010

Day 'O Fun - Yeah, it's Sewing Related :)

Today is a good friend's birthday (Happy Birthday, Renee!!!) so I took a few hours off work so the two of us could attend the San Francisco Bead and Design Show near the city's shopping district. Besides beads and jewelry (and the occasional button or purse handle...) there are a few designers at this show. One who produces nuno felted pieces, another who produces beautiful handwoven pieces, another who produces garments from a variety of fabrications, and the like. There is a designer we like and she has a booth at this show.

I was wearing my top with Marcy Tilton neckline and my Au Bonheurs pants and I wasn't in her booth for 15 seconds before the designer complimented the pants and asked, "Whose pants are those?" I resisted the immature response, "Mine", and told her about Au Bonheurs patterns and she asked me to write the name down. I think I've made another fan of those patterns. :)

I was very restrained and bought only a necklace at the show, but my friend found several beautiful pieces and, she deserved them. :) The show runs through Sunday so, if you are in the Bay Area, it costs only $10 for the 3-day run.

Shams says check it out. :)

Sunday, May 16, 2010

Report - Center for Pattern Design Workshop

Yesterday, I took an all-day class, offered through the Santa Rosa branch of the American Sewing Guild. (I'm not a member, but I'm thinking maybe I should join. :) )

This class, taught by Sandra Ericson, of the Center for Pattern Design, was called Your Proportion, and examined clothing from the perspective of a body's proportions.

We started with a slide show/lecture explaining the importance of proportion, the Golden Mean, and the ideally proportioned body. She gave us instructions on how to capture your own silhouette, then we broke into teams and taped huge pieces of paper to walls, windows, doorways, and proceeded to gather the necessary points to create a personal croquis. After connecting the points with straight lines, we drew an "ideal proportion" grid over the life size silhouette and transferred it to a graph on an 8x11 piece of paper. On the small croquis, it was now possible to see where our bodies differed from the "ideally" proportioned body.

What a fascinating exercise, and one I'd wanted to do for a long time.

Especially recently, I have been trying to figure out what sorts of clothing most suits me. When I first returned to sewing, I was focusing on tops and skirts. I tend to like longer skirts, but I also like longer tops and, of course, these don't generally work together. So I'd made a few shorter, more close-fitting, tops that I could wear with skirts or fuller pants. Because I have thin legs and hips, I also tended to wear pants that skimmed my legs, but one or two friends had mentioned that I needed pants with more fabric at the hem to create a more balanced look. From the photos taken for this blog, I could see that this is true – in narrow pants I had the silhouette of an ice cream cone in danger of toppling over. I have been thinking a lot about this lately, trying to figure out which path I should follow with my wardrobe.

So, what did I learn from creating a personal croquis? I learned that my shoulders, which I always thought so narrow, are actually fairly ideal, for my height. (Note, they are narrower than my bust, but for my height, they are only a shade narrow.) My hips are also a shade narrow for my height, but only a tiny amount. So, basically, my shoulders and hips are fairly "ideal", in terms of proportions. Not surprisingly, my waist is much larger than the "ideal" and is the same width as my shoulders and hips. (The ideal waist is half the width of the shoulders. HA! Not one of the 30 women there had the "ideal" waist.) That describes my proportions, horizontally.

Vertically, my bustline is far lower than the ideal. Even with my really good, really expensive, really supportive bra. My waist is also lower than the ideal – I am quite short-waisted. (No surprise there.) My hips are just a tad lower than the ideal, and my knees are higher than the ideal, so I guess I have short thighs and long calves. I knew my legs were short, but I didn't realize the shortness was in my thighs, but my calves are actually quite long. :)

At lunchtime, Sandra offered some personal suggestions for my body. She suggested that I get a shorter haircut, with more height to it, to help balance my body. She also said she couldn't overstress how important it was for me to focus on my shoulder line. That I should bring my shoulder line "up and out" and use it as a focal point. She said it would greatly help to balance my bust. She also said the hips would be a good focal point for me, and that an asymmetrical line is very good for me – especially tops/jackets that button off center. It's handy that I love asymmetric looks. :)

In the afternoon, we came back together for a lecture on the aspects of proportion. We started by looking at the ideal silhouette for our personal proportions, but then we talked about the impact of interior design lines, and creating a focal point. We learned about the proportion of texture, color, rhythm. It was a semester's course shortened to a few hours, so my head was spinning afterward. She talked about necklines, fabric choice, shoes, hairstyle. Thank goodness I took notes to go back over and study. :)

We had been asked to bring 8 or 10 pages torn from a magazine, to show looks we though would be good for us. Unfortunately, we ran out of time before we could really do much with them, but I guess that is left as homework. :)

All in all, a great workshop, giving me much to chew on. I know of sewists who travel far and wide to take of Sandra's workshops – for example, her Vionnet classes. I just might have to keep closer tabs as her Center for Pattern Design is located in St. Helena, which is only an hour or so away from me. :)

Thursday, May 13, 2010

Vogue 8397 - Marcy Tilton Pants

This Marcy Tilton pant pattern has been fairly popular on Pattern Review, especially View C. View C is a pant with no side seam. I have been wanting to make it but my first rendition doesn't use the pattern as designed. Instead, I decided to try out a version Marcy has shown on her website. Here are her two versions (click the pictures to take you to her pages):


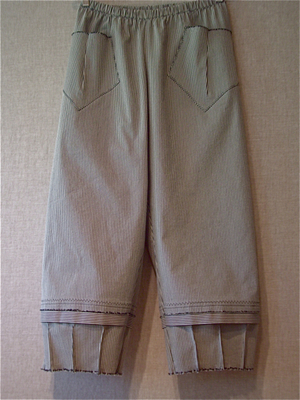
As you can see, Marcy has changed the pant detail at the hem. According to her page, she has created three 1/2" darts at the hem, tapering to nothing. From looking at the picture, I assume she has also put 3 corresponding darts at the back. When I made my pants this way, tapering them to nothing inside of the horizontal pleat, and tried them on, they looked unbalanced on my body, so I ripped the darts out and replaced them with 1/4" darts, tapering them to nothing about 1/2" away from the pleat. I also put a dart where the side seam would be and on the inside seam, so there were 8 in all, rather than six. I liked this look better.

The fabric selvedge serves as the hem of the pant.

The other detail Marcy has changed is the addition of the funky patch pocket. She gives a tutorial for creating this pocket. I created a template using her measurements and made the same pocket. That is the fabric selvedge at the top of the pocket.

My fabric is a navy linen/poly blend from Fabrix. I have enough to make another pair of summer pants and I'm thinking another pair of Marcy's panel pants with the horizontal pocket. :)