Friday, July 9, 2010

Happy Birthday to Me!

Hmph! My own kids have evidently forgotten about my birthday today, but I did get myself a little gift. I saw this set of books recently in a shop and was amazed at the quality of it. What we have here are two large sized, hardback books, published by the Kyoto Costume Institute about the history of fashion and called, conveniently, Fashion. The two large books slide into a nice quality slipcover. The two volumes cover the 18th, 19th, and 20th centuries, with the second book focusing on designers. The quality of the photos is amazing!

This set would be a deal at $100, and it lists for $60, but I got it from Amazon for $38! If you dropped this set on your foot, you would definitely break a toe or two, but Amazon shipped it for free. Really, if you love costume and fashion, do not miss this book!!! Years from now it will sell for mucho denaro on ebay.

This weekend, I hope to finish my trench coat!

P.S. I don't get anything for recommending this book. :)

Sunday, July 4, 2010

Happy 4th of July!

And, for me, it's a day of sewing. :)

Thanks so much for all the comments yesterday on my Au Bonheurs pants. Who knows, maybe in a few months, after they've aged a bit, I might like them better. We'll see. They did have one great purpose, however. Sewing up that pattern gave me enough justification to order a few more patterns from Au Bonheurs. :)

I ordered three more pants patterns and a skirt pattern. So, stay tuned! I do find that it is getting easier and easier to use these patterns as I get more used to the sewing French that they use. And the instructions are so terse, it's getting pretty easy to translate on the fly, though not, perhaps, that instructive. :)

On another subject, I have been wanting to make a trench coat for the last month or two. It's funny how an idea can seep into you, seemingly from nowhere. I'm not sure where the idea originally came from, but now, everywhere I turn, I see trench coats. Yesterday, I went into Neiman Marcus for the first time in a gazillion years (they are across the street from Britex, but I normally never enter) and I saw trench coats galore. I also saw Eskandar clothing up close for the first time. Drool.

Anyway, seeing those trench coats at Neimans really got my obsessive sewing juices flowing. I went back to Britex and bought some hardware for the trench. Last night I pin fit the pattern tissue, and compared the FBA princess technique in Fast Fit by Sandra Betzina to that in Fit for Real People by Palmer/Pletsch. There is no question that the Palmer/Pletsch approach, while more involved, will yield a better result, since the Betzina approach adds only length, not width, and doesn't affect the armscye at all.

Then, this morning, I rushed off bright and early to Fabrix to find some lining and piping fabric for the trench project. (One of the coats at Nieman's piped their coat with a very nice, malleable, vinyl fabric. I couldn't find anything like this at Fabrix, but I found a fabric that should work.)

So, I need to do the FBA, make a muslin, and get going on the real fabric. I'm itching to get off the computer and get started. :)

One of my kids is in New Jersey, and the other in Boston, (both were just in Nantucket, but have headed in different directions with different relatives), so I can really focus on sewing. I hope everyone (who celebrates) has a great 4th!

Saturday, July 3, 2010

Au Bonheurs des Petites Mains - Pants with Bottom Bands

I've been in a pant sewing frenzy lately, and I'm loving it. My poor skirts have been completely neglected in favor of making, and wearing, pants. The French pattern company, Au Bonheurs des Petites Mains has some very interesting pant designs. I decided it was time to try another pattern, so I pulled out PLH08003, which comes in sizes 36-46 and 48-52. (At least, I assume the larger pattern covers the size range 48-52, because I have the smaller pattern and it definitely includes size 46, though the web pages says it goes to size 44.)

This pattern has center seams, front and back, so there are four primary pattern pieces: center front, side front, center back, and side back. The waist is finished with waist facings and closes with a front zipper. A band attached to the bottom of the pants is sewn partway into the front and back seams. The pants are evidently intended to be cropped, based on the length of the pattern pieces, though the description doesn't mention this and you can't tell from the garment photo on the pattern.

As I traced off my size (46), I made the following changes:

  • I lengthened the pants 3", between the knee and the ankle, to make them full length.
  • I overlaid the Trio crotch/waist onto the pattern. The crotch curve from the original pattern is designed for a very slim, very small, young bum, and is low waisted. I raised it to my preferred waistline, and increased it so I could avoid a zipper.
  • I omitted the waist facings.

It's a fairly easy pant to construct, the trickiest bit being the bottom band and, on that score, the pattern is rather terse. (It gave better instructions on how to finish the waist, which is much easier to figure out.) Since I changed the waist and omitted the zipper, I used a slightly different construction. Here are the steps I used. If you are using a zipper and waist facings, follow the construction you would normally use, placing the zipper at center front, and interfacing the front (5) and back (6) waist facings before attaching. The band is attached after the legs are formed.

  • Sew the side front (2) and the center front (1) together, stopping at point A. Press the seams open.
  • Sew the center back (3) and the side back (4) together, stopping at point B. Press the seam open.
  • Sew the side seam of each leg.
  • Sew the inseam of each leg.
  • Sew the short ends of each band together, forming a loop.
  • Attach the band to the bottom of each of the pant leg placing the seam of the band at the inseam of the pant. When you come to the center front (or center back) seam, turn the band around the corner (you need to snip the seam allowance of the band to turn the corner), and continue to stitch up the center front (or center back) seam, stopping at point A (at CF) or point B (at CB). Break the thread, turn, and resume stitching back down to the hem. Turn at the corner (snip to the seam allowance again), and continue stitching along the hem. Attach the band all around the bottom of each pant leg in this manner, so that the band is stitched into the center front and center back seam, to point A and point B.
  • Attach the legs by sewing the crotch seam.
  • Finish the waistline using your preferred technique.
  • Hem each leg.
  • Voilà!

I admit I was on the fence about the pattern before I made these pants, but, in the spirit of adventure, was willing to give them a try. Now that I've made them, and photographed them, they are too fashion forward, even for me. Yep, I don't like the bands at the bottom. If I were to make them again, I would also tweak the fit to remove about 4" at the hips. Oh well, they will be fine to wear around the house. :)

I lightened the photo so you can better see the hem detail.

Tuesday, June 29, 2010

Sewing Workshop - Ikina Jacket, Salsa Top (#4), and Tilton Pants

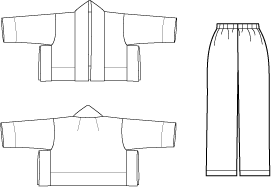
It's high time I made myself an Ikina jacket. I have seen numerous sewists who sing the praises of this jacket, which is reminiscent of a cropped kimono, but for some reason, it didn't bubble to the top of my pile, partly because I didn't seem to have the right fabric on hand.

Recently I bought 3 yards of a very yummy poly/cotton/lycra brushed twill from FabricMart. Originally, I wanted to use this fabric for the Sandra Betzina jacket, but when I realized that pattern wasn't working for me, I reallocated the fabric for the Ikina.

I.love.this.fabric. One side, as shown, has a brushed surface and looks sueded and the other side is slick and shiny, so it feels as if it's self lined. It has a lovely, weighty drape and a rich, warm color. The only downside is that it doesn't want to hold a crease, so I ended up topstitching every seam and every hem. Luckily, I love to topstitch and this fabric loves to be topstitched. :)

I made three changes to the pattern:

  • I eliminated the side vents.
  • I lengthened the jacket 3". This meant I also added 6" to the front band.
  • I added a hanging pocket.

What I did not do was an FBA. I decided I didn't want to. I like this jacket as designed; I knew it would be large enough (I made an XL), and I liked the hemline a bit shorter in front. For this jacket, anyway. :)

I had been warned about one tricky aspect of this pattern – the bias front band. At least in some "wobbly" fabrics, this can be very tricky to construct. A sewist friend who has made this jacket multiple times reported that you can achieve a perfectly good result with a straight-of-grain front band. And, of course, in a knit, a bias band is not necessary. However, I really wanted to use a bias band because I like how it lays around the neck and forms a small fold-back collar (if you want to wear it that way).

I diligently followed the instructions for ironing the bias band to remove some of the stretch and to form the curve it will have on the final garment. The band is folded in half, the long way, before creating the shaping. I basted along the folded edge to keep it in place. You then trim the band to 3 5/8" wide. I marked 3 5/8" and then basted just inside the marked line.

Trimming the front band. The shaping has been applied.

My thinking was to treat the folded band as a single piece – to sew it to the jacket in one go, then trim the seam allowance to 1/4", overcast the raw edge, turn it towards the jacket (away from the band), and to topstitch. I was hoping that this would help avoid some of the problems other sewists have reported when they follow the directions, which tell you to sew one edge of the band, then turn the raw edge under and hand stitch that edge to the inside. This is tricky with bias, at least on an unstable fabric.

Well, the final result was ok. It could have been neater, but it's fine so long as no one scrutinizes it too carefully. :)

I am wearing the Ikina with my new Marcy Tilton pants (Vogue 8637), made using cream ponte I bought from Marcy Tilton.

I am not too crazy about the excess fullness at the shoulder. I'm not sure how to tweak the pattern to fix this.

My hand inserted into the spiffy hanging pocket that I added.

Hanging pocket, up close. I sewed one side into the side seam. I think you can make out the stitching at the upper left edge that anchors the pocket to the jacket.

The final item in this ensemble (and yes, I made these pieces to go together) is a Sewing Workshop Salsa blouse. This is #4 of this pattern for me. This time I made it using an Anna Sui cotton/rayon voile from FabricMart. This fabric was sold by the panel, and I fell in love with it, but decided to use it as a border print.

I purchased three panels and was able to just squeeze out this top. I changed the grain to put the front edges along the border stripe. I also put the sleeve hems along the border stripe and, yes, I intentionally cut them to use the stripe asymmetrically. This is the 4th time I've made this top but the first time I've actually finished every raw edge, using either French seams or flat felled seams. It just seemed the right thing to do with this very fragile handkerchief-weight fabric.

When the top was complete, I tried it on and it didn't fit! I quickly realized the reason – this was the first time I'd used a woven for this pattern. Twice I'd used knits and the third time a stretch woven. The top was tight across the waist, but fit me otherwise, so I added little flanges at the sides. The fronts now button to the flanges, instead of the back. This gave me an additional 3" in the waist and it's now perfect!

The flange, with the buttons sewn to the edge. This fixed the problem where it was too tight at the waist.

And, if you are observant, you will notice that this fabric has polka dots woven into it!!! swoon! :)

Sunday, June 27, 2010

Ahhh... A summer weekend filled with sewing.

Ever since the first official day of summer, early last week, the weather here has turned cold and foggy. It's true San Francisco weather, where the summers are often cold and foggy. In fact, I've been turning on the heat most evenings because it's been 60 or 61 degrees in my house. Then I sit and read blogs and hear how sweltering it is in the rest of the U.S. It's been years since I've experienced a "regular" summer, like those of my childhood.

But today, on this Sunday morning, I dashed off early to the grocery store and was surprised to see gorgeous, crystal blue skies outside my door. There was actually sunlight streaming in through my kitchen windows, a rare phenomenon. There is street construction near my house, so I like to get out and back before the traffic gets bad.

I live a few blocks from the underground (yes, San Francisco has an underground, OTHER than Bart, but people don't seem to know about it) and when I returned, I saw people - men, women, and children - heading towards the underground in fair numbers, wearing Mardi Gras style beads, feathers, etc, and I realized they were heading for the Gay Pride parade and festivities. One guy, movie star gorgeous, was wearing a red feather boa over his otherwise conventional EHN-SAMBL. The sight of these happy and colorfully dressed folks put a smile on my face.

But, no running around for me. This is a serious sewing weekend, now that I've laid in some groceries. Yesterday, I finished a Marcy Tilton pant, an Ikina jacket, and I've almost finished a pair of silk PJ bottoms. Nothing ready to photograph yet, but I'm looking forward to being able to take the photos myself when ready.

I'm heading back to the sewing machine, but I hope everyone (or at least everyone in his hemisphere) is enjoying the summer weekend. Otherwise, enjoy your winter weekend. :)

Thursday, June 24, 2010

FREEDOM!!!

Since simultaneously returning to sewing last August and blogging about it, I have had one continuing frustration that I'm sure many sewists can relate to. Getting photos of my garments on my body. For this to happen successfully, the following had to align perfectly:

  • One of my daughters had to be around, and have the time, energy, and inclination to help me out. (Though, to be honest, various techniques of coercion were used on more than one occasion.) :)
  • I like to photograph outdoors, so the weather and time of day had to cooperate. (How often, during the winter months, was a photographer available only after dark had fallen.)
  • I had to look reasonably decent (though I sometimes slack on this requirement, if the other requirements are in place).

My kids are teenagers, both intent on attending college far away, and I sometimes found myself wondering, "It's hard enough now, but how the heck will I take pictures when they really aren't around?" Well, it turns out that the answer was easy. Far easier than I could have imagined, but I have to thank a Audi and her blog, Fashion for Nerds, who showed me the light. Audi takes great photos of her daily sartorial efforts. To do this, she says she uses a wireless remote with her Canon Digital Rebel.

Huh? Come again?

It just so happens that I use (and love) a very old Canon Digital Rebel. In fact, it was the first model released, the DS6041, which was later called the 300D. I wasn't sure a wireless remote would work with this model, but I started to do some research. The manual that came with the camera said it would work with an RC-1 or RC-5 wireless remote. More research told me that the difference between the two is that the RC-5 has the ability to take the photo immediately, where the RC-1 has the ability to take the photo immediately, or with a 2-second delay. The delay has the obvious advantage of allowing you to strike a more natural pose. I then discovered that there is a very low cost substitute for the RC-1, the Opteka RC-4 Remote Control for Canon, available from Amazon for $12.95!

I ordered the Opteka and it arrived in two days, with free shipping, thanks to Amazon Prime. The tiny remote works out of the teeny box, once you remove the plastic insert that preserves the battery. To set up the camera, push the little "clock" button on top, next to the shutter button, to put it into Self Timer mode, and make sure the camera is in Automatic mode. Set the camera on a surface and point it in the desired direction. Stand in front of the camera, push the 2S button, and assume a pose.

WHIRR... CLICK! (goes the camera, after adjusting the focus)

FREEDOM!!!

This is soooo easy! This changes everything! I can't think of the last time I improved my life quite so much for $12.95. :)

My next goal is to dig my tripod out of the garage, but I was delighted to find that you can buy a reasonable tripod for around $20.

I should add, the Opteka has three other buttons as well. The S, W, and T buttons in the lower box do not work with Canon DSLRs, like mine. Those are used with the Canon point-and-shoot models. I gather the S is for shoot and the W and T are for zooming in and out. I use the buttons in the upper box: the S button shoots immediately and the 2S button (my favorite) shoots after a 2-second delay.

Oh, I should also add, to take the camera out of Self Timer mode, push that little clock button again. You can tell if you are in that mode by looking at the LCD display on the back of the camera. When in Self Timer mode, a tiny clock is present in the display.

Wednesday, June 23, 2010

No Jacket for YOU! (Reprise)

As you probably know, I have been on a quest for a great jacket pattern. I have been looking for something a bit fitted, or at least not greatly oversized. I really thought this Sandra Betzina jacket would work for me! A sew group friend made this jacket. I loved it on her and thought it had great potential for me, though her body type is quite different.

My first challenge was the FBA. I needed to add about 2" of fullness and distribute it through the three front darts. Based on my tissue fit of the pattern, it looked like my bust apex was located in the direction of the middle dart. Once I figured out how to slice the pattern to adjust all three darts, I added fullness to all three, but put most of it in the middle dart. I made up a muslin. (I actually used muslin for once!) I tried it on and ... it wasn't quite right. First, my bust apex actually fell between the first and middle dart, but that didn't completely account for my dissatisfaction with the muslin – I wasn't quite sure what I didn't like about it.

Last Friday morning I attended a local ASG meeting. The host, and several friends attending, are good at fitting and have a great eye, so I took my muslin along. The ten or so women remaining after the meeting quickly concluded that the three downward darts were the problem – it just wasn't a good look for me. They suggested either 3 or 5 darts that angle upwards and fan outwards. They agreed that the fit of the jacket, especially the back, was otherwise good.

I sliced and diced the pattern further, creating five upward darts that were 3/4" of an inch apart at the side seam, and fanned them to 1 1/4" apart at the tips. I decided to use black ponte for muslin #2, because I was pretty sure it would be wearable. (HAH)

When I tried on the second muslin (the basic shell was constructed, though only one sleeve was attached), I wasn't happy. Part of the problem was caused when I sewed the 10 darts: I didn't stabilize them, so they were a bit distorted. But aside from that, they just weren't quite working.

Last night I took the second muslin to my sew group meeting. The general consensus of the group was that this jacket isn't for me, though, the overall silhouette is good.

At this point, I'm going to rethink the project. Since, except for the front of the jacket, the overall design and silhouette works for me, I may just change the front to use a princess seam. Or not. Maybe I will just move on to the next pattern. We'll see. :)

The five upward pointing darts. I topstitched them, adding to the wobbliness. If this had been the only problem, I could have fixed it in my next version by stabilizing the darts, but it wasn't the only problem.

Harputs

On the tangentially related subject (of jackets), yesterday I had an appointment near Union Square, so I decided to dash into Britex to see if they carried a notion a friend has been looking for. I was one or two doors away from Britex, when two jackets in a store window caught my eye and stopped me in my tracks. These jackets were absolutely beautiful and very unusual. Though I didn't have much time, I couldn't resist and I entered Harputs.

Besides selling garments from other designers, such as Yohji Yamamoto and Commes des Garcon, Harputs sells their own line of clothing. The incredibly friendly folks who work there were very excited to show me their line of clothing, which is manufactured right on the spot, upstairs, and designed by the people who work there. They have only been in this location for about 8 months. (The previous tenant of the space, evidently, was Prada.) The pride in their work was evident and the workmanship was beautiful.

I was fascinated by several of their designs, but I was particularly interested in the jacket I'd seen in the window. Their garments have cute names and are designed to be worn in a myriad of ways. But this jacket, which is a newer design and is not shown on their website, has three armholes, or rather, two sleeves and one armhole. I can't remember the name of the piece, but the right side is a fairly conventional jacket, and the left side is more of a wrap. When you slip the third armhole over the opposite arm (over the more conventional half of the jacket), the jacket front forms a soft cowl. It was absolutely gorgeous and they can make the jacket in any size, and customize it to fit, since they manufacture it right there. The price for this piece ranges from $650 to $780, depending on fabric, though all the samples I saw were black. My favorite was the black lightweight wool, underlined with a cream linen - I think it might have been a linen/rayon blend based on the wonderful drape.

I was also entertained by Lulu, Harputs' very cute mascot (a French Bulldog), who loves to visit Britex, next door, for doggie treats. :)

For more information on Harputs, check out this review, as well as yelp, but be aware that they are referring to their previous location on Fillmore. Oh, by the way, I get nothing from nobody, when I post reviews. Nada. :)