Saturday, October 30, 2010

Weekend Sewing... and Miscellaneous

Wow, I haven't sat at my sewing machine since Monday (and that was to briefly zip up a hem). This may be a first for me in the last year. I haven't been knitting either, though I've been planning some projects, thanks to the great Ravelry site. I'm shamzi on Ravelry, but I don't have much of interest to show you over there. (Must.buy.yarn.) There is a Miyake group there, but it's pretty quiet.

I have to really thank everyone for their generous and kind feedback on my Koos coat and my Sandra Betzina dress. The coat, in particular, has garnered me more positive feedback than anything I've made in the last 14 months, so I guess it's a success. It has received 43 comments on Pattern Review which is a record for me. :)

During construction of the coat, I had become a "fan" of Koos's Facebook page. Imagine my delight when logging into Facebook on Thursday and seeing that Koos (or his representative, more likely) had featured my blog on his page! I had not mentioned it on his page or anywhere on my FB page, so I suspect they watch Pattern Review for reviews of his patterns.

I really recommend checking out his page. There are photo albums that show many pieces of his current work - things that he sells in his New York boutique and there are some really great garments. (You may not know this, but Koos was responsible for those great, wild sweaters that Cosby wore on The Cosby Show.) In his current work you will see several pieces that feature the scallop - it's interesting to observe how a motif can evolve throughout a designer's process. It fascinates me, a designer wannabe. Check it out.

A stack of patterns sits next to me and I plan to make the most of this wet weekend. Maybe I'll have something new to show on Sunday or Monday. :) Coats and jackets are still on my mind and yesterday I ran to Britex at lunch (wearing my new Koos) to pick up some separating zippers for a couple of imminent projects. I yearn for a better zipper selection, but this is one of those things I prefer to see in person before I purchase. There are just too many interesting things to make, including new Au Bonheur pattern goodness.

And then, of course, are the imminent holidays. So many garments are "needed" for the various events coming up. I have a very fun piece of Thakoon fabric I bought from Emma One Sock months ago and I have been searching and searching for just the right pattern/design. I haven't found it yet. And I also have to find the right thing to make/bring for my sew group's gift exchange. I think I've decided, but I've thought that many times before.

Have a great weekend and a frabjous Halloween! ;)

Monday, October 25, 2010

Vogue 1210 - Sandra Betzina dress

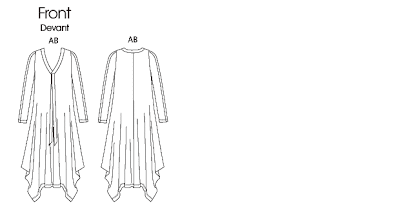
When I reviewed the recent batch of Vogue patterns, I pretty much wrote this Sandra Betzina dress off as "not for my figure." Fast forward to Artistry in Fashion, an event benefiting the fashion design program at Canada College and featuring Sandra herself, who spoke and presented a fashion show of her designs. Students from Canada's fashion program modeled Sandra's garments and the same dress from the pattern cover was presented, but it was worn with the ties hanging down, rather than tied under the bust. It was lovely on the student model and I realized that it might work for me.

It wouldn't be fabulous on me, mind you, because it would hang from the bust and completely hide my hips/legs, but, hey... Variety is the spice of life, and all. :)

Several months ago I bought this border print fabric from FabricMart (no longer available). Well, it's not exactly a border print. It is a polka dot print, but the dots are small on one selvedge and grow larger towards the other selvedge. The fabric is wide (maybe 60") and I needed a long garment to show it off. A top or pants wouldn't satisfy my desire to use the entire print.

Yes, that's right. My first dress. gulp

I first considered Vogue 8659, but decided I didn't want to interrupt the print with that curved hem. Sandra's design is reminiscent of that pattern, but is cut almost straight across at the hemline.

This fabric is a 4-way polyester ITY knit. I don't particularly like to sew or wear ITY, or slinky, knits, because I find them to be hot and they tend to hug (rather than skim) my lumps and bumps, but I was completely seduced by this beautiful polka dot print.

This fabric has most of its stretch in the lengthwise grain. I cut it on the crosswise grain, which is more stable, but I had no choice if I wanted the dots to grow larger as they approached the hem. Meaning that the stretch goes up and down the body, rather than around the body, which is how you would usually want it. Having the stretch go vertically is rather strange, but, wow, the dress sure does swing and flow, and when I jump up and down, the dress actually bounces. After I bought this fabric from FM, I later saw it on Marcy Tilton's site, so, between the two sites, there must be lots of us who now have this in our stash. :)

Materials:

  • Polka dot ITY knit from FabricMart.
  • Black mesh (for contrast) from Fabrix.
  • 1/2" Steam A Seam 2 (for hems)
  • 1/4" twill tape (to stabilize neckline)

Alterations & Modifications:

  • I cut out a size F, which was 4" too small in the bust. (This pattern allows for 1/2" finished ease in the bust, at least in the sizes I was looking at.) Instead of a traditional FBA, I just added 1" to the side seam at the bust and tapered it out after a few inches. I had to do this on the front and back side seam, and the front and back underarm sleeve seam - four pattern pieces were affected, in all. The side seams are sewn last so I knew I could take out what I needed - every knit has different stretch and you should tweak the fit here anyway. This approach worked well for this garment.

    Sleeve with added bit for FBA.

  • During construction, I removed 1/2" from the shoulder seams, before attaching sleeves.
  • As recommended in the pattern, I doubled the mesh for the sleeve insert.
  • I did not shorten the sleeves. This is very unusual for me, so I suspect that the sleeves are on the short side.
  • After the dress was finished, I shortened it 2". They recommend that you lengthen or shorten at the hemline, so this worked well.
  • After sewing the side seams, I tweaked the fit by removing 1/2 from the side seam, just under the bust - a 2" reduction in all.

This pattern was fairly easy to construct, with a couple caveats. The trickiest part is the neckline. Despite stabilizing the neckline with twill tape, once I had attached the contrast mesh band, it was far too baggy. Sandra recommends that you block the neckline, using steam, to encourage the band to hug the body, but there was no way any amount of steam would have fixed the floppy neck band.

Stabilizing the neckline with twill tape

After mulling it over for a bit, I decided that it was time to use a Marcy Tilton technique I had never used before. It felt right to combine their work, since Marcy and Sandra have been great friends for years. :) Marcy often creates outside tucks on her neckbands, which you can see on Vogue 8636. I'm not sure if I used the exact same technique as she uses, but I pinned in a number of tucks and started sewing. I kept adding tucks, without measuring, until the neckline fit the way I wanted it to fit. In the end, I added 18 tiny tucks.

Baby "Marcy" tucks!

Finished neckline. Photo lightened to show detail.

In order to reinforce the idea that these tucks were intentional, I also added tucks to the sleeve inset. They are hard to photograph, and very subtle, but they are there.

It's subtle, but there are 6 tucks spread across the length of the sleeve inset.

What do I think about this pattern? To be honest, I am not sure. It reminds me a bit of loungewear. Something I might wear before dinner when my friends drop by for cocktails. Wait, I don't do that. OK, I might wear it on the cruise ship apres swimming. Oops, not my lifestyle either. OK, how about I wear it when the doorbell rings and it's the neighbor reminding me to move the car because it's street cleaning day. Yup, that sounds more feasible. This knit is so heavy and drapey, and the print so dramatic, the great funky skirt shape is a bit lost, which is unfortunate.

When DD1 returned on Sunday afternoon, I put the dress on and styled it as I might wear it out. I nervously asked her what she thought and she really liked it and felt it was a rather dressed up look.

So, for me, the jury is out. I'm not sure if I will wear this out of the house, or to bed. What do you guys think?

Hangar shot

The shape of the dress

My knee fits perfectly into the corner!

Twirlability? Check.

Fashion DON'T. (I couldn't resist.) ;)

Pattern

A Bit of Knitting - Missoni Scarf

One of the sewing blogs I follow is The Selfish Seamstress. I enjoy the humor of her blog. She is a younger, petite sewist with a passion for classic and retro styles crafted in menswear fabrics. She has recently relocated from Canada to Europe and her sewing machine has been in transit, so she has been knitting in the interim.

I had been getting the itch to do some knitting recently (must be the season and the cooler temperatures), when I saw her latest project, a Missoni-inspired scarf, and I had to make one. This design uses the classic Feather and Fan stitch, and I was preparing to create my own, when she graciously shared her pattern. I had already located some Lang Jawoll Magic sock yarn - I loved the variegated greens in her scarf, but I selected the blue shades (color 84.0035, or 35, for short). Lang Jawoll Magic is a superwash fingering weight yarn that is 75% wool and 25% nylon. The zigzag design of the Feather and Fan stitch really highlights this yarn's tendency to stripe. I grabbed my size 7 (4.5mm) bamboo circular needle and off I went. The pattern is on her page, but here it is again:


Cast on 78 stitches:

Row 1: K
Row 2: P
Row 3: K3, * (K2tog) 3 times, (YO, K1) 6 times, (K2tog) 3 times. Repeat from * until 3 stitches remain. K3.
Row 4: K

Repeat all rows until desired length is reached. Bind off loosely.

Before blocking

Notes:

  • I slipped the first stitch of each row in the way it would have been knitted (or purled). This is an age-old technique that yields a more stable selvedge edge.
  • I ripped out many, many rows of this project. In fact, for the first 15 inches or so, I probably knitted it twice, because I did so much "unknitting". And that was after my first effort, which I completely frogged after a couple inches. I was really good at losing stitches, or forgetting the odd yarn over. Feh.
  • I used less than two skeins. The completed scarf was 56"x10-1/4" when relaxed.
  • This is a lace pattern, so you really have to block it to fully appreciate the design. I wet blocked mine, gently swishing it in a sink filled with warm water and Garnier shampoo (the current "regular" shampoo in the shower). I emptied the sink, refilled it with clean warm water, and rinsed the shampoo out. I put the scarf in a clean dry towel, rolled it up, and removed as much water as possible. I then laid out the scarf on two towels on the carpet. I arranged the scarf to 80" x 12", coaxing the scallops into shape, and secured them with lots of pins, stabbing directly into the towel/carpet. I didn't bother pinning the sides of the scarf, but smoothed it with my hands. Because it was a rainy day, I pointed a small rotating fan at the scarf to encourage it to dry more quickly.

    Proper blocking is no laughing matter, Jack!

Lacey goodness, post blocking.

Fini

Now that it's done, I'm a little sad. I finally got this pattern down and now it's over. I need a new knitting project. :)

Thursday, October 21, 2010

Vogue 1213 - Koos van den Akker Linen Coat

This is a long post. Maybe you want to skip the text and just see more pics. :)

Omigosh, do I love this pattern!

I liked it when it came out. I ordered it during the big BMV sale a week or two later. It arrived, along with all the other new pattern goodness, and, much to my surprise, I just knew I had to make this one first. I didn't expect that when I ordered it, but once I had the pattern in hand, I immediately envisioned the project and couldn't wait to get started.

Luckily, I had the perfect fabric on hand. Months ago, I purchased 6 yards of a "denim linen" from FabricMart (it's no longer available). I washed and dried it several times. This is truly a denim linen and not just a denim-colored linen. It is woven in a twill weave, just like denim. The warp threads are white and the weft threads are indigo-colored, resulting in that typical yarn-dyed denim effect. The only difference from standard denim is that the fiber is linen, so the resulting fabric has a nice drape and wrinkles like crazy.

I had trouble finding a suitable lining fabric. I bought at least three different potential linings from Fabrix, but none worked. It's difficult to match blue, especially this heathered, indigo shade of blue. I dove into my stash, but came up empty handed, at first. Finally, I found a sueded, sandwashed rayon that I bought from FabricMart maybe 6 months ago that worked pretty well. I purchased the fabric just after attending a lecture by Sandra Ericson where she talked about making Vionnet (and similar) bias garments. Someone asked Sandra how much fabric she buys and she answered that when she finds a nice, drapey rayon she will usually buy 5 yards for a dress, so that's what I did. I still have a couple yards left – I am not making bias dresses anyway. ;)

Materials:

  • denim linen from FabricMart - I used about 5 of the 6 yards
  • slate blue sueded, sandwashed rayon for lining, also from FabricMart - you need more than is called for if you want to line the sleeves
  • 2 spools Gutterman cotton topstitching thread, color 20 (white)
  • white tricot fusible interfacing from Fabrix
  • 4 1-1/4" shank buttons from Fabrix
  • 4 5/8" clear buttons from Fabrix

I often make muslins, but I couldn't bring myself to make one this time, partly because I'm running out of fabric suitable for muslins - I can't keep cutting up my kid's bed sheets. :)

Instead, I pinned the pattern tissue together, tried it on, and decided I needed an FBA. Vogue gives the sizing of this pattern as "Very loose fitting" and they are right. According to the pattern, the finished bust measurement is 48" for a size 14, 50" for a size 16, 52" for a size 18, and 54" for a size 20 (the largest size). Usually, I cut out a size 20 and have to add an FBA to add width at the bust, but this time a size 20 was plenty big in the bust.

However, I still needed an FBA to add length - without it the hem of the coat would be shorter at the front. So, this time I used Sandra Betzina's princess seam FBA, from the book Fast Fit, which adds to the length only. I added 1" to the front pattern piece. For the middle front pattern piece, I added 1" to the side that is sewn to the front piece, tapered to 1/2" on the side sewn to the side front. On the side front, I added 1/2" to the side sewn to the middle front, tapered to nothing at the side seam (remembering to hinge at the 5/8" seam line to maintain the overall length of the seam). I also lowered the bust "bump" on the middle front several inches to my actual bust line. I applied the same alteration to the front lining pattern pieces.

I imagined this wonderful design a bit differently than shown on the pattern. First, I wanted to fold down and sew the scallops to the coat, rather than have them marching at attention along the seams, mimicking the back of a T-Rex. I also wanted to use a single fabric, rather than 6 contrasting fabrics. To ensure that the scallop detailing wasn't lost, I topstitched the seams with white topstitching thread.

A couple notes about the scallops: If I had thought this through a bit better, I would have realized that a twill fabric is not going to yield easily to scalloped seams. A twill weave is a diagonal weave, meaning it behaves differently depending on whether the bias angles to the left or the right. Scalloped seams have, by definition, bias in both directions. Creating a smooth scallop is not easy on a twill fabric. I was very painstaking when cutting and sewing the scallops, but they are not perfect. Of course, this isn't entirely my fault because the pattern scallops were apparently drawn by a human – they are not even - they vary quite a bit. I really don't care, but keep this in mind.

If you find the scallops too "unusual", it would be an easy matter to fold them down on the pattern before cutting out the fabric. I did this when I created the lining pattern for the sleeves.

Scallop construction

Folding out the scallops for the sleeve lining.

How many scallops? The body of the coat has six seams with six scallops each. The sleeves have another five, so there are 46 scallops total.

What is the deal with the buttonholes? I think of the buttonhole treatment as a quasi-bound buttonhole. You first sew a lined square - similar to an empty beanbag. Markings are transferred to the square, which is then sewn to the inside front facing. The buttonhole is cut, and the square is pulled through to the front. The opening is top-stitched, encasing the raw edges. The fabric square, which is now on the front of the coat, is pleated and topstitched to create a decorative bound buttonhole.

Pattern alterations and construction notes:

  • The pattern tells you to interface the scallops. This might be a good idea if you plan to let the scallops stand up, as designed, but I omitted the interfacing since I planned to stitch them down and didn't want them to have a different "hand." I did interface the front band, the collar, under collar, and collar stand. However, since the scallops aren't interfaced, stitch and handle carefully so as not to stretch the bias portions of the seam.
  • I narrowed the shoulders approx 3/4". I could have narrowed them even further.
  • There are no shortening or lengthening line on the sleeves. This is because the scallops run along the entire length of the sleeve. I needed to remove length, so I removed about 1/4" from each of the five scallops. (I folded approx 1/8" - 3/16" from the fullest part of each scallop, perpendicular to the grainline.)

    Shortened the sleeves by removing 1/4"-3/8" from each scallop.

  • The body of the coat is lined, but the sleeves aren't lined. I created my own lining by folding the scallops down, creating a straight line. I realized this fairly late in the game, so I sewed the sleeve lining in and then bound the armscye with a bias linen strip.

    Creating the sleeve lining by folding out the scallops.

    Lining. You can see the bias strips finishing the armscye.

  • The decorative buttonholes are a multi-step process. You first create a lined square, transfer the markings to the square, and sew it to the inside of the right facing. Cut the buttonhole and pull the fabric to the outside. The topstitching is done in three steps. First, stitch around the buttonhole. Then stitch around the outer part of the square. Finally secure the tucked portion of the buttonhole.

    Steps one and two of the topstitching are finished.


    Completed buttonholes

More Pics!

Lining

Topstitching goodness!!

Worn closed. Remember this scarf? My friend Renee made this this silk Nuno scarf for Christmas last year.

Hangar shot

Without scarf.

What do I like about this pattern?

  • The fit and flow of this great silhouette. If the scallops seem weird to you, it is easy to fold them out of the paper pattern, so don't let that deter you from this great design with lots of RTW details!!! You can also use regular or standard bound buttonholes and eliminate the decorative buttonhole detail. I'm just sayin'. :)
  • All the delicious topstitching goodness!!!

    Some of the great topstitching!

  • The unique quasi-bound buttonholes!
  • The collar with the collar stand. The stand doesn't extend all the way to the front edge of the collar, which is unusual, and it feels like high-end RTW. The under collar is cut on the bias and is slightly smaller than the upper collar, so it's easy to create a collar that falls beautifully.

  • The "two" princess seams in front, one has the scallops, and the other has the pockets, so the fit is so nice and the pocket is placed at a more natural location.
  • The bias band that finishes the hem.
Buy this pattern before it goes out of print! :)

How could one not love this line drawing? It reminds me of a Picasso, with the squiggly lines, and buttonholes that look like eyes stacked on top of each other! That little horizontal line at the bottom looks to me like the bemused mouth – it's actually the word "FABRIC" shrunk to a tiny size. :D

Postscript: After the coat was nearly finished, I moseyed on over to the discussion boards at Pattern Review. In the "New patterns from Vogue" thread, I saw that this coat had received some rather cutting comments, and had been dubbed the "Stegosaurus Coat" or the "Stego Coat." I love the nickname, but those reviewers really didn't see how marvelous this pattern can be. I want to make it again and already know what fabrics I would use for it (yes, next time I would use more than one fabric and I might even leave the scallops standing up).

Sunday, October 17, 2010

ASG, PIQF, Iron - Report!

It feels as if I haven't blogged forever, though it's just been a week since my iron post. But it is my second weekend intensively sewing the same project and I'm still not done! This one is fairly labor intensive, but I'm hoping to have it done in the next few evenings. The post is mostly written, so I just need to finish and get some pictures.

Meanwhile, I had a fun day on Friday! I don't always attend my ASG (American Sewing Guild) meetings because it means taking time off from work, but I managed to make it this month. Everyone was encouraged to muslin the Loes Hinse Oxford pant. This pant was selected because it's reputed to fit a wide variety of figures and we found that to be true. My muslin, made from a very light lining fabric, is too sheer to share publicly, but I hope to make up a pair, or three, of these pants soon. The ASG group recommended a very simple alteration, so I just need to select some fabrics and get sewing. It is a flattering pattern and very suited to the more mature figure.

After the meeting, I rushed off to PIQF (Pacific International Quilt Festival) in Santa Clara. I used to quilt obsessively, so I am quite familiar with this conference, and I still remember the indigo dyeing and shibori dyeing classes I took there long ago, but I hadn't attended in years. Now that I am back into sewing garments, I looked at the vendors with a new eye. You can see in the above photo some of my booty. I bought some nice separating zippers for $7 each, some very interesting buttons, some Collins Wonder Tape (previously, I'd only found the Dritz version), and a couple cleaning devices for my machines. The four "sticks" shown in the photo are wooden beads that the seller (and artist) had airbrushed. They are really beautiful and only $1 each, but I'm not sure how to use them. I also bought a couple pieces of jewelry and a purse pattern, not shown in the photo. Everything I bought fit into my purse, so I was feeling good about my apparent restraint. :)

There were a few questions/comments about the Digital Velocity iron I recently purchased. I've now used it for a couple of weeks and I continue to love it. But let me address some specific comments:

  • Robin asked if the point is "pointy" enough. Robin, it seems to be. I'm not sure what your criteria is, but, so far, the point is pointy enough for me. Do you require a specific angle? Maybe I can find a protractor and measure it for you.
  • ReAnn asked about the recommendation on Amazon to buy replacement filters. I was a little surprised by this - I'd totally missed that. From what I can tell, the filters are used by the anti-scaling system. I am not using the anti-scaling system - so hopefully I won't need any filters. Do I even need a anti-scaling system? Does my water have scales? :)
  • Nancy says her sewing instructor has two of these irons and one has developed a leak. Quel horreur! I hope this is an anomaly and not the norm.

Another nice feature of this iron is that it has very few holes in the stainless steel sole plate. There are just a few towards the tip of the iron and then there are little grooves that lead from the holes, towards the bottom and curve towards the sides. So you don't get lots of unfused "holes" when you fuse interfacing that you have to go over to eliminate. My current project had quite a bit of fusible interfacing and it worked great!!!

Another thing I should mention is that when you turn off the iron, at least the way I do it by turning off the power strip, you lose the "settings". When you turn it back on, you have to reset the temperature and disable the auto-shutoff again. (This is done by holding down the steam button for several seconds until a "pause" symbol appears (two parallel lines)).

I hope everyone has a great week. I really need to finish my current coat, so I can move on to other projects!

Sunday, October 10, 2010

Reliable Digital Velocity v100, How Do I Love You!?!?!?

Last week I moaned about the demise of my Bernette ProGlide Plus iron, which had served me well for many years. It had been developing cracks in the plastic over time, but the final straw came when I dropped it.

SIGH

This happened when I was in the middle of making a Miyake coat, so I ran out and bought the only iron I could find without auto-shutoff, a cheapie Black and Decker.

Wow, what a piece of junk. I have heard sewists say that they were satisfied with their Black and Decker irons, but they must have been talking about an older, better-made model. I couldn't possibly fuse interfacing with this thing.

What else could I do? I ordered myself a Reliable Digital Velocity v100. It arrived on Wednesday, but I had a very busy work week and I didn't open the box until Saturday morning.

OMIGOSH.

This iron is AMAZING!!!

First, this iron is heavy, the way a good iron should be. It's not too heavy, but it's heavier even than my ProGlide. The iron does have an auto-shutoff feature, but you can disable it. This thing creates steam like there is NO tomorrow. Even on the coolest setting, it creates buckets of steam.

The negatives are very minor, but I should mention them. The manufacturer recommends using soft water. I had read that it required distilled water, so I'd purchased it even before the iron arrived, but if your tape water is soft, you can probably get away with using it. When the iron is creating steam, it hums. There is a button on the handle which toggles the "humming"/steam mode and my hand sometimes hits it accidentally. I'm still figuring this out.

I have been sewing on linen all weekend, using my new iron. I am loving it so much and having so much fun with this project, that I could barely tear myself away to even write this blog post. It may be another week or so before I can get this project finished, but had I known this iron would be such a joy to use, I might have dropped my ProGlide much sooner. ;)

Postscript: I did take that nasty B&D back to Target this morning. I got my $13.10 refunded and took it to JoAnn's where I spent it all on topstitching thread for my current project. A much better use of that money!

Sunday, October 3, 2010

Vogue 1069 - Issey Miyake Embroidered Wool Coat

As Self Stitched September was waning, I was beginning to get a hankering to make a coat... or three. When I ordered this embroidered wool fabric from Fabric Mart months ago (it's no longer available), I was surprised when it arrived. It was quite thin, kinda rough, but very drapey. I can't remember what I originally had in mind for it (and maybe I had nothing in mind at all), but I was perplexed when it arrived - it reminded me of a thin army blanket that had been embroidered. I put it away.

Later, I cut a square and threw it in a load of laundry to see what would happen. It felted up, so was less thin, but much of the embroidery unraveled and I really didn't like the result, which was now thick(er) and still rough.

Some time later I was at a friend's house and she had this Vogue pattern laying out. I had never really paid attention to this Miyake pattern before – it looks so... conventional. ;) But I started really studying it and it had some features that I liked: the shawl collar, a shoulder princess seam that curves to the side seam, the slight fullness at the hem, and a sleeve gusset.

Actually, when you open up the pattern, it is more interesting than it first appears. The seams are all sewn as lapped seams. The sleeve and the curved piece at the side are both cut together - and that pattern piece is where the gusset is attached. The front band and shawl collar are a single pattern piece. You cut out two of these, sew in a tuck and a large dart to create shaping, seam them together as center back, and then attach to the coat backwards. The lining is then attached and the collar is brought around to the front and partially attached. The rest is left unsewn, so it flaps open when you move and the wrong side of the fabric can show.

Materials:

  • Navy wool with embroidered rayon squiggles from FabricMart. (They no longer have it on their website.)
  • Slate blue poly charmeuse from Fabrix for the lining.
  • Leftover black, diagonal poly used to line my McCalls 5525 trench coat - used for the pockets.
  • Two size 10 (3/4") black Dritz sew-in snaps.

I cut out View A (the shorter version) in the largest size (20) and made some modifications before the constructing the muslin:

  • A princess seam FBA on the side front. (I didn't modify the side piece that is attached to the sleeve.)
  • Shortened the sleeve by 4".

Modifications and alterations after the muslin:

  • The sleeve is a bit narrow at the bicep. I widened it 1" at the top of the sleeve, tapering it to nothing at the elbow. (This widened the sleeve a total of 2" at the bicep.) I had to move the gusset slit – I traced off the original gusset slit and then moved it to the new location and copied it.

  • After making the muslin, I tweaked the FBA further.
  • I drafted a pocket in the princess seam.

    The pocket pattern that I drafted, next to a pocket sewn into the coat.

  • The pattern calls for lapped seams that are zigzagged. I didn't want to use this construction because of the rayon embroidery, which tends to ravel where it's cut. I used conventional right-side-to-right-side seaming. This required thinking ahead, especially for the collar.
  • I managed to lose the gusset pattern piece, so I drafted a new one.
  • The pattern calls for hidden buttons/buttonholes and I was planning to do that. But when the time came, I decided to use snaps instead. The biggest snaps I had on hand were size 10s (3/4"), but I would have used bigger ones if I'd had them on hand.
  • Where the embroidery looks like it might unravel, I applied Fray Block.
  • After the outer coat was constructed, I took it in a bit at the side seams. I always do this final tweak at the end of construction.

Worn open

Trying to show how the front flap opens to reveal the wrong side of the fabric - but the camera went off a bit too soon. :)

Flashing the lining. Silky soft to wear, nasty to sew. I didn't mention it in the text, but I also did a bit of gathering at the bust to fit around the cure. This was accomplished in the wool shell as easing, but you can see the slight gathering in the lining, particularly on the left side.

Pocket closeup

Used 3/4" snaps instead of buttons

Reverse front flap is left partially unsewn.

Conclusion

This is a fun unstructured coat. I'm not sure how flattering the wide hem is, but I will see how I like it over time. It really needs pockets,so I would recommend adding those. And the bicep is narrow, so I recommend making a muslin first. Because the way the coat is constructed, the shawl collar is formed at the very end. I find that it's a bit "messy", as shawl collars go. It doesn't lay as well as one might like. I'm not sure if this is a result of the FBA or not. It's ok, and I like how full it is, but it's a bit fussy.