Tuesday, September 6, 2011

Tutorial - Style Arc Jacqui Pocket

Finished pocket

First, I want to thank everyone for your kind comments on my Jacqui coat!

I just love the curved pockets featured on this coat. However, I found the instructions a tad terse. What confused me most was one of the terms used. Have you ever heard of a pocket bearer? I hadn't. Once I realized that one of the pattern pieces is named the "pocket bearer", the text wasn't quite so confusing.

Out of curiosity, I googled the term. It is an industry term. Apparently, it is the term for the part of the pocket that is against the body. (Perhaps it is so-called because it bears the weight of the pocket.) The pocket lining is the part of the pocket against the garment. That is probably not the most correct description for pocket bearer, but it seems to be pretty accurate.

Empirically speaking, anyway. ;)

By the way, I'm sorry I don't have better pictures, but I took these as I went along and I was very focused on making the pockets correctly. I made the pockets last - the entire coat (sans lining) was finished, so it was a bit nerve-wracking as I could have ruined the entire coat with one fell snip.

To make this pocket you need:

  • the pocket bearer - cut from the fashion fabric (though I don't see why you couldn't use the lining fabric)
  • the pocket lining - cut from the lining fabric
  • the ribbing - cut from the hem of the cashmere sweater (in my case)
There is a pattern piece provided for each of these.

Note: it occurred to me once the pockets were well along, that it would have been prudent to reinforce the pocket area with a fusible interfacing on the wrong side of the coat fronts where the pockets would be positioned. I suggest you consider this step - I was a bit surprised at myself for not thinking of it sooner. Oh well. :)


Step 1

Oops. I thought I took a picture before I sliced into the tracing, but it wasn't in the camera.

  • Trace the pocket placement from the front pattern piece onto tracing paper. (I don't cut the slit at the time I cut the coat front for several reasons, but you can do it then if you wish.) Make sure you mark the location of the side seam on the tracing. (Ignore the wonky side seam lines on my tracing - my side seams vary from the original because of my unusual FBA.)

Step 2

  • Lay the tracing onto the coat front, exactly where you want it to be located. (Mine was 14-1/2" up from the bottom of the coat.)
  • Pin the tracing to the coat (triple check that it's in the correct location). Cut through both the tracing and the fabric, along the "split" line. Transfer the "x" mark at the end of the split to the fabric. (I used a tailors tack.)
  • Unpin the tracing and set aside. You will use this for the other pocket.

Step 3

  • Pin the "pocket bearer" to the top of the slit, right-side-to-right-side.
  • Sew with a 1/4" seam allowance. Stop stitching exactly at the end of the slit - do not stitch past it or you will have trouble when you turn the pocket to the inside in Step 6.

Step 4

  • Prepare the ribbing. I was using a single thickness of ribbing, so all I needed to do was to turn under the raw edge about 1/4" and whipstitch it to itself. The other edge is secured into the side seam, so I left it raw.
  • Pin the ribbing to the bottom edge of the slit, right-side-to-right-side and raw-edge-to-raw-edge.
  • Stitch with a scant 1/4" seam allowance. Sew up to, but not past, the end of the slit.

Step 5

  • Pin the pocket lining to the bottom edge of the slit, on top of the ribbing, right-side-to-right-side.
  • Sew the lining with a 1/4" seam allowance, on top of the previous stitching.

Step 6
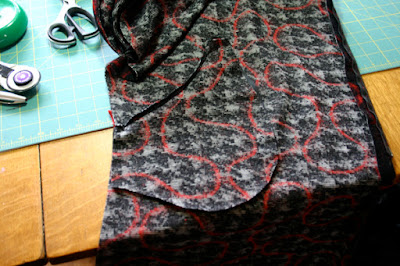
  • Push the pocket bearer and the pocket lining through the slit to the wrong side.
  • Arrange all the pieces so they lie flat and aligned. The ribbing folds up to the outside of the coat, but the ribbing's seam allowance folds to the inside with the rest of the pocket.
  • Making sure everything is flat and aligned, pin the pocket lining to the pocket bearer.
  • Stitch around the curved pocket shape, creating the pocket bag.

Step 7

Finished pocket

  • Stitch the finished edge of the ribbing in place - this is the upper edge of the pocket. If there is any wonkiness at the end of the slit, you can probably tweak the ribbing to cover it. I hand stitch this short seam, but you can machine stitch it if desired.
  • Finally, secure the pocket and the ribbing to the side seam. I pin it and then stitch, but you can baste.

Step 8

  • Flip the tracing and place on the other front, at the same relative location. Repeat the process.


VOILÀ!

Monday, September 5, 2011

StyleArc - Jacqui Sweater Coat

More pics

Labor Day weekend is almost over. I used it to make a Style Arc coat. Yes, it was fun. :) I'd hoped to get more done this weekend, but shopping with daughter, and napping also occurred. Who says my life isn't full? :)

I bought this wool sweater knit from Fashion Fabric Club last winter. This fabric is interesting. If you look at one of the closeup pics, you will see little "white" patches. You can actually see through those areas if you hold the fabric up. In the "non-white" areas, it's pretty beefy. The knit is stable, but I knew this was one I didn't want to preshrink by tossing into the washing machine (I could tell it would felt like crazy), so I took it to my local dry cleaner to have it steamed.

Has your dry cleaner ever argued with you that it was pointless to get wool steamed? That it would "do nothing", not even shrink it? Mine did. Her English is poor, so I didn't belabor the point, other than to say that I wanted them to use LOTS of steam and for it to be single layer - no creases. I didn't measure it beforehand, but I do think it shrunk; the texture felt different afterwards. She charged me $10 for the 4 yards. Lazy me felt it was totally worth it.

I wanted wool ribbing for this coat, which, as you know, it harder than heck to find as yardage. I went to Thrift Town to see what I could find ready-made. Wow, too many people are upcycling these days, because I could find almost no wool sweaters of any kind. I looked in both the men's and women's sections and they were almost picked clean. All I could find was a black sweater and this red 100% cashmere turtleneck in a women's medium for $10. I was plenty grateful, believe me.

I mail ordered the zipper and the Bemberg lining. Sometimes it takes awhile to collect the things you need for a project.

Materials:

  • 100% Wool Sweatering from Fashion Fabric Club (no longer available).
  • Black Angel Weft fusible interfacing from Apple Annie's for the front and neck facings, and for the hem.
  • Red 100% cashmere sweater from Thrift Town ($10). I harvested the ribbing from the sweater for the neck, wrists, and pockets. The sweater tag indicated that it was a Bloomingdale's brand.

  • YKK #5, 30" black, antique brass, two-way, separating zipper from ZipperStop. (I bought the 36" and had them customize it to 30" for $1.) I don't like an overly long zipper.

    Bottom of separating zipper

  • Black Ambiance Bemberg lining from Vogue Fabrics.

Alterations and Modifications:

  • I started with a size 18.
  • 3" FBA (into raglan seam) in both the front and the front lining pattern pieces. Also lengthened the front facing to match.
  • I did not use any of the ribbing pattern pieces, which are intended to be doubled. I used the single thickness ribbing from the sweater. The dimensions of my ribbing (both width and length) weren't exactly the same as the pattern.

    The collar, in process

  • Shortened the sleeves by 2".
  • Moved the shoulder "bump" at the top of the raglan sleeve inwards. The pattern is drafted for a wider shoulder than mine.
  • I tapered the side seams in about a 1/2" at the high waist. I could have fitted it even more, but I wanted this coat to have a relaxed fit.
  • Once again, I used Marcy Tilton's video instructions for inserting a separating zipper that is featured on her Inspiration Paris CD.
  • The instructions tell you to bag the lining, but I am not a fan of the bagged lining. I sewed mine in by hand.
  • I was a bit confused, at first, by the instructions for constructing the curved pocket. I took a few pictures and created a tutorial. Once I figured it out, it was not at all hard.

Conclusion

I really like this coat! It's not too heavy, and it will be perfect for chilly San Francisco. The fabric is a bit scratchy, so it's perfect with the lining and the cashmere at the neck and wrists. Yummmm...

Once again I am impressed by Chloe's attention to detail when she drafts her patterns.

When I went shopping with DD1 at the Thrift Store on Saturday (she needs clothes for her new job), I found this great gathered red scarf. It still had the brand-new Limited Edition tags but I got it for $13. Shams likes. :)

(In these pics, I am wearing my favorite pair of Au Bonheur pants.)

More Pictures

Partially zipped

Fully zipped

Sunday, September 4, 2011

Sunday Notes & Artistry in Fashion 2011

Oh, the deliciousness of writing Sunday notes and knowing I get one more day of sewing! :)

Apparently this mini sewcation will yield only one garment. I was hoping for more, but then I spent some time shopping/eating with DD1 on Saturday and napping today.

I am working on a Style Arc coat. The shell is complete and the lining is complete. I am going to hand sew them together, because I like the control I get by hand sewing a lining, so that will take me some time. (The pattern instructs you to bag the lining, but I am not a huge fan of the bagged lining. At least not when I sew them.)

So stay tuned for a new coat on Monday or Tuesday.


Artistry in Fashion - September 24th at Cañada College

You might have noticed that I added an Artistry in Fashion button to the blog (on the left). AIF is one of my favorite annual events - I look forward to it all year. Let me tell you why:

  • The setting, at Canada College, is just beautiful. It's up in the Redwood City hills in an almost retreat-like setting. In fact there is a monastery or nunnery somewhere in the vicinity - I've read about it. Sometimes it can be very hot on that day, by the way, but I kind of doubt it will be this year.
  • The guest speaker. This year it's Lyla Messenger, pattern designer and owner of The Sewing Place. She will be giving a lecture and fashion show in the theater. I've never heard Lyla speak, but I've heard she is good.
  • The vendors. OK, I admit it, my favorite aspect to the event is the shopping. Many of the vendors are artists who make wonderful things. There are accessories, wonderful artsy clothing, jewelry. There is usually a vendor or two that sells buttons (sometimes vintage, sometimes handmade, it varies) and possibly fabric. Lyla will no doubt have a booth selling items from her store.

    Usually this is the event where people buy wonderful accessories to complement the garments they sew. I will often admire a necklace or scarf on a friend and she'll say, "Oh, I bought this at Artistry in Fashion." They don't have a massive number of vendors, but they are carefully selected.

  • In addition to the big lecture/fashion show, there is usually one or two smaller talks given by the guest speaker in one of the classrooms. As part of the open house, impressive student work is on display and you can see the excellent facilities used for the fashion classes.
  • The social scene. It's one time of year I run into lots of sewists that I don't often see. I usually meet new people who read my blog. And many friends from the various sewing groups I attend are there: members from BABES (Pattern Review group), PenWAG, ASG.

In addition, this year they are trying something new. There are two stylists who will be selecting items from the vendors and styling them on several women. This will be happening at specified times in the outdoor amphitheater. It promises to be very interesting.

If you aren't local to the SF Bay Area, I'm sorry to taunt you. But if you are in the area, it's worth checking out!

I have many friends who teach and study in the Canada fashion program and I, myself, am an alum to this excellent program! There, full disclosure. :)

Friday, September 2, 2011

Opinions Needed: And the Winner is...


Linda pant front

Linda pant back

I mentioned in my Jalie Jean post that FabricMart had given me an extra 2.5 yards of the stretch cream Jones New York corduroy because it had spots. (They came out in the wash.) I decided to use the fabric whip up my fourth pair of Linda pants (from Style Arc) and do a side-by-side comparison.

So, what do you think? Do you think one pair is better than the other? One pair is sure more comfortable to wear than the other. :)

Linda on the left, Jalie on the right


Linda on the left, Jalie on the right

Thanks to the Labor Day holiday on Monday, I am looking forward to a 3-day sewcation! (Term borrowed from Carolyn.) I have the supplies for several projects and we'll see how it goes. I've also made up some eggless salad and roasted some veggies, so I'm ready to go!

I am still waiting to hear from two of the giveaway winners. I plan to put in my Style Arc order on Sunday night. BBinGA, please contact me! Where are youuuuu? :)

Wednesday, August 31, 2011

Giveaway Winners Announced!

Style Arc has put up their September freebie, so it's time to draw the winners for my Blogiversary Giveaway!

Without further ado, the WINNERS are:

  • For the "choosable" Style Arc pattern up to $15 in value: BBinGA.
  • For the Style Arc Samantha top in size 8: Mary! Mary, you left the following comment:

  • For the $10 gift certificate from The Button Shop: Mary of the blog, Mary is Sewfast.

Did you see that Julie, owner of The Button Shop, has a special coupon for all of my blog readers, good through Sept 10th?

THANKS, JULIE!

Congratulations to all the winners! Please contact me via the email address in my blog description (upper left of this page). If I don't hear from BBinGA in the next few days, you will have to wait until my October order to select your pattern, because I am itching to put in my order. :)

Sunday, August 28, 2011

Zipper Talk

Let's talk about zippers for a moment.

I love zippers. I loved zippers even before they were so "in fashion", but that certainly didn't hurt. I usually buy my zippers via mail order, or I pick them up at Britex or Stone Mountain.

When I made my cream jeans last week, I didn't have a cream jeans zipper, and I was in a rush, so I picked one up at JoAnn's. JoAnn's carries the Coats & Clarks brand, which I haven't used in many years.

Can I just say... ICK!

This zipper felt so cheap. The teeth are sharp and unfinished and the zipper tape is so inflexible and... it feels cheap.

If this is the brand of zipper that you are using, please know that there IS BETTER and your clothing deserves it.

My favorite brands are European, such as YKK or Riri. Riri zippers can be hard to find, though Marcy Tilton usually carries some, but they are often decorative/specialized.

When you just want a good, but regular, zipper, I prefer the YKK brand. In fact, if you look at European RTW brands, such as Deca Paris, they use YKK zippers. I see them used quite often in RTW. This brand is available at your better fabric store (which you should patronize), however, if that is not an option, let me tell you about my favorite online vendor.

ZipperStop is one of those special shops located in the Garment District in New York. I worry about them, as so much of our garment manufacturing is now off-shored, many wonderful shops in the Garment District are closing. It's very sad. I am very happy to give ZipperStop my business and to get the word out.

First of all, their shipping is super fast. I can get a zipper in a couple of days, with no special expediting. They have an amazing selection. They carry decorative zipper stops. And, (this is my favorite thing), they will cut a zipper to a custom length for a measley $1 fee. Do you need a medium-weight separating zipper with antique brass teeth in a 23.75" length?

No problem!

Their prices are very reasonable and I hear they are super nice if you call them on the phone, though I have never needed to. Shams says, check them out!

I have a few more projects in the hopper, but have also done some cleaning this weekend. I may have more things to show early this week, assuming my evening energy holds.

I'm glad that Irene wasn't the monster storm they predicted, although the inconvenience and damage seems bad enough.

Saturday, August 27, 2011

Fix for Blogger Comments

I posted this in a comment on my giveaway post, but I want to elevate this so others see it. I have never had problems posting comments on blogger, but many people have. Gwen posted this fix. Give it a try!

Gwen's Fix for Blogger Comments.

Thanks Gwen!