Friday, April 13, 2012

A Meetup with Luz Clara!


The sewers in their native habitat, Fabrix

Luz Clara, a blog follower and friend from Stitcher's Guild, was in town recently. Actually, she was in town last summer and we hoped to meet up, but it was the first week in my job of 12 years where I had to go into work every day for long hours, so it didn't work out. I was determined that we should make it work this time around! In fact, both daughters had asked separately if they could get together with me the same day, but I said no!!

We met for lunch at Squat and Gobble, one of my favorite local eateries. After a long, leisurely lunch (she is so easy to talk to!), we headed to Fabrix. I hadn't been there in a couple months and we both found a tidbit or two, as you can see from our bags in the top photo.

Afterward, we decided to visit Japantown. I hadn't visited the bookstore, Kinokuniya, in quite a while — they have a very good sewing and craft section. I bought one of the latest Japanese sewing magazines as well as a book on Shibori dyeing. In fact, the skirt I wore is a version of shibori. I did a little shibori dying about 20 years ago and would love to try it again — particularly now that I have a new clothes dryer and can do my own laundry once more.


Luz Clara also found a book and then we visited the incredibly cute Kunikuniya stationary store. For lunch I had a delicious Greek Crepe, but we both decided that we needed a Japanese ice cream crepe from Sophie's Crepes for dessert. The freshly made crepe was still warm and filled with Mocha Java chip ice cream. Yummmmm.... I really blew my dairy-free, gluten-free, lifestyle that day. ;)

It was so much fun to hang with Luz Clara! She is a fascinating person who makes jewelry, speaks Spanish and American sign language, and is incredibly well traveled — we talked for hours. She gifted me with a gorgeous piece of wool challis from Paris as well as a very cute medal from a Paris flea market. Thanks so much, Luz Clara, and I hope we get to do it again!

The Garment Formerly Known as Tablecloth Skirt


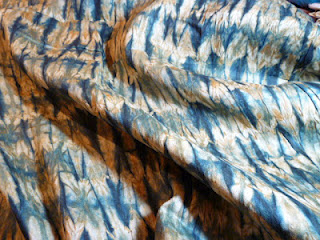
In early February, Rhonda (of Rhonda's Creative Life) posted a picture of a piece of fabric that a friend had gifted to her. This friend had purchased the fabric in Africa — it was a cotton jacquard that had been tie dyed with indigo and kola nut dyes. I drooled all over it, and Rhonda generously gifted it to me.


The first thing to do was to follow the instructions on the handwritten label and give the fabric a vinegar soak to set the dye. I used the bathtub and an entire bottle of white vinegar to give the fabric two soakings. What surprised me was that the water turned quite brown, both times — I had expected the indigo blue to bleed, but it was the kola nut brown. After two soakings, each followed by a thorough rinsing, I machine washed and dried the fabric. Afterward, I thought the fabric looked very much the same as before, the blues and browns didn't visibly change, so it truly was "extra" dye remaining in the fabric.

Rhonda approved of my idea of sewing the fabric into my tablecloth skirt. In fact, several weeks ago she asked me to write a guest post on her blog about the skirt for Fabulous Free Pattern Friday, which was posted today.

For this version of the skirt, I cut the center square a bit larger, so the resulting rectangles are a bit more narrow. The larger the center square, the fuller the skirt and the larger the hemline. The corners are less pronounced.

I am really going to enjoy wearing this version of the skirt, so many thanks again for this thoughtful gift, Rhonda! Again, check out Rhonda's blog for my guest post with details on how to sew the garment-formerly-known-as-the-tablecloth-skirt. (Too many people assume that this skirt is made from a tablecloth, so I do regret that name.)

More Pictures


Tuesday, April 3, 2012

FabMo and Lined Zipper Pouches Galore


I've been a bit quiet of late, but I've also been busy at work, including a few 10-12 hours days, leaving me with minimal energy for sewing or blogging. But last weekend I took a class that spurred a little creative (and may I say, obsessive) binge.

You may remember when I blogged about Scrap in San Francisco recently. They are a place where organizations and manufacturers donate materials of all kinds that they have no use for. It keeps lots of material out of the landfill and provides supplies for teachers, artists, and creative people of all ilk. They do have some fabric, but that is not their focus.

Enter FabMo. FabMo provides the same sort of function, in Mountain View (on the peninsula south of San Francisco, about 40 minutes in light traffic) and they specialize in fabric. Local manufacturers, decorators, and individuals with unwanted stash, donate fabrics to FabMo, and contributions range from samples and sample books, to giant bolts of fabrics, and everything in between. (And, to be accurate, they also have other supplies available, such as trims, zippers, and ceramic tiles, but fabrics are the main focus.)

They give these fabrics away, though you do, of course, pay a donation to help cover the costs of overhead. Unlike Scrap, which has daily hours and a much larger facility, FabMo opens about once a month for a distribution and you register for a 45-minute slot. They replenish the fabrics continually during that time, so it's not an issue of first-come first served gets the best stuff.

I have heard of FabMo for years from my sewing friends but had never gone down there to check it out. (I can be a bit slow about such things.) Many of the fabrics they receive are home dec (I have a friend who has reupholstered most of her living room using FabMo fabrics) and I don't "do" home dec, except for the occasional tote bag. The fabrics run the gamut, and include synthetics of all types, silks, linens, and wools.

FabMo also offers classes. A sewing pal, Luanne Seymour, teaches three of those classes. Some of my sewing friends have taken her workshops and I occasionally attend a show-and-tell where their projects have been shown, so I know she teaches a quality product.

Sue mentioned to me that Luanne had a lined zippered bag class coming up, so I decided to make my first trek to FabMo. I am SO glad I did! In her class, you start with a pre-made kit provided by Luanne (or you might spend hours pulling fabrics from the bins and not accomplishing anything). After completing our first bag, we pulled fabrics for another bag, though I didn't get started on the construction until I got home.


Luanne demonstrates how to insert the zipper.

Not many people know this, but I used to be an obsessive quilter. (That was before my digital camera, so I don't know where the pictures of my quilts are.) So, for me, the fun was in the piecing of the bags. Many of the most luscious fabrics that called to me were quite small, samples with paper adhered to them and, after you cut the paper away (Luanne has tried all sorts of techniques and was not able to dissolve the heavy duty glue they use), they were smaller still. Some of my smallest pieces, for example, being around 1.5" by 4". So piecing was necessary if I wanted to use these great textiles. I made one bag in class and then three more at home. You can see, from my second bag to my fourth bag, that the piecing becomes more involved. This is because my fabric scraps were getting smaller, but I love the effect.


Sue is ready to put her bag together!


Complete!


Auditioning fabrics for the second bag, including fabrics from home. My pile is on the right and Sue's on the left. We like similar colors. ;) You can see I brought my Janome Gem (far right). My Bernina 930 (pre-computerized) died and is being serviced, but I love my little Janome!


My bag, sitting on fabrics for bag #2.

I no longer have enough fabric to make more bags and am too spoiled to use mundane fabrics. But it's just as well because I have other things to sew. However, I am signed up for Luanne's tote bag class in May. :)

While we were there, we met the founders of FabMo, Hannah and Jonathan Cranch, whom I refer to as Mr. and Ms. FabMo. Jonathan talked about the 40 tons of material they keep out of the landfill each year - the statistics are quite impressive. They also participate in community events. While we were there, I saw Hannah cutting 1/2" strips of fabrics (using scissors!!!) for an upcoming Earth Day event in which they are participating. Thousands of youngsters are expected to attend this event and the FabMo booth will offer a weaving project. They are cutting 50 pounds of fabric strips in preparation for the event. With scissors. My hands and wrists hurt just thinking about it.

Luanne's version of the zippered bag is fully lined. Both ends of the zipper are covered (a very nice detail), and the bag features a bottom so that it stands up. If you are local, I really recommend Luanne's classes (and probably all of the FabMo classes). It's not just the great instruction (Luanne is a wonderfully generous, relaxed, and thoughtful teacher), but also the camaraderie of the group (I knew several people attending) and the luscious fabrics. But if you aren't local, I found some online tutorials for you. There are many more if you google for them, but these look nice. Let me know in the comments section if you have other good ones to share.


Bag #4: pieced outside


Bag #4: pieced lining


Bags 1 through 4, side 1. I made them in the order displayed, with the first one at the top left and the last one at the bottom right.


Bags 1 through 4, side 2.


The inside of Bag 4. I pieced the lining. You can see how the zipper ends are covered.


Bored mama, sitting in a dark-ish room and waiting for DD1 to call back on Facetime. ;)

Saturday, March 24, 2012

Koos Loop Infinity Scarf


One of my sewing pals, Lynn CC, was taken with the Koos scarf article in the January 2012 issue of Threads magazine. The article, by Linda Teufel, shows how designer Koos van den Akker creates his version of the infinity scarf.


Using different fabrics, sewn in a spiral, and twisted so that it lays nicely, the scarf construction is much more complex than it appears. Lynn CC liked the scarf, but wondered how it would work in a smaller format, such as a half yard of fabric. She made several and liked the result.

When I saw Lynn's scarves, I loved them. She used the full width of the fabric, and when you use, say, a half a yard of a 45" wide fabric and twist it once, it produces a scarf that lays nicely and close to your neck. It's a great way to showcase a special fabric - be it knit, woven, or lace. Lynn has found that these make great gifts.


Single twist

I had to make the black and white ikat scarf twice. The first time, I added a single twist, but somehow lost it when sewing the selvedges together, because the resulting scarf was a cylinder, with no twist. Luckily, I had another half yard (because I was too lazy to unstitch the first scarf) and made it a second time, this time asking Lynn to assist with the twisting. This one was perfect.

On my way home last weekend, Sue and I stopped by Hart's fabric store in Santa Cruz. I had never been there before, and it's a great store. (They also have a nice online store.)


Full disclosure: one of those bags was Sue's and they were very heavy! :)


Harts displays their knits on long cylinders, standing straight up. It was nice to be at a fabric store with lots of knits and so well displayed. They had 2 or 3 rows of knits.


Another Hart's purchase. This is a polka dot lightweight fine wale corduroy! I just may use this for another Koos pattern.

Hart's carries a lot of knits, including quite a few of the Missoni knits. I am not really a Missoni girl, but I decided to buy a half yard to make a Koos scarf.

Because the Koos fabric is much wider than the ikat fabric, I decided to use the full width, but add more twists. In the end, I added four full twists, which was maybe one twist too much. Twisting the scarf helps to shorten it, but I think I would have been happier if I had cut the rectangle to be shorter than the full selvedge-to-selvedge width (closer to 45") and twisted it only once.

Oh well, it was an experiment and I'm sure I'll get some wear out of it.


The Missoni Koos scarf. Meh.

Tuesday, March 20, 2012

Technique - Lattice Smocking


As I mentioned in my earlier blog post, I started a pair of pants last September and I wanted to use lattice smocking on the hem. I had first seen this treatment last spring used on some tops in Macy's. Then kbenco used it on a top and posted a tutorial. Being a visual learner, I watched several videos on youtube and made some samples. It seemed very complicated, at first, but it's actually not that hard.

You sew the smocking stitches on the wrong side of the fabric. You need to create a grid - a striped fabric can help with this. I used my large Olfa ruler and an orange Frixion pen to draw the grid and the diagonal lines. The drawing won't show on the front, but the lines can be removed by steaming or washing the completed garment.

You can see my samples below. I took photos after one, two and three rows of smocking. I decided that I wanted three rows on my pants. I made my sample the same width as the pant leg so I could confirm that I could comfortably put my foot through the sample and that it would be comfortable to wear. The smocked area has some "give" but is not stretchy.

One row of lattice smocking

Two rows of lattice smocking

Three rows of lattice smocking

I measured the pant leg of the Loes Hinse Oxford and, for my size, I was able to make a 1" grid 20 squares wide, from inseam to inseam. You need an even number of columns for the smocking to work properly in a continuous round. The Oxford is drafted with 3/8" seam allowances, so I started and ended the grid lines 3/8" in from either raw edge.

Each row of lattice smocking requires 2 grid rows, so I created the grid with 6 rows, for 3 finished rows of smocking.

After cutting out the pants, I used the Frixion pens to draw the grid on the wrong side. I then constructed the pants. When sewing the inseam, the first and last lines of the grid are sewn together at 3/8". I then turned the pants inside out, and sewed the smocked pattern. Where there is a diagonal line, you draw those opposite points together and secure them with a knot.

Here is a video that shows the stitch pretty clearly:


Once you get into a rhythm, it goes pretty quickly.

If you do any interesting garment projects with lattice smocking, I'd love to hear about it! I still plan to make a longer version of this pant with the same effect.

Loes Hinse Linen Pants with Smocked Hem


I seem to be flailing around a bit lately, sewing-wise. I have been developing a stable of tried and true patterns, which is great. Most of them are Style Arc patterns, which have a fabulous fit. This has allowed me to start focusing more on design details and morphing the patterns into other designs.

So, what is my problem? I don't know. Maybe I am getting bored? Or maybe this just a regular mojo cycle - we all know how that goes. Am I confused by my style, resulting in Hamlet-like indecision? Or am I just frustrated that I often can't sew what I really want, because it won't work on my boobular figure? Maybe I just have too many clothes? (Though I have purged the closet.) I can't quite put my finger on it. Maybe it's a bit of all of the above.

At any rate, it's been hard to settle on a project.

I actually started this project in early September. I know that because I started a blog post at the time and it had the time stamp of Sept 6th, 2011. I was very taken with lattice smocking, also called Canadian smocking, which I had seen a season before on some tops in Macy's. Then kbenco used it on a top and wrote a tutorial.


Being a visual learner, I watched various youtube videos and made some samples. I decided to use the detail on a pants hem. Because I wanted as few seams as possible, I used the Loes Hinse Oxfords, which are the best fitting no-seam pants pattern I have.

The fabric is 100% linen in grey with a thin cream stripe, from Fabrix. Using a stripe makes it a bit easier to create the grid you need for the smocking. I plan to write another post with a bit more detail on how I achieved the effect.

The reason this project went into the UFO closet for six months is that, after smocking one leg, I wasn't pleased. I wanted the smocking closer to the ankle and knew that if I'd tried to remove it to make it lower, the fabric would show damage. Then, I recently decided to pull them out and try them on again. And now I love the capri length! Just the thing for summer. If I ever experience summer weather, that is. :)

Blog post: Lattice Technique.


And speaking of Loes Hinse. This last weekend I was finally able to visit her store in Carmel. I had seen her speak a couple times, once at Artistry in Fashion and once at PenWAG, and had talked to her once about using her patterns with my bustline, but it was fun to descend on her store with four sewing friends. She had been warned that our group was in the area, so she brought some fabrics and patterns to her shop, which is so small that she doesn't usually have them available.


Rita and Pat, excited to be in Carmel and visiting Loes.


Despite the pouring rain, she was our first stop in Carmel. I helped her bring her fabric from her car, requiring two trips through puddles, but we were determined. (And, besides, my friend Sue volunteered me for the task. ;) ) We had a lot of fun groping her RTW clothing, in that way that sewists do, and trying her garments on.


We made a mess!


Dorothy trying on one of Loes's jackets. The fabric in this is so interesting. Loes calls it her "feather" fabric. It's kind of like a faux fur, but it's not made with regular fur-like fur, but with these thin sheets of ... not sure what, but it had a sort of feathery effect. It reminded me of thin sheets of shale... in fabric form. Loes says you can buy the fabric on the Casual Elegance site, though I haven't looked.


All I bought was a wonderful striped rayon knit fabric. I was quite restrained. I can't say the same of my compatriots. :)


'Twas a fun outing! I can also recommend the shop Findings, which carries vintage trims and buttons and a few fabrics, and Pacific Rim, which had fabulous, fabulous clothing.

Monday, March 19, 2012

The Nest Scarf


My black and white nest

Once a year I go off for a weekend of sewing with some like-minded buddies. I usually shop too much, eat too much, and sew just the right amount.

This year was no different.


Sewing away...

My first project didn't require a sewing machine at all.

You may have heard of the recent Sew Expo in Puyallup, Washington. Billed as the nation's largest sewing expo and held in late February and early March, I've never been. But my friend and retreat roomie, Sue, did. While there, she bought a scarf kit from Diane Ericson, called The Nest.


Sue's earth tones nest

Independent of Sue, I was reading Diane Ericson's facebook page, and I saw the Nest scarf, made up and worn. I immediately emailed Diane and asked if I could order one. I could. She had only a few left, so it is a limited edition and not listed for sale on her site, but I snagged one.

The kit consists of a long strip of a bias cut silk/metallic lattice, in an off-white color, and a collection of ribbons, trims, and fabric scraps, plus four charms. You tie the goodies onto the scarf and then wind it around your neck. Once it's on your body, you reach in through the lattice and pull a few of the tschotskes through to the outside, which also helps anchor the arrangement.

VoilĂ , a nest.


Sue and I were amused that we had each purchased one of these kits without talking about it, even afterwards. We laid them out on our beds and tied away. I may go back later and add some red strips from my own stash.

Diane tells me she has a few of these kits left. If you are interested, you can contact her.

I have more projects to blog from the weekend, so stay tuned.