You may be familiar with the standard technique for binding raw edges using a strip of bias (in wovens) or across-the-grain (in a knit). This technique turns that idea around - literally.
You need a single knit to use this binding. How can you tell if you have a single- or a double-knit fabric? If you gently pull the edge as it comes off the bolt, a single knit rolls towards the front. A double knit does not roll. You want to take advantage of the fabric's natural inclination to roll.
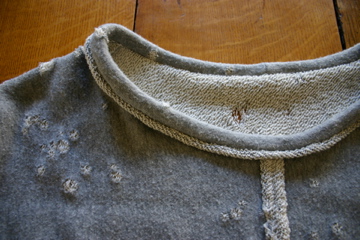
On this sweatshirt I used this binding on the neckline, but you can use it anywhere. For example, a sleeve, hem, or pocket.
Step 1: Cut a strip of your single knit about 2 1/8" wide and longer than you need. (It can be wider and you can cut it down later.) In my photo, the strip is on the left and the "garment" is represented by the larger piece of fabric on the right:

Step 2: Sew the right side of the strip to the wrong side of the garment with 1/2" seam allowance (S/A). If you are navigating around curves, such as on a neckline, you will want to gently stretch the binding as you go.

Step 3: Wrap the binding around to the front of the garment.


Step 4: Pin in place.

Step 5: From the wrong side of the garment, stitch in the ditch. As you sew, make sure that the raw edge of the binding (underneath) remains flat and does not get caught.

The finished edge will naturally roll towards the padded binding.

I'd love to see your applications of this technique. :)
Thanks for taking the time to post the steps for this technique Shams. It looks great on your french terry. I definitely will be borrowing this one!
ReplyDelete