Showing posts with label best. Show all posts

Saturday, April 2, 2011

Sewing Workshop - Striped Liberty Pullover

With cowl

Without cowl

I still have yet to make the Liberty as intended with the button closure, but a little over a year ago, I was inspired by Heather, who had the idea of converting the button-down Liberty to a pullover. It's basically a wonderfully funky t-shirt.

I had this grey/black ponte which is similar to Heather's luxury wool knit, and I cut it out a year ago and it sat. And sat. I don't know why I took so long to sew it up, because it's such a quick project.

Materials:

  • Black/grey stripe ponte from FabricMart.

Alterations and Construction Notes:

  • I used the same tracing for my last version of the top, which is a Large with an FBA. I converted the FBA to gathers at bust level. I usually ease the dart in a knit, but this knit is fairly stable, so I used gathers. I prefer it with an eased seam. :)
  • The sleeves were too long in my last version, so this time I shortened the sleeves by 1". Then before attaching the sleeves, I shortened the shoulder by 1", tapered to nothing. Suddenly, the sleeves were 1" too short. (Rookie mistake.) Luckily the sleeve hem is very wide, so I was able to lengthen the sleeves by 1". (Note to self, I think I could shorten the shoulders another 1" next time.)
  • I cut the neckline to be a bit wider. I finished the round neckline using a technique I had seen on a Marcy Tilton top.

    Completed neckline

    • I cut a 1.5" bias strip (so the stripes are on the diagonal).
    • I folded it in half and pressed it.
    • I then laid it against the neckline so that all 3 raw edges were even. I topstitched 1/8" from the folded edge of the bias strip, pulling slightly as I rounded the curves. (I could have pulled a bit more.)

      The three raw edges

  • I made a separate cowl.
  • I cut another bias rectangle, approx 12" wide and fairly long. (I didn't measure it.)
  • After playing with it for awhile, I decided to sew the short edges together so that the cowl was a slight funnel shape - it narrowed closer to the head.
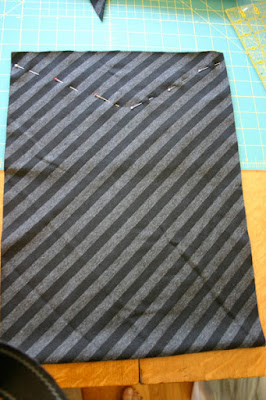
    The pins indicate where I sewed the side seam. The narrowest point is the top of the cowl after it has been folded in half the long way.

  • I folded the tube in half to encase the wrong side.
  • There was a "point" where the seam met up, so I rounded the edges.
  • I turned the raw edges to the inside and topstitched around the donut shape.

    The finished cowl. Yeah, it's a bit different. ;)

The next time I make this pattern, I want to make a fresh tracing and do my "new style" of FBA. This is where I chop the pattern at the waist (or thereabouts) and do the FBA on the upper half. I then merge the pieces back together. I've been using this now for several garments and I LOVE it as it preserves the design on the lower half.

Friday, November 12, 2010

Holey Scarf and another Teagarden T

I couldn't resist a bit more knitting. This time I made a holey scarf - a free pattern on Ravelry called the Swiss Cheese Scarf. (The link only works if you have a free Ravelry account.) Three skeins of fingering weight yarn (Araucania Solid #103), a size 3 bamboo circular needle, and 48,510 stitches later (give or take) and, voila.

Before felting, approximately 66" x 17" with 27-1/2 repeats of the 16-row pattern.

Before felting

Next step, a top loading washing machine, small load, hot water, 1 Tblsp laundry detergent. Ten minutes later, nothing had happened, so I added an old "unlinty" (lint might become embedded in the felt) towel and set the timer for another 10 minutes.

Yowza, very felted. I let it go another couple minutes (not sure why, but I guess I wasn't mentally prepared for it to be done yet) for a total of 22 minutes of agitation. I removed the scarf from the machine, placing it in a bowl of hot water, and rinsed in additional hot water until clear. Squeezed out as much excess water as possible, and laid it on a towel, under a small fan, to dry.

Voila. It's probably a tad overfelted, because it is more stiff than I intended, but I love it!! As I was knitting, I suspected that the Araucania would felt well (because the yarn liked to grab itself) and I knit loosely. However, it exceeded my expectations by felting to the point that there is no longer any stitch definition. I had hoped for that, but wasn't expecting it.

After felting, approximately 63" x 13.5".

Despite the holes, it is quite warm. I would like to make this again in a charcoal gray, maybe changing the dimensions a bit and felting it a bit less. I should add that this piece uses two dye lots. I bought two skeins on ebay for half price and the third, also on ebay, from a different seller that was a bit more expensive. When the third skein arrived, there was a visible difference with the other two. I considered my various options, but decided that I didn't really care and just added the third yarn to the end of the scarf. I like how the scarf subtly changes, in fact. :)

On a different topic, I was asked to post a photo of one of my recent pieces made from the bamboo jersey from FabricMart. I didn't plan to post this Teagarden T, which I made in September during the SSS challenge, because I've already made and shown this pattern several times, but here it is in rust bamboo jersey. This is for you, andib! :)

Friday, June 11, 2010

Vogue 8397 - Marcy Tilton Pants (View A)

I've been trying so hard to put a moratorium on sewing black for spring and summer but, oh well, what the heck. I still have scads of black ponte and I love to use it to test out some of the wonderful pants patterns that are available.

Today, we have Vogue 8397, a Marcy Tilton pattern that has been out for years, since 2005, I think. This pattern offers three very different pairs of pants. I recently used View C to try out a variation that Marcy posted on her website, but this time, I made View A, which is for knits only. Because this pattern has been out for years, there are many reviews on Pattern Review, but only three for view A. Most of the sewists used a fairly drapey fabric, such as jersey, but I decided to try it out using my firmer ponte knit, though I wasn't at all sure that it would work.

According to the pattern, the finished measurement for a size 12 at the hip is 43". I decided this sounded right for me, so I cut out a size 12 from the hip down to the hem, tapering out to larger than a size 14 at the waist. (This multi-sized pattern goes to 14 at its largest size, so I made it bigger – maybe more like a 16.) I traced the Trio crotch curve onto the pattern. Other than that, I made no changes. I even used the original length for the size 12, so this pattern may run a bit short.

The pants were very quick to stitch up, even with the top-stitching. (But then I like to top-stitch.) And I love them! Love love love. Definitely another keeper.

Worn here with another new top. This is my fourth Teagarden T, made from a diagonal knit. I love this pattern too! It's "my" version of a t-shirt.

Sunday, May 9, 2010

Sewing Workshop - Teagarden T and Trio pants

To those of you who celebrate Mother's Day, I hope you had a good one!

Eldest Daughter is off in Washington for a week and a half for a ballet "thing", so the burden of celebrating fell onto Youngest Daughter. She did herself credit, though, by taking me for my first pedicure in 10 years. Yup, I remember the last time was on a cruise to Alaska. I pity the poor technician that had to deal with my extremely unkempt feet and I told daughter to make sure to give her a good tip. :)

Afterward, DD2 and I had a great lunch, and even ended up at my favorite fabric store. Some of our other plans got a bit derailed when DD2 was invited to a last minute birthday party for a friend visiting from Holland, but I enjoyed a long nap. What's not to love?

I have a new outfit made from TNT (Tried 'N True) patterns. The top is a Teagarden T, one of my favorite Sewing Workshop patterns. I declared that I would probably make 20 of these, and this is number three (not counting the muslin). It is made from a cotton interlock from Britex. I have #4 cut out as well.

I have been wanting to make some cream linen pants, but I was very nervous about it. It's been years since I've had any white or cream pants – they seem so impractical! But I found this gorgeous Dana Buchman fabric from Fabric Mart in cream; it's 65% rayon, 30% linen, and 5% silk. I threw it into the washer and dryer a couple times and it came out beautifully, but the second time I added a light blue linen and it came out of the dryer with lavender spots sprinkled all over it. I washed it a third time, with bleach, but it didn't seem to help the spots.

I decided to use another new favorite pattern, the Trio pants (I think this is number three from this pattern as well). I cut around the worst of the spots, but there are very light spots that I hope are mostly invisible. If, later, the pants develop further stains, I may dye them a darker color. But for now, I love these pants! I was planning to buy more of the fabric, it was on the website for a long time, but, of course, it's sold out now, except in peach.

Youngest daughter took these photos of me today. In the second one, she asked me to do a Kung Fu pose. I did my best. ;)

Wednesday, April 28, 2010

Vogue 8637 - Marcy Tilton Pants


This is Marcy Tilton's latest pant and skirt pattern. I originally planned to make the skirt first, after a fellow sewing group friend made it and I tried it on and loved it (it looked amazing on her!), but I have been on a pant kick recently, so I decided to start with the pants.

The design of these pants is interesting, which you can see if you look at the line drawing. There are three pattern pieces — the front, the back, and the godet. It doesn't have a side seam, per se, but the front and back join for several inches at the hip, and the godet is inserted from the point where they intersect. It's very easy to construct, because you first attach the godet to the front, and then you attach that piece to the back, so there are no awkward corners to deal with. The godet is cut to be wide at the hem, but there are three darts to contain much of the fullness.

The finished hip of the size 8, the smallest size this pattern comes in, is 44". I decided that was perfect for my 40" hips. The waist of the size 8 is 33". This is a problem for me, since my waist is also 40". I couldn't do my usual trick of just drawing a line straight up from the hip without compromising the design of these pants. Widening the little seam at the hip would affect how the godet fits into the piece and I didn't want to increase the size of the godet. Instead, I slashed and spread the little extension that juts out at the side front, which you can see in the photo.

I also used the crotch curve from the Sewing Workshop Trio pants, since I like how those fit. I made the pants out of a very black ponte – the same fabric I have been using to test all of my pants. I bought 11 yards of it for $2.39 a yard, so I have been getting a lot of use out of it. :) I was pretty happy with the fit. The only alteration I made once the pants were made was to shorten them about 1.5", which is pretty typical for me.

I like these pants very much, though I wish they had a pocket. To add a pocket would compromise the interesting design, so I will have to think about this some more.

I lightened the pants in this photo so you could see them better. (Have I mentioned recently how much I love Photoshop Elements? I bought it for $30 on sale and it has been such a useful tool for editing photos!) I am wearing it with my Bells top that I reviewed last fall.

Here you can see the darts at the hem.

Do you think I need a new Welcome mat? :)

Thursday, April 15, 2010

Sewing Workshop - Trio Pant

I finally made the Sewing Workshop Trio pants and I love them!

Janis, on Stitcher's Guild, has sewn some beautiful pants from this pattern, so I was eager to try them. I traced off a size small, though, according to the Sewing Workshop measurement chart, my hips are between a medium and a large, and my waist is off the chart (larger than a XXL). I can often get away with a smaller pant size since my hips are small and I increase the waist, as necessary. I didn't have to fiddle with these pants.

My first pair, using a black ponte knit, fit well, but were a bit short. I am 5'5" and almost always have to shorten things, so these must run short. I left the pocket off this first pair.


My second pair are from a brown stretch woven. This time, I included the pocket. I finished the pocket with buttons from my grandmother's button basket.

I had to lighten this photo a bit to show the pants better. I am wearing these with my new t-shirt with the Marcy Tilton neckline.

Worn with my Sewing Workshop Now shirt.

Pocket detail.

Tuesday, April 6, 2010

Sewing Workshop - Liberty Top

Our traditional Easter High Tea. So decadent...


For awhile now I've been wanting to make a Liberty top. I have seen some really beautiful versions on the Sewing Workshop Gallery, Pattern Review, Stitcher's Guild, and in my own sewing group. Then, at our last sew group meeting, Heather Nishimura showed her latest version of the Liberty and I fell in love. Heather is one of those stealth sewists. She quietly, and without fanfare, makes the most gorgeous pieces. She always looks so elegant and beautiful - she really rocks her wardrobe. She had the brilliant idea of making a pullover using the Liberty pattern. She used a black/grey stripe knit (with the stripe positioned vertically) and placed the center front on the fold of the fabric. She finished it off with a turtleneck.

Well, I love knit t-shirts, pullovers, and the like, that have interesting details and this one was fabulous. I couldn't wait to try it out. I traced off a Large and added a dart. I tested the pattern fit using a light yellow cotton interlock someone had given me at our last Babes meeting. I finished the neckline with a binding.


My test garment, using donated cotton interlock.


For my actual garment, I used a Japanese knit from Emma One Sock. This slightly sheer knit has a weighty hang - really nice. For this version, I didn't sew the dart, I eased it. For the neckline I finished with a piece of the selvedge.

The second version uses a Japanese sweater knit from Emma One Sock

When I wear this top, the neckline pulls a bit to the back. The next time I make this top (and there will be a next time) I plan to move the shoulder seam forward 1/2" and to shorten the sleeves an inch. Eventually I want to make the pattern as shown on the envelope. It's a great one!

[Edited on 4/9/10.] Heather has sent me a picture of her striped Liberty turtleneck for posting! My understanding is that it will appear soon on the SW gallery. Isn't it gorgeous?

Friday, October 2, 2009

Sewing Workshop - Teagarden T


Oooh, I love this t-shirt! This design, based on a classic Issey Miyake design, is wonderful and I am soooo glad that Sewing Workshop has made the pattern available. It consists of two pattern pieces, not counting the neck interfacing pattern piece: the front/back/sleeve/collar (all in one), and the underarm gusset. Now, this gusset can be problematic for some folks, particularly those who bear no resemblance to the Venus of Willendorf (in which case, see the next paragraph). But for us busty folk, the gusset is vunderbar!!! It adds fullness just where you need it and the fullness doesn't overwhelm you anywhere else.

In my case, I cut out a Large, based on my high bust measurement, and removed the curvature at the waist – nice straight lines for me, thank you very much. (It's like sewing for a guy, in that regard.) That's it, that is the only change I made. I first sewed the top up in a very nasty nylon knit (which I've found is excellent for scrubbing dirty floors and counters), and it fit perfectly!

If you don't need the huge gusset and don't desire the "design line" of fabric drooping under your armpits, you might want to use the gusset reducing instructions posted by Linda.

Because this is a Miyake design, there are certain resemblances to origami in its construction. This means that the pattern pieces have many places you must mark. These marks have labels: A, B, C, and so on, up through K. Some people use colored tailor tacks to keep them all straight. That is brilliant, but I am much too lazy to use ELEVEN different colors of thread for my tailor tacks. What I did was use little round sticky labels and put them next to each tailor tack, on the underside of the fabric. So I made 6 labels for F, and two labels for A, for example. If they threatened to fall off, I just pinned those labels on. :)


I do recommend making a muslin, just to get it straight what you are doing. The first time (on the muslin) I blindly followed the instructions, and then I understood the basic idea so the second one was much easier. I still needed those labels, though. I have to remember not to get cocky and leave off those labels, which is exactly the kind of thing I would do. ;)

I need ten or twenty of these tops, all in black. (I apologize, in advance, for those who see me on a regular basis and will have to endure the many tops I plan to make from this pattern.) Oh, because I did cut this out at night and the light over my dining table is poor, I cut it on the crossgrain. The knit is a four-way, but it's much stretchier in the other direction. No matter, it's just fine. :)


Note to self. Buy a few boxes of sticky labels at the office supply store.