Sunday, January 8, 2012

RTW-inspired Navy and White Check Shirt

More pictures

First, I thank all of you for the wonderful comments and feedback you left on my Marcy Tilton top, both on the blog post and the review. I am really overwhelmed!

Marcy Tilton featured pictures of Margy's tops on her blog. What a nice surprise! Also, Vogue patterns asked if they could feature my top on their Facebook page (which hasn't posted yet). It seems that this top, with my machinations, struck a chord with many.

I have tops on the brain. There are no less than two separate year-long top sew-alongs on Stitcher's Guild - one for "top of the month" and one for "shirt of the month". I have not joined either, formally, but my mind seems to be in "top" mode so it's possible my sewing mojo has signed up on its own accord. (I try to follow the mojo where the mojo leads.)

Several months ago I was in a boutique and I saw an interesting blouse, very briefly. It had a hanging front band, which I loved. I looked at it for maybe 5 seconds and moved on. I didn't take notes or draw pictures, or even try it on, so I can't remember that much about it, other than the hanging front band. I can't even remember what color it was. I believe it was a Kedem Sasson top, but am not even 100% sure about that.

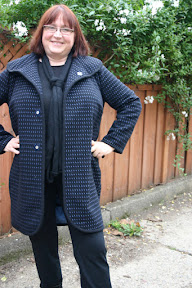
Often I see interesting details in RTW and forget about them, but not this time! I decided to use a pattern I had as the basis for this top. Butterick 5034, recently out of print, is a good basic pattern.

Somewhere along the way I had cut the tissue paper pattern as a size 16. Now why did I do that? I am not a size 16. I am a size 18, and I still need a hefty FBA, in most patterns. But I can deal with a 16 if I widen the back and pay even closer attention to the FBA, so that's what I decided to do. (And it helped that this is not a fitted pattern.)

I wanted the front of the top to be shorter than the back, and I wanted side slits. At first I planned a regular shirt collar, but in the end I went with a plain neckline, finished with a bias strip. Since the front band extends below the hem, I had to use separate front bands, rather than a cut-on facing which folds to the inside.

Materials:

  • Drapey navy/cream check fabric from Fabrix. I think this is another rayon/poly blend and is very crepe-like. It ravels like crazy, but has a great drape.
  • 11 5/8" mother-of-pearl buttons from Fabrix.

Alterations and Modifications:

  • 3" FBA.
  • Widened the back by 1" (2" total).
  • Narrowed the shoulders by about 1.5".
  • Shortened front to 2" below the waist. Marked the waist point because I wanted to stop the side seam at the waist, leaving side slits.
  • Shortened the back to 4" (or so) below the front.
  • The upper sleeve measured narrow, so I widened it by 1".
  • Folded out (removing) the cut-on facings. Instead, I cut two front bands 2.5" wide and several inches longer than the front. I used 1/4" seam allowances for the front bands, so the finished band is 1" wide.
  • Originally I was going to use a standard shirt collar, but, while sewing, I decided not to. Instead, I stay-stitched the neckline at 5/8" and trimmed off 3/8", leaving a 1/4" seam allowance. I cut out a bias strip 1-1/4" wide and longer than the neckline. I sewed it at 1/4", wrapped it around to the inside, folded the raw edge under, and hand stitched. I really like wearing this sort of easy, casual finish.

I decided to finish the front bands by sewing them together, at the bottom, wrong sides together. I trimmed close to the stitching, turned them right side around (after pressing), and top-stitched close to the edge.

When it came time to put on the buttons, I raided the button box. I didn't have any fabulous buttons, but I did have the ubiquitous mother-of-pearl buttons that I have used for other projects. These cost 10 cents each at Fabrix, so I stocked up. (I probably would have preferred navy buttons.)

During construction, I put the blouse on many times. (Don't you love to sew wearing a bra and PJ bottoms?) I realized that the blouse is loose enough that I could pop it on and off over my head, so I decided not to use buttonholes. The buttons are merely sewn through both bands. All but the top two - those are sewn to the left band only. I never planned to wear it buttoned all the way up anyway.

I know, it's pretty cheeky of me to cheat and leave off the buttonholes. But I won't tell if you won't tell. :)

Conclusion

I really like this top! It will be great in warm weather. I made it a tad too short in front, so it won't be the top to wear to a revival meeting, or a sporting event, or anywhere one might want to throw up one's arms, unless one wants to exhibit one's belly button. I will definitely make this again.

By the way, I wrote this blog entry last night, as I often do, but waited to post it until I could take photos in daylight. I accidentally hit "post" instead of "save". Once that happens, even when the post is deleted from the blog, it can't be removed from blog readers.

More Pictures


Worn with my cream corduroy Linda pants

On New Years Day (morning) I took a walk and discovered this abandoned New Years top hat on the side of the street. I love to take shadow pictures and that morning I was wearing a skirt. After taking a few pictures, I picked up the hat and was walking along when a man, walking his dog, asked if it had been a good party. :)


Tuesday, January 3, 2012

Vogue 8709 - Take 2

Conclusion, with more pics

In the fall of 2010, Vogue came out with this Marcy Tilton swing top. I liked the top very much, especially the peplum with the cool pockets and the draped back, but was pretty sure it wouldn't look that great on me. Swing tops are not flattering on my figure.

So I resisted, though I did buy the pattern when during a BMV sale. I pretty much buy all Tilton and Betzina patterns as a matter of course. :)

Then Peggy made one, and I loved it on her. I was well aware that Peggy's tall statuesque figure was quite different than mine, but I could no longer resist, so last May, I made one. It is a fairly intricate pattern, and I wasn't sure how to alter it, so I made a size 22, almost out of the envelope. (I usually start with a size 18 and FBA up.)

Version #1. Click the picture to read the blog post.

I loved it, at first, because I was blinded by the pattern's coolness. But I had to finally admit that the style, as it was, really didn't work on me. I have said, many times, that a swing shape just doesn't suit me and the photos don't lie. I'm embarrassed to admit that, not only does it look like a maternity top on me, enhancing my butterball shape, but it appears that my boobs are about to jump into the pockets, perhaps to feed diminutive babies hiding in there. I wore it exactly once, then the top went into the closet and languished.

Fast forward.

I was talking to Margy last week during the holiday break. She had also made this top (with much better success) and wanted to make another, incorporating some changes sparked by something she had seen on Marcy's site.

Margy's first version. So much cuter on her!

Margy suggested a mini sew-along - we would both work on the same pattern over the 3-day New Year's weekend.

Materials:

  • A wonderfully drapey fabric from Fabrix. It is woven with black and cream threads, giving an overall appearance of grey. I am not sure if it's rayon, poly, or a blend. The threads are minimally twisted and fluff out when they unravel from the fabric.
  • For the buttons, I had some "button stacks" I bought from a vendor at PIQF two years ago. Each button stack consists of 3 buttons in graduated sizes. The buttons are purely decorative.
  • 5/8" clear snaps from Britex, positioned under the buttons.
  • Fusible interfacing, from Fabrix, for the front plackets.

Auditioning buttons. I ended up using the stacked buttons on the left. The color in this picture is a bit off - the metal is silver in real life.

Final button and snap configuration

When I made the original version, I used a size 22 and made only one change to the pattern: I lowered the darts by 2". For this revised version, I made significant additional changes:

  • Removed the swing shaping from the left and right fronts.
  • Removed the swing shaping from the left front placket.
  • Lengthened the bodice by 2" - this affected the back, left front, right front, left front placket, and right front placket.
  • Widened the back bodice by 2".
  • Straightened out the side seam of the back bodice, at least somewhat.

During construction, I made even more changes:

  • Additional fitting of the side seams and the center back seam. Removed 2" or 3" from the bottom of the CB seam, tapered to nothing at the bra line.
  • Fitted the peplum to the modified bodice, removing about 4" to 5" from the width, prior to cutting it out.
  • Inspired by the version Marcy shows on her website, I cut the collar with a lowered neckline and finished it with a pleated strip of the fabric selvedge.
  • Marcy Tilton's gorgeous version in apricot taffeta. The neckline on my top was inspired by hers. (Is it my imagination, or do I spy fish-eye darts in this version to make it more fitted?) Click the top picture to see this version discussed on her website.

Collar

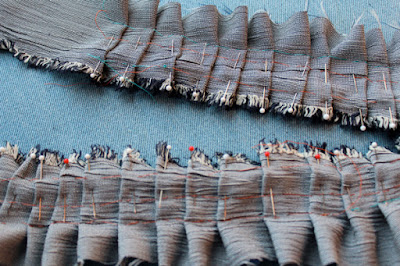
I wasn't sure how to make the collar. When I tried pleating the fabric directly to the neckline, it did not work for me. My fingers were too clumsy and the fabric too "sproingy." So I then pleated the fabric on it's own. I cut the strip roughly twice as long as the finished neckline (plus a little extra) and much wider than needed. I then pinned in the pleats, not attempting to make them even in depth or distance - I liked the random effect.

I held it up to the top to adjust as desired. I then did three rows of basting. The first row was at the desired seamline. Then, I did a row of basting on each side, to help tame the "sproinginess." I finally basted it to the neckline, along the seamline. I did a second row of basting on the inside of the seam allowance. There is a lot of handwork in this collar. :)

The pleated strip. I removed the pins after all three rows of basting were completed.

The pleated strip has been basted to the neckline. On top of that is the bias strip which finishes the inside neckline edge.

Conclusion

I love this top! I think I will wear this one a lot. Make sure you check out Margy's second version, my partner in crime. Her modifications show how versatile this pattern can be. Buy it before it goes away!

And, just to drive the point home, here are both tops, side by side.

Did I lose weight? Noooo. Did I get taller? Noooo. Did my hair turn red? Well, yeah. :)

Also, did you know that Marcy started a blog? I hope she adds a proper feed for the blog, so we can subscribe to it, and be notified of updates. There is lots of good information on her site, especially in the Marcy's closet, t-shirt gallery, pairing pattern and fabrics, and tutorial areas. It's interesting to see what people are pinning from her site.

More Pictures


Friday, December 30, 2011

2012 - The Year of No Goals

Table of contents:

Click a picture to see the related blog post.

Year of 12 Jackets and Coats

You may recall that last year I joined the "Year of 12 Jackets and Coats" challenge on Stitcher's Guild. I completed 8 jackets. I started (and made good progress) on more than twelve, but I now have several UFOs.

hanging head in shame

Why so many UFOs?

Well, a variety of reasons. For two of them, I needed more supplies and they languished (and lost momentum) while I waited to acquire said supplies. One was too oversized and needed major alterations. One had "bleh" issues and another had issues relating to my alterations.

So, there you go.

In fact, because I did not finish this goal, nor did I finish my Autumn 6-Pack (though I came close), I decided, no more such commitments in 2012. Despite the fact that "Shirt of the Month", "Pants of the Month", "Top of the Month", (not to mention the 2012 Swap), are proliferating on Stitcher's Guide, I am resisting. It does not help my creativity when I start to feel pressure to complete something in a specific time.

We'll see if this helps my floundering mojo. Yesterday I had to take to my bed with a full batch of fudge, so I can use some mojo resuscitation.


Pinterest

I must be one of the last people around who has talked about Pinterest, at least on my blog.

Have you used Pinterest yet? Have you heard of it? I resisting signing up for it, at first. For a couple of reasons. First, the idea that everyone could see what I was pinning creeped me out a bit. If you didn't know, Pinterest provides a facility for creating virtual bulletin boards. You can create any number of bulletin boards, with any categories you wish. You can then "pin" any picture you see on the internet to one of your bulletin boards.

When you pin a picture, Pinterest saves a copy of it, so even if the web page goes away, the image is still available on your bulletin board. If other Pinterest members like what you pinned, they can "re-pin" it to one of their boards. Or they can "like" it. They can also comment on it.

The other reason I was reluctant to join, is that you are required to create an account using a Facebook or Twitter account. But once you create a Pinterest account, you can "unhook" your Facebook or Twitter account, and you can create a pseudonym, so you don't have to use your real name or have it exposed to the world. I did this immediately, so my Pinterest name is "Shams", as it should be. :)

I should also mention that you either register a request for a Pinterest account, or you ask someone who *has* a Pinterest account to extend an invite. I registered a request and it took only a few days, but I am happy to invite anyone who is interested, until I run out of my allotment. Just drop me a line, or leave me a comment.

Having said all that, I have been using Pinterest now for several months and I find it to be an invaluable tool. I have learned about new shops, new products, new creative ideas. Let me give you a few ideas about how I use Pinterest.

First, I created bulletin boards based on creative things that interest me. For example, I have a "stripes" bulletin board where I pin images of clothing that use stripes in interesting ways. I have a "polka dot" board. I have a "techniques" board, where I pin techniques I have come across that are interesting. In this board I have pinned various youtube videos as well as other techniques I have found on blogs and whatnot. This is one of my favorite boards. I have a "recipes" board of recipes that look yummy, and a "healthy recipes" board for when I don't want to be tempted by the unhealthy yummies. :) I have a board for saving cool ideas for a Sewing Room. You can pin just about anything!

Whether or not you create your own boards, you can then follow other people. You can choose to follow an individual, so that you will see anything they pin to any board. Or you can choose to follow specific bulletin boards that they have created, so that you see new items added to those boards.

I have used the "search" feature to find some of my favorite pinners. For example, by searching on some of my favorite brands of clothing (like Oska or Eskandar) in the search field, I found Karyn A, who has a fabulous sense of style. At least for what I like. :) I don't know Karyn personally, nor have we ever spoken. That's the way it is on Pinterest. You aren't "friends" with the folks you follow, or the folks who follow you. You are interested in what they are pinning, and that's as far as it goes, at least inside of Pinterest. It is not a "social app", the way Facebook, Twitter, or MySpace, are.

So, not only can you search for things, and follow people and their boards, but you can see what sources people are using for their pins. I find this to be one of the most fun ways to use Pinterest. For example, say you love clothing from Anthropologie (as many pinners do). You can find out what people are pinning from Anthropologie by entering, in the URL window of your browser, the following string: http://pinterest.com/source/<website>/. Where it says <website>, enter anthropologie.com. So it would look like this: http://pinterest.com/source/anthropologie.com/. You can now see what other folks have pinned from Anthropologie's site, even if the items are no longer available on the Anthropologie site itself.

I have spent a lot of time playing with this feature and it's very fun. If you have a blog or a website, you can see what people are pinning from your site. I've provided a few sites for you to get started:

Anyway, you might see that Pinterest can be an addictive site. I don't tend to spend a lot of time on it myself, but I find it to be a wonderful resource when I do browse there. I do often find that their servers are slow, or down, so I presume these are just growing pains and that it will improve over time.

Just be warned, it can be quite addictive. :)


Funny Video - "Like the Costume Fairy, Only Taller"

Finally, one of my Facebook friends posted this very funny video on her wall. Enjoy!

Happy New Year!

Sunday, December 25, 2011

Dancing Skirts ... and Post Christmas Wrap Up

IMG_0346_smaller

Happy Christmas!

Table of Contents:

I have been quite busy the last week, or so, cooking, baking, cleaning... preparing for the holiday. Though, to be honest, very little decorating. This year we placed our gifts under the Christmas Poinsettia, and I drew a stocking shape on two grocery bags. That, plus a wreath, and I was done. I've been working a lot and just couldn't get into the decorating, especially as the kids weren't around much to help/inspire/motivate.

Lazy? I like to think "efficient." :) You see, my week of vacation, and sewing, begins tomorrow and I'm ready to go! My house is all tidied and ready for some serious creative work.

I hope. :)

Dancing Skirts

I may have mentioned that younger daughter is now into Swing dancing. She had many dancing activities recently, so this week I whipped up three dancing skirts for her. For all three I hit the stash. I drafted up a gored trumpet skirt pattern. I was going to post a tutorial, then I googled and discovered there are many such tutorials, so why create another? In particular, I recommend this one and this one. It really is easy. :)

I first made an 8-gore skirt in red. The fabric for this one is a red sweater knit from Fabrix. This sweater knit is very "sticky" and wanted to grab onto itself. It was highly annoying to sew. I should have lined it, but couldn't be bothered. To help force it to behave, I took a couple dryer sheets and rubbed them all over the skirt, inside and out. That helped quite a bit. It's hard to pin down DD2 for pics, as she has a very active social life, but here is the hangar shot. It's a little bumpy at the waistline where I topstitched it, but that disappears on her body. I hemmed this skirt by hand.

Next up, I made her a 10-gore skirt using a slinky green fabric, also from Fabrix. This one has no hem, and is 3" shorter than the red skirt.

Finally, I made her a black skirt, also using a slinky fabric from Fabrix. This is a 12-gore skirt, with an asymmetric (raw edged) hem. Unfortunately, I have no shots of it on her, but here are a couple hangar shots.

The technique for creating the pointy hem is quite easy. Once you create the gore pattern piece, just draw in the asymmetric hem. I made the hem shorter on one side by 4" and then drew a curve to connect it to the other side. It would have been interesting to make it even shorter on one edge and to use a straight line to connect the points - to create a more dramatic effect.

Drawing the 12-gore asymmetric pattern. The original 10-gore skirt pattern is on the left.

The resulting 12-gore skirt pattern. I photographed the back side because it continued to curl up when laying on the right side.

Note: If you do try this, make sure that you cut all 12 gores with the same orientation. Unless your fabric is the same on both sides, you need to cut them all the same - do not fold the fabric in half and cut them out and expect it to work out. You have been warned. ;)

Photo Shoot

Several weeks ago my kids and their two cousins asked me to do a photo shoot for the grandparents for Christmas. I am not a professional photographer, by any means, but I enjoy taking pictures so I enthusiastically agreed. We had to wait for finals to be over, but we finally had an hour last week where all the schedules aligned and I was able to corral the cousins at the Palace of Fine Arts in the late afternoon. It was so much fun! Besides the jumping photo at the beginning of this post, here are a few more pics, out of the more than 500 that I took.

IMG_0014_smaller

IMG_0076_smaller

IMG_0104_smaller

IMG_0172_smaller

IMG_0137_smaller

I think you can see that these cousins are more like siblings.

Christmas Booty

My two girls gave me some fun gifts this year. Nothing sewing related, but it's not like I need much in that area. ;)

Fun felted slippers!

I love this whimsical reindeer so much, she's staying out all year!

I saw a profile about Vienna Teng on PBS recently. I was waxing rhapsodic to one of the girls about her music and was gifted with one of her DVDs.

Here is one of her songs. She is classically trained and amazing. Prepare to be enchanted!

I also received a pair of knitted gloves that had not yet arrived, so no pictures, though DD wrapped up a printout. They have polka dots!

I expect to be sewing more than blogging this coming week. We'll see how it goes. :)