Saturday, April 2, 2011

Sewing Workshop - Striped Liberty Pullover

With cowl

Without cowl

I still have yet to make the Liberty as intended with the button closure, but a little over a year ago, I was inspired by Heather, who had the idea of converting the button-down Liberty to a pullover. It's basically a wonderfully funky t-shirt.

I had this grey/black ponte which is similar to Heather's luxury wool knit, and I cut it out a year ago and it sat. And sat. I don't know why I took so long to sew it up, because it's such a quick project.

Materials:

  • Black/grey stripe ponte from FabricMart.

Alterations and Construction Notes:

  • I used the same tracing for my last version of the top, which is a Large with an FBA. I converted the FBA to gathers at bust level. I usually ease the dart in a knit, but this knit is fairly stable, so I used gathers. I prefer it with an eased seam. :)
  • The sleeves were too long in my last version, so this time I shortened the sleeves by 1". Then before attaching the sleeves, I shortened the shoulder by 1", tapered to nothing. Suddenly, the sleeves were 1" too short. (Rookie mistake.) Luckily the sleeve hem is very wide, so I was able to lengthen the sleeves by 1". (Note to self, I think I could shorten the shoulders another 1" next time.)
  • I cut the neckline to be a bit wider. I finished the round neckline using a technique I had seen on a Marcy Tilton top.

    Completed neckline

    • I cut a 1.5" bias strip (so the stripes are on the diagonal).
    • I folded it in half and pressed it.
    • I then laid it against the neckline so that all 3 raw edges were even. I topstitched 1/8" from the folded edge of the bias strip, pulling slightly as I rounded the curves. (I could have pulled a bit more.)

      The three raw edges

  • I made a separate cowl.
  • I cut another bias rectangle, approx 12" wide and fairly long. (I didn't measure it.)
  • After playing with it for awhile, I decided to sew the short edges together so that the cowl was a slight funnel shape - it narrowed closer to the head.
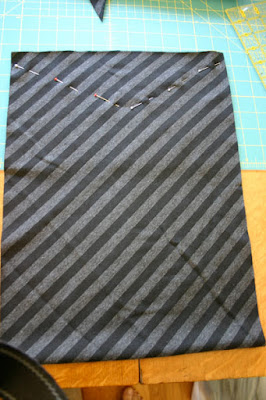
    The pins indicate where I sewed the side seam. The narrowest point is the top of the cowl after it has been folded in half the long way.

  • I folded the tube in half to encase the wrong side.
  • There was a "point" where the seam met up, so I rounded the edges.
  • I turned the raw edges to the inside and topstitched around the donut shape.

    The finished cowl. Yeah, it's a bit different. ;)

The next time I make this pattern, I want to make a fresh tracing and do my "new style" of FBA. This is where I chop the pattern at the waist (or thereabouts) and do the FBA on the upper half. I then merge the pieces back together. I've been using this now for several garments and I LOVE it as it preserves the design on the lower half.

Friday, April 1, 2011

Me-Made-March '11 - Wrap Up

A visual summary of Me-Made-March.

IMG_8897_smallerIMG_8906_smallerIMG_8912_smallerIMG_8914_smallerIMG_8922_smallerIMG_8958_smallerIMG_8998_smallerIMG_9012_smallerIMG_9025_smallerIMG_9028_smallerIMG_9036_smallerIMG_9039_smallrIMG_9052_smallerIMG_9054_smallerIMG_9063_smallerIMG_9067_smallerIMG_9070_smallerIMG_9076_smallerIMG_9078_smallerIMG_9085_smallerIMG_9105_smallerIMG_9108_smallerIMG_9109_smaller2IMG_9122_smallerIMG_9144_smallerIMG_9156_smallerIMG_9160_smallerIMG_9166_smallerIMG_9174_smallerIMG_9187_smaller

I'm still absorbing the results, but I guess I have some early thoughts:

  • I have made quite a variety of clothing.
  • I am improving at styling. I am trying to get better at accessorizing.
  • I am getting better at creating more flattering proportions.
  • I need more jackets. :)
  • I have more work to do!

I don't know how the style blog do a daily picture and post. It's exhausting!

Feel free to post your thoughts. :)

Links:

Saturday, March 26, 2011

Knipmode 2/11 - Sleeveless Cardigan

One of the blogs I follow is Fehr Trade. Melissa is a fan of KnipMode magazine, a pattern magazine from the Netherlands. Her review of the February issue finally pushed me into buying my first copy.

KnipMode is similar to Burda. You trace the pattern and add seam allowances. The text is in Dutch, but I was able to translate it using Google translate. The only word I couldn't get a good definition for was "panden", which Google translated to "buildings." So "Stik de schoudernaden van de panden" translated to "Sew the shoulder seams of the buildings." It was good enough, but I am curious what "panden" actually translates to in sewing terms. :)

In the February issue, I was intrigued by a cardigan which was not to Melissa's taste, but I loved the look of it. The most intriguing feature was the pocket design, which looked promising, but I couldn't tell what was going on, exactly.

Line Drawing

One thing I like about KnipMode, is that they show a garment made up in different fabrics and on different women. Here is the same cardigan, shown five ways.


Once I had received the issue, I saw that the pocket is drawn onto the front and back pieces - it's not a separate pattern piece. Several inches below the armhole, the pattern tissue zags 90° away from the body, then tapers back. And it's not really a pocket, it's more of a drape. Now that I have made it, about the most you can put into it is a tissue. But sometimes a tissue is enough. :)

I realized that the models in the magazine are wearing the cardi with the pocket "pushed in". I didn't care for it this way because if your hands are not in the tiny pockets, it just looks as if you hadn't pressed your side seam. I like the pocket "partly" pushed in - maybe the length of a finger, so you can see the soft drape.

Materials:

  • Rust on grey double-faced wool blend from Fabric Mart
  • Coordinating rust & grey stripe double-faced wool blend from Fabric Mart

Alterations and Construction Notes

  • I cut the largest size - 46 - and performed an FBA. Not because I needed it to close at the front, but I didn't want it to look "skimpy" over the bust.
  • I made the facing go all around the outer edge. The pattern has a curved facing that ends at the side seams. I drafted a facing for the back hem and made it one giant facing that was sewn to the outside. I also changed the construction order a bit to accommodate this change.
  • I cut the facing from the coordinating stripe fabric, which I cut as off-grain as possible, and sewed it to the outside edge.
  • When I had completed the body of the cardigan, I tried it on and my sewing buddies unanimously thought I should leave the sleeves off. So I drafted facings for the armholes, and finished it as a vest.
  • I flat felled all seams except for the side seam. Flat felling wouldn't work with the funky pocket.

I don't usually wear vests or sleeveless layers, but I'm going to give the look a try. I just made the eShrug, which is similar with it's short sleeves. I'm a late-comer to the sleeveless layer party. :)

Wednesday, March 23, 2011

Thrilled!

DD1 has been studying ballet since she was knee-high to a grasshopper. She is graduating from high school this year and has decided to go another route, career-wise. I wanted to do a professional photo shoot to mark this milestone and decided to go with a photographer she knows who has a real knack for ballet photography in outdoor settings. (She used to sometimes partner with him in pas de deux class).

I just received almost 200 pics from the shoot and couldn't be happier. This photographer is reasonably priced (at the moment) because he's still getting his business going. He also takes non-dance-themed pictures, and he's photographed weddings and the like.

If you follow my blog at all, you know I don't take money for advertisements. I only recommend something I am happy with. I couldn't be happier with Ballet Zaida. Yes, Oliver is in the Bay Area, but I'm sure you could fly him somewhere if you wanted him badly enough. :)

I'm intentionally including only pics taken from a distance, but there were plenty of close up shots as well.

Oh, I was going to sew her something to wear for the shoot, but I didn't. ;)

Sewing Workshop - eShrug

If you haven't heard about the Sewing Workshop's new pattern, the eShrug, I am surprised. This is TSW's foray into digital downloads. For $6 you get a PDF file that you print out, tape together, and cut out. It comes in 3 sizes - S, M and L.

I bought the kit from Linda Lee when she spoke at PenWAG a couple weeks ago and I finally got mine sewn. I made the large, which fits me through the back, but the shoulder is a bit wide. If I make this again, I will narrow the shoulder.

It takes less than a yard and less than an hour to sew if you choose a fabric where you can leave the edges raw.

I was curious how this would work on the uber busty, like me, since the fullness of the drape lands on the bust. If the fabric is drapey enough, it's ok, but tread carefully. :)

Sunday, March 20, 2011

Sewing Workshop - Cowl Top

There was a brief respite this morning from last night's storm when I could grab a picture. It poured again after this was taken, and then was gorgeous the rest of the day, culminating in a beautiful sunset.

Shortly after returning to sewing almost 2 years ago, I tracked down several out of print (OOP) patterns that I'd read or heard good things about. This Sewing Workshop Cowl Top was one such pattern. I'd read that the cowl on this pattern is really great. And it is. The nice high cowl, and the relaxed sizing of the top, with the dropped shoulders, just screamed "snuggly loungewear" to me.

I am currently visiting a coastal town in northern CA and last night was one of the worst storms I've ever experienced. Finally, around 2:30am, I gave up trying to sleep and got up to sew. As I was winding the bobbin, the power went out. An hour later, the power came back on (much to my surprise as the storm was still raging), and I was still awake. I returned to my machine and finished this top, in fairly short order. It was so calming to sew as the 60+ mph winds played dice outside with deck chairs and barbecues.

Material:

  • Popcorn fleece from FabricMart. This looks like minky, but is not minky.

This pattern comes in Small-Medium-Large. The large is supposed to be a size 18 and is fairly generous. I cut out a size 18 with no alterations (such as an FBA) and it fit pretty well. My only other alterations are listed below.

Alterations and Construction Notes:

  • I wanted it to be more of a tunic, so I lengthened it by 2"
  • I finished the hem with side slits, which begin around the waist.
  • I shortened the sleeve by a couple inches and tapered it in at the wrist by about 2" (1" pinched).

I'm sure I will wear this to shreds. I just saw this pattern about a week ago on ebay, so it shows up from time to time.