Wednesday, March 23, 2011

Thrilled!

DD1 has been studying ballet since she was knee-high to a grasshopper. She is graduating from high school this year and has decided to go another route, career-wise. I wanted to do a professional photo shoot to mark this milestone and decided to go with a photographer she knows who has a real knack for ballet photography in outdoor settings. (She used to sometimes partner with him in pas de deux class).

I just received almost 200 pics from the shoot and couldn't be happier. This photographer is reasonably priced (at the moment) because he's still getting his business going. He also takes non-dance-themed pictures, and he's photographed weddings and the like.

If you follow my blog at all, you know I don't take money for advertisements. I only recommend something I am happy with. I couldn't be happier with Ballet Zaida. Yes, Oliver is in the Bay Area, but I'm sure you could fly him somewhere if you wanted him badly enough. :)

I'm intentionally including only pics taken from a distance, but there were plenty of close up shots as well.

Oh, I was going to sew her something to wear for the shoot, but I didn't. ;)

Sewing Workshop - eShrug

If you haven't heard about the Sewing Workshop's new pattern, the eShrug, I am surprised. This is TSW's foray into digital downloads. For $6 you get a PDF file that you print out, tape together, and cut out. It comes in 3 sizes - S, M and L.

I bought the kit from Linda Lee when she spoke at PenWAG a couple weeks ago and I finally got mine sewn. I made the large, which fits me through the back, but the shoulder is a bit wide. If I make this again, I will narrow the shoulder.

It takes less than a yard and less than an hour to sew if you choose a fabric where you can leave the edges raw.

I was curious how this would work on the uber busty, like me, since the fullness of the drape lands on the bust. If the fabric is drapey enough, it's ok, but tread carefully. :)

Sunday, March 20, 2011

Sewing Workshop - Cowl Top

There was a brief respite this morning from last night's storm when I could grab a picture. It poured again after this was taken, and then was gorgeous the rest of the day, culminating in a beautiful sunset.

Shortly after returning to sewing almost 2 years ago, I tracked down several out of print (OOP) patterns that I'd read or heard good things about. This Sewing Workshop Cowl Top was one such pattern. I'd read that the cowl on this pattern is really great. And it is. The nice high cowl, and the relaxed sizing of the top, with the dropped shoulders, just screamed "snuggly loungewear" to me.

I am currently visiting a coastal town in northern CA and last night was one of the worst storms I've ever experienced. Finally, around 2:30am, I gave up trying to sleep and got up to sew. As I was winding the bobbin, the power went out. An hour later, the power came back on (much to my surprise as the storm was still raging), and I was still awake. I returned to my machine and finished this top, in fairly short order. It was so calming to sew as the 60+ mph winds played dice outside with deck chairs and barbecues.

Material:

  • Popcorn fleece from FabricMart. This looks like minky, but is not minky.

This pattern comes in Small-Medium-Large. The large is supposed to be a size 18 and is fairly generous. I cut out a size 18 with no alterations (such as an FBA) and it fit pretty well. My only other alterations are listed below.

Alterations and Construction Notes:

  • I wanted it to be more of a tunic, so I lengthened it by 2"
  • I finished the hem with side slits, which begin around the waist.
  • I shortened the sleeve by a couple inches and tapered it in at the wrist by about 2" (1" pinched).

I'm sure I will wear this to shreds. I just saw this pattern about a week ago on ebay, so it shows up from time to time.

Saturday, March 19, 2011

Burda 7344 - Harem pants!

It was very blustery and nippy when this photo was taken.

I recently purchased a pair of boutique pants with extreme draping at the sides. I really like these pants, which you can see in the following picture.

Sandra Betzina jacket with RTW pants

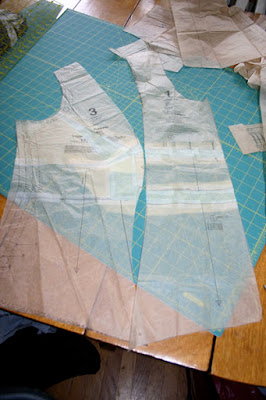
When I saw the new Burda spring patterns, I decided to give #7344 a try, since they had a similar vibe to the pants I had purchased. When I went to cut out the tissue pattern, I was shocked at the size of it. This pattern piece, roughly the size of a Buick, had to be cut out on the floor.

My fabric wasn't quite long enough to accommodate the pattern, so I shortened the pant leg by 1". I couldn't possibly tell what size to use or if it needed altering, so I measured the top of the pant (sans pleats) and chose the size closest to my desired finished waist measurement.

Materials:

  • Black microfiber from Fabrix
  • 1" waistband elastic

Alterations and Modifications:

  • As mentioned previously, I shortened the leg by 1". You can see this in the pattern piece above.
  • I eliminated the zipper. This fabric has a generous 4-way stretch.
  • I eliminated the yoke.
  • Once I had the two legs sewn together, I tried it on. The crotch seam was too long by 3", so I shortened the entire waistline by 3". This was tricky, due to all the pleating. I had initially sewn the pleats 1/2" from the top of the original waistline. I then carefully laid them out and pinned them 3-1/2" further down and sewed them again. I then cut off the 3" excess evenly around the top of the pant.
  • I sewed on a waistband casing and inserted elastic (instead of the yoke).
  • The finished pant is left raw at the hem. The pant legs are VERY long. Even though I shortened them 1" (which is typical for me), they are maybe 6"-8" longer than my ankle. However, my sewing buddies tell me that they look better when ruched at the ankle, so I left the length.

As I sewed these pants (and they are a quick project), I had no idea if they would work. I wondered if I'd have wadder on my hands. I had no idea until the final fitting, after the waistband was completed. When I finally saw them, I was surprised at how much I liked them.

Monday, March 14, 2011

Happy Pie Day!

I love Pi Day! (Yeah, I have geek tendencies.)

Edited 3/24/11 to add these pics: I've found a couple pictures from Pi Day, 2007. I used to use these Bento boxes for my kids' lunches. These are tiny blueberry pies made in little tart pans. Yes, DD1 sold hers. Note how I used Japanese cutters to cut the carrots into shapes. LOL

When my kids were little, even before they knew what mathematical Pi was, I would bake tiny pies - usually two kinds - and put them in their lunches on Pi Day. I'll never forget the year that DD1 sold her tiny lunch pies to a boy who coveted them. Now that they are teenagers and rarely around, I don't bother making tiny pies anymore.

Me-Made-March

IMG_9054_smaller

I have been fairly quiet, but I have been continuing to participate in Me-Made-March. The photo is today's outfit. The top is a Sewing Workshop Liberty, made as a pullover. The pants are the Sewing Workshop Trio pant, one of my favorite pants. (Yeah, I have lots of pants favorites, but mostly Tilton and TSW. :) )

PenWAG and Linda Lee

This last weekend was an intense sewing weekend. First, I attended PenWAG. The featured speaker was Linda Lee, of The Sewing Workshop. I very much enjoyed hearing her lecture and seeing the trunk show of her clothing. She really has an eye for detail and a wonderful ability to select unique fabrics and to combine them in creative ways. She immediately recognized my Teagarden T and asked to take a photo of it, so it may appear in her online photo gallery at some point. (If you haven't seen her new website, it is much better organized and easier to navigate than her previous website.)

Cutting/Altering Frenzy and the Perfect FBA (for me)

I spent the remainder of the weekend altering patterns and cutting them out. I think I really have finally settled on "my" version of the FBA. For the longest time, I was unhappy with FBAs that added width to the lower portion of the garment, but now I just chop the bottom of the pattern off where I *don't* want width, do the FBA on the top half only, and then reattach the top and bottom of the pattern, merging them together as needed.

Before I started doing FBAs this way, I used to spend a lot of time fitting the garment - particularly removing fullness at the hip, but not so much anymore. Plus, some patterns, with bands on the bottom or around the edge, for example, couldn't be tweaked easily once constructed. This new approach is SO MUCH BETTER!

The following pic shows a pattern that I altered yesterday using this approach. It's the Katherine Tilton swing top pattern and has princess seams. Hopefully you can see the image well enough to make out my alterations.

I love to use Bienfang Canary Tracing paper from Dick Blick for pattern alterations and tracings. NAYY.

So, if you know of any busty gals with (relatively) thin hips, feel free to send them my way for FBA advice. :)

And enjoy some pie today!!!

Sunday, March 6, 2011

Burda 7400 - Two Pairs of Pants!

It was great this morning to wake up to two new pairs of pants!

Well, almost. The second pair only needed the bottom bands, which I completed by 8:30am. After all my recent involved projects, I needed some nearly instant gratification!

Burda 7400 (view B) calls for knits or wovens (linen, jersey or crushed fabrics, and rib knit for the waistband). For my first pair, I used black ponte and for my second pair, a denim-colored linen washed/dried so many times I lost count; so I tried both types of fabrics.

On the pattern tissue, it states that the finished hip measurement for a 38/40 is 41-1/2". The finished hip measurement for a size 42/44 is 44-1/2". As my hips are 40", I fell between these sizes, so I decided to use the size 42/44 for the front and the 38/40 for the back. For the first time since sewing pants, I decided to use the crotch on the pattern. The Burda crotch is very shallow in front, which echoes my TNT crotch curve.

Materials:

  • Black ponte from Fabrix. Love this stuff, but my stock is getting low and they only carry it occasionally. Danger, Will Robinson!
  • Denim-colored linen from FabricMart. I bought so many yards of this fabric, I must have been contemplating a wedding dress. :) I want to use some of this for a spring jacket.
  • Stiff waistband elastic.
  • Fusible interfacing for the leg bands.

Alterations and Modifications

  • The first pair, the black ponte, was much too large through the hips, so I used a trick I've used before. These pants do not have a side seam - they have a forward seam. So, where there would be a side seam, I added a vertical dart. It started from the waist and ended around the knee. At the waist, I sewed at 1" (removing 4" total) and tapered it to nothing around the knee. I was very pleased with the resulting fit and the vertical dart just adds to the funkiness of the pants.
  • I shortened the pants 2-1/2". For the first pair, I just chopped the length off the bottom of the pant before attaching the band. The pant leg is very straight and the fullness is pleated into the band, so this approach didn't affect the design. For the second pair, I made the alteration in the pattern.
  • For the linen pant, the fit was perfect as it was cut out. I needed that 4" at the hip for movement.
  • I omitted the rib knit waistband. While this is a cute look, I didn't want to bother tracking down coordinating rib knit and I wear my tops over my pants anyway. I did my usual elastic waistband.

Pair #1. Black ponte. When I took this picture yesterday afternoon, it was sunny and gorgeous!

Pair #2. Distressed linen. When I took this picture at 9am this morning, it was rainy and foggy! I took the picture on my landing so the camera could stay covered, but I got quite wet.

This last week was very intense, work-wise. But I have been keeping up with Me-Made-March. You can see my personal journey on my Me-Made-March 2011 Flickr set and the group effort in the Me-Made-March Flick Group.

Sunday, February 27, 2011

Butterick 5423 - Felted Jacket

More pics

Wow, I feel like I haven't blogged in forever, but I haven't had much to share. February was a low-productivity month, between work and illness. I also have been working on more intensive projects, which forces me to slow down. However, I am glad to have finished jacket #3! Or mostly finished. I can't find the jumbo snaps I bought last week to complete this jacket, and the light was fading fast this evening, so I took the photos sans snap.

At last month's ASG meeting Ronda Chaney, head of the Fashion Department at Canada College, gave a presentation on FBAs and other bodice alterations. For February's meeting we were encouraged to work on a garment incorporating a technique that was presented.

I'd been mulling this jacket pattern over for some time. I like the big band that goes around the outer edge. I like the shaped front edge. I like the opportunity to use two contrast fabrics. I wasn't sure about the dolman sleeves - it's not my most flattering look - but the opportunity to needle felt the contrast, combined with an idea from Ronda, pushed it to the top of the pile.

My "twist" on the FBA was to convert the FBA dart to tucks (or gathers) into the front band. For my thick fulled wool, I converted it to 5 small external darts, and for the silk charmeuse lining, I used gathers.

Alterations and Modifications

  • Lengthened the jacket 3".
  • Added an unconventional FBA: Created the FBA after cutting the pattern in half (in prep for lengthening). I slashed up to the bust point, then up to the shoulder notch, then slashed in from the front to the bust point (NOT to the side seam). Added a second slash from the front to the bust point, as if I were adding two darts. Angled the bottom piece back, so as not to add any more width. Then I lengthened the piece 3".

    This may not make much sense, but I've been experimenting with FBAs that won't add to the overall width of the garment below the waist. The two slashes I created at the front can be sewn as either tucks or gathers, depending on the fashion fabric.

    I think you can see my alteration here. I sliced off the bottom before doing the FBA. The added width was tapered back to the original width and then the piece was lengthened 3". I created two slices in the front which can be sewn as darts, tucks, or gathers.

    Dart closeup

  • At the back, there is a pleat at the bottom of the band. This creates a very strange silhouette. Ronda suggested extending the tuck up throughout the band and this looked much better.
  • I added a flat piping on each side of the band at and the sleeve hems.
  • I did not shorten the sleeves and you can see they are quite long, which I liked for folding back. But the pattern calls to line the sleeves to the edge. Because I wanted the wool to appear when the cuff was folded back, I drafted sleeve facings and shortened the sleeve lining accordingly.
  • I added small shoulder pads.

Materials

  • Peacock blue wool from Fabrix, fulled in the washing machine/dryer. This fabric really thickened up, like a fuzzy wool blanket. I had been planning to use it for another project, but it was too thick after machine fulling.
  • Royal blue pebbled Vera Wang silk for lining. From FabricMart, this was left over from my Sandra Betzina Motorcycle Jacket.
  • Variety of merino wool batts, New Zealand corriedale fiber, dyed mohair locks, merino wool/silk blend fiber, and other exotic fibers and yarns, from Living Felt.
  • Giant 30mm brass snap (not pictured).
  • Small raglan shoulder pads from Britex.

Felting

Felting samples

Needle felting such a large area was intimidating. I started with the back: I sewed the darts into the back shoulder, then sewed the back together at CB. I made several samples using various fibers. I found that it worked best to tack the fibers loosely in place with a hand needle before taking it to the felting machine. It worked best to build the background in layers. Once the basic band and fronts were complete, I sewed them at the shoulder seams and continued layering. The curly mohair locks and novelty yarns were felted at the very end.

As I worked on the felting, I thought it looked bad at first, but I had faith. As I continued, my faith wavered as it appeared to become uglier and uglier. Finally, at the end, when I was adding the yarns, I decided it wasn't so bad and that I actually liked it. Being artistic requires cojones. :)

All my supplies, ready to go. Intimidated much? (Yeah, I should have ironed it first. ;) )

First layer complete. This layer consisted of wool batting in "blobby" shapes

This layer consisted of a merino/silk fiber in squiggly shapes. Not pictured is the next layer, which consisted of curly mohair, loosely felted. The final layer of novelty yarns was completed after the shoulder seams were sewn.

I love the contrast of the royal blue lining with the turquoise wool.

What's Next

Me-Made-March begins this week, so this weekend I moved my handful of RTW garments to a remote closet, so they won't be in my way. I'd like to create a few more pants/tops for this coming month, but we'll see how far I get. My goal of sewing coats/jackets has definitely slowed me down, as much as I love how they fill out my wardrobe. :)

As a total aside, today I spent 6 hours at a photo shoot for my daughter. I arranged for this as a graduation milestone and the photographer specializes in working with dancers in outside locations. It was fun, but WOW it was exhausting, partly because we got up at 4am to start in the dark. At the very end I asked him to snap a photo or two of my daughter and I, so I might end up with a decent picture of the two of us. We'll see. :)

I hope you have a great week!