Saturday, February 12, 2011

Vogue 1198 - Sandra Betzina Motorcyle-Style Jacket

You might remember back in November I won some beautiful boiled wool in Sandra Betzina's coat/jacket contest. The fabric, donated by Stone Mountain and Daughter, is a hard-to-describe royal blue/periwinkle color. (I first referred to it as purple, but it really is more of a royal blue.)

I decided it was fitting to make this fabric up using a Sandra Betzina pattern. I chose Vogue 1198, View B, which I'd been wanting to make since the motorcycle-inspired jacket pattern came out last fall. I also felt it was fitting to purchase the notions from Stone Mountain, who donated the fabric, so I headed off on New Year's Day to buy zippers, thread, and maybe a piece fabric, or two. ;)

I recently reviewed the Palmer/Pletsch DVD, "Full Busted?," and I applied techniques from the DVD to this pattern.

LOOK MA, NO MUSLIN!

One of the biggest tricks I learned from the DVD is how to prepare a tissue pattern so you can use it as a fitting tool. I usually do a rough fitting using the tissue pattern, and then do a final fitting in a test fabric. Previously, I found it difficult to get a good fit in tissue without ripping it to shreds. The Palmer/Pletsch technique worked fairly well. I did spend much longer than usual fitting the final jacket, but I saved the muslin stage, so it was worthwhile. I certainly knew that the final jacket would be large enough to make fitting possible and that is critical.

Supplies and Notions:

  • Royal blue boiled wool from Stone Mountain and Daughter
  • Royal blue pebbled Vera Wang silk from FabricMart for the lining. (Purchased last June, originally for another project. I bought this Vera Wang fabric in both pebbled and non-pebbled versions, but the pebbled was closer when I grabbed for it. :) )
  • Black, lightweight fusible interfacing
  • Scrap of cotton/rayon fabric for interfacing the hem.
  • 24" YKK zipper - "Brastique" in black. (The pattern calls for a 20" zipper, but I knew I would be lengthening the jacket as part of the FBA process.)
  • Two 7" YKK zippers - "Brastique" in black
  • 1/4" Wonder Tape
  • Black wool batt from Living Felt.
  • Needle felting tools (needles, foam, Janome FM725 felting machine)

Alterations and Modifications:

  • Lowered the bust fullness 4.5". (Which was a bit too much, but I was able to fix this when fitting the final fabric version.)
  • 3" Princess seam FBA.
  • After fine tuning the fit, I decided to omit the gathered back belt.
  • Narrowed the cuff 1".
  • Removed fullness at the side hip.
  • In the final fitting, I removed some of the fullness from under the bust, down to the hip, at the front princess and side seams. On the princess seam, I removed fullness from the side panel only because the bottom of the left front was already quite narrow and I didn't want to interfere with the line.
  • Though I am a huge fan of topstitching, I didn't want it for this project. The zipper pockets are supposed to secure the zipper using topstitching, but I hand picked both zippers. This also avoided any risk of needle breakage on the brass teeth of these substantial zippers.
  • At the very end, I shaved off 1/2" from each shoulder, before attaching the sleeves.
  • The first time I hemmed the jacket, I was not happy with it. It was too unsupported, so, inspired by Ann Rowley, I frogged the hem and made a proper, interfaced hem. The result is so much nicer. :)

    Interfaced hem, in progress

More Needle Felting!

Tszuj it up!

As I was working on this jacket, I had the nagging feeling that I needed to tszug it up a bit. I was pondering over various techniques when Annette, one of my favorite reviewers on Pattern Review, and who is participating in the "12 Jackets in 12 Months" sew-along on Stitcher's Guild, became inspired by my needle felted jacket.

The concept of dry felting was new to Annette, but she eagerly jumped into it with both feet, and I advised her on her first order of supplies. She was then gifted with a needle felting machine and, within a week or two, she had completed a new coat, which featured a needle felted collar. I loved the camouflage-style design she created. (The clever girl couldn't wait for her wool roving order to arrive for the coat, so she felted the collar using dryer lint created when she machine washed/dryed the brown Shetland wool.)

She gave me ideas. :)

I immediately ordered the same needle felting machine she was using, a 5-needle Janome FM725, which is for sale on many sites at a clearance price (they have to make way for newer models). I bought mine from Fabric.com, so shipping was free.

While waiting for the machine to arrive, I wanted to get started with the needle felting on my collar and cuffs. I used the black wool batt I bought from Living Felt for my last project. (It as part of their monochrome set, but one of the only colors I did not use for that project.) I played with a free-form technique using both a single needle and the 4-needle tool that I purchased after completing my last project.

I made several samples before I was ready to start on the actual garment pieces. The samples were critical to the process, because I really didn't know what I was doing, but I liked how the samples were turning out, so I felt ready to attack the actual pieces. To prepare the final collar and cuff pieces, I fused interfacing to the back and then proceeded to apply the batt in the "squiggle" free form design that I had practiced.

See? I can do things besides circles. :)

The collar and two cuffs took me an evening to felt. At the end of the evening, I had broken several needles, but the swirls of black batting were fairly securely tacked. The wool was not as "melded" into the fabric as I wanted, but I knew I could accomplish that pretty easily once the felting machine arrived.

You've heard how long it took for the felting machine to arrive, so the project languished a bit. Once it came, I was delighted how quickly I was able to meld the black fibers thoroughly into the collar and cuffs. It's such a satisfying process.

Cuff on top was hand felted. Cuff on bottom after machine felting. I really wanted to meld the fiber into the fabric and was able to accomplish that with the machine.

Finally, the jacket could be finished. But wait, work intruded with an all-weekend emergency. As soon as I delivered my part of that project, I immediately came down with some form of plague and sewing was out of the question. I am still not over it, but am functioning, thank goodness.

So I persevered and it's done! WOOT! Jacket #2 is complete, at last. :D

Wearing the collar open

OK, I've bathed, put on make up, but I still look sick. At least I hope that's my sick look. ;)

Thursday, February 10, 2011

Me-Made-March '11

I, Shams, from http://communingwithfabric.blogspot.com/, sign up as a participant of Me-Made-March '11. I endeavor to wear all handmade clothing each day for the duration of March 2011. This does not include underwear, socks or shoes.

Very little sewing here of late. I worked all weekend and then promptly got sick on Monday with a plague that really kicked my butt. I'm still down, but not out.

I'll be back. :)

Friday, February 4, 2011

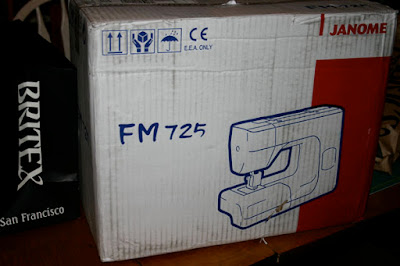
Janome FM 725 - How do I love Thee?!

Finally, she arrived! My felting machine arrived!

From Ohio, to Oakland, CA, back to Indiana and, finally, to San Francisco. The UPS man showed up on Wednesday, sometime after 7pm, but I was not up to opening the box, having spent hours in the dental chair earlier that day.

I finally fired her up on Thursday evening.

YOWZA!!!!

I am in love with this machine. I had some samples I had hand felted – I had felted these as thoroughly as possible, by hand. Within seconds under the needles on the machine, they were embedded into the fabric as if they had been manufactured that way.

I can now make progress on the jacket that was waiting for this machine. I may not finish it this weekend, though. I have been pulled into a fire at work this weekend and have four meetings scheduled (yup, two per day), plus whatever work needs to happen. I can sew in between, though.

Here's a peek at my current felting project.

Don't be sad, Felt Sample! This is FUN!

I hope you have a safe, warm, dry weekend, wherever you may be!

Monday, January 31, 2011

Au Bonheur des Petites Mains - Tunic with Front Tucks (TQH08002)

There has been much activity surrounding Au Bonheur patterns over on Stitcher's Guild, largely spurred on by PStarbuck (aka Peggy), and her wonderful creations. It made me want to knock out another of these fun French patterns.

I bought this tunic pattern a year or so ago. It is reminiscent of recent tunic patterns from the Big 4 that fit through the bust then flare out at the waist and feature an uneven hem. However, this one has two large tucks on the front at hip level. The front is cut much wider and longer than the back, and when the tucks are sewn in to the front, the fabric under the tucks falls in such a way as to suggest a "skirting." I have sewn tops similar to this style from the Big 4, and this one is drafted quite differently.

Which is why I like this pattern line. :)

The pattern comes in size 36-46, which is too small for me and my trusty ruler told me I'd need to add at least 10 inches at the bustline. Though there are only 3 pattern pieces, it took me longer to alter the pattern than it did to cut and sew it.

Alterations:

  • I widened the sleeve 2" at the bicep tapered to 3/8" at the wrist.
  • I widened the back 2" (a total of 4").
  • I applied an FBA, ending at the hip. I added a Y-dart that was 4" wide (adding 8" total). I did not sew the dart, however. I eased the fullness into the side seam.

When I visited Stone Mountain and Daughter on New Year's Day, I picked up a sweater knit from the upstairs sale room. It contained wool, mohair, and synthetic - I can't remember the exact blend, though the bolt recommended dry cleaning. I threw a small piece of it into the washer and dryer, and I liked how it softened the slightly scratchy mohair, so I threw the entire piece into a normal load. It did shrink, though I didn't measure the amount.

This fabric was a pain to sew. It is a very loose knit and it ravels. It is a fun print, but is highly unstable and stretches out like crazy. So, with the running and the instability, it required a gentle hand.

Construction Notes:

  • Before sewing the front tucks, I placed Steam a Seam Lite on the stitching line of each tuck.
  • I stabilized the shoulder seams, also with SAS Lite.
  • After my alterations, the back shoulder seam was wider than the front. I eased in some of that fullness, but I chopped the remainder off of the armscye.
  • Despite my best efforts, the neckline stretched out of shape, almost as soon as it was cut. I sewed the neckline using a strip of a black leotard-style lycra knit, turned to the inside, and then topstitched at 1/4". I then inserted a 2mm round elastic into the casing formed by the topstitching and eased the neckline back to its desired location. Note that this pattern has a fairly open neckline and I cut it a bit higher than designed.
  • I spent time fitting the top through the bust. The knit is so stretchy, that I did remove several inches from the side seam from the bust to the waist.
  • I hand sewed the hems, both the bottom hem and the sleeves.
  • I finished the seams with the serger.

I love my new Fluevog boots! I bought these during the sale in early January. :)

What the Heck, UPS?

Here are the facts:

On Sunday, January 16th, I ordered a Janome Felting machine from Fabric.com.

On Wednesday, January 19th, I received a shipping confirmation, with a tracking number for UPS.

I hoped it would arrive in 5 days or so. It was coming from Ohio to San Francisco, and this seemed reasonable.

Time dragged on and it didn't arrive. I chalked it up to the nasty weather that has been pummeling much of the country.

Finally, on Tuesday, January 25th, I dug up the tracking information and looked it up. It said that the package had arrived in San Pablo, California, the previous day, on Monday the 24th. That is a mere 30 minutes from my home, so I assumed it would arrive any minute and I started stalking my front door.

When I checked tracking the next day (or maybe it was later the same day) the only change to the status was that it had said I would receive the package on February 2nd.

HUH?

How come it would take NINE days to travel 30 minutes to my house? There was no clue on the status page.

On Saturday, I checked the status page again, and saw that my package had left Hodgkins, Illinois on Friday.

Come again?

There was no departure scan from San Pablo, which suggested to me that it was scanned on arrival and then stuck on the wrong truck, or not unloaded from the truck, or something similar. But at least I now understand why they put an arrival date of February 2nd.

What the heck, UPS?

Perhaps they are not aware that I have a half finished jacket that is languishing until I have the machine in my hot little hands.

Meanwhile, I've made a top this weekend. I can't take photos until tomorrow, but I'll go write the post up now. :)

Tuesday, January 25, 2011

Vogue 8712 - Marcy Tilton Pants - in Black!

Well, I couldn't help myself. I really wanted to perfect the fit on these pants before I put the pattern tissue away. I folded the excess fullness out of the side back and back pieces and then cut the pattern out of my beloved black ponte. I whipped up this pair in a couple of hours last night, making no other changes. In effect I was cutting a smaller size in back than in front. Many women, as they mature, carry more "fluff" in front and I know sewists who routinely use a smaller size in back. It is a fairly common alteration for many of us.

I love these pants! I like the width, the length, and the overall fit. I like the subtle lantern shaping near the hem. I am sure I will get lots of wear out of this pair, as well as the pair I made on Saturday. I would still like to make view A/B, but not today. :)

This photo has been lightened so you can see the detail a bit better.

I have a slightly weird stance here, but you can see that the back fits much better than my last pair.

Several of you found my blog through the Vogue Patterns Facebook page. Welcome!

I am still waiting for my needle felting machine. I wonder if it's stuck in bad weather. The temps here have been in the 70s, but I am thinking of those of you freezing your patooties off back east. Stay warm and safe!!! Maybe you can get lots of sewing done in the bad weather... :)

Saturday, January 22, 2011

Vogue 8712 - Marcy Tilton Pants

I ordered Marcy Tilton's new patterns in the recent BMV sale. They arrived yesterday (Friday). I opened the mailing envelope at 11pm and was cutting fabric at midnight. I was a little obsessed about making these immediately - I needed quick project!

What Size?

There was one teeny problem. I wasn't sure which size to order as Marcy's pants sometimes have more design ease and sometimes less. This pattern comes in two multi-size groupings: 8-14 and 16-22. According to Vogue, a size 16 has a 40" hip. I have a 40" hip, so I ordered the larger pattern. But when I opened the pattern tissue for View C, I saw that the finished hip on the size 16 is 46". This is larger than I like to wear, particularly in a knit, even a stable knit like a ponte.

I really wish Vogue would tell us the finished measurements in this situation, so we know which multi-size grouping to buy. I would have purchased the smaller size if I'd known this little tidbit.

I proceeded to alter the pattern. In my case, I transferred the crotch from my TNT pants pattern, so I know that the crotch will fit me without tweaking. I planned to pin fit the pants in the fashion fabric to remove excess at the hips.

I finished cutting out the pants and went to bed.

When I woke up at 6am this morning, I was eager to finish these pants. I told myself I couldn't leave the house to hit some enticing sales until I'd finished, so motivation was high. Besides transferring my crotch curve, I had eliminated the fly front and zipper. Did I mention that I really needed a quick project? I started sewing around 6:30am or so and quickly fell into the groove of stitching and top-stitching - I enjoy me some good top-stitching.

Unfortunately, in my eagerness to finish, I forgot to pin fit the pants. Oops.

After they were constructed and before I attached the waistband, I realized my mistake and added two additional darts in the back, taking out 1 1/4" (doubled) from the waist, tapering to nothing about 15" down, removing 5" of fullness in total from the waist/hip. I even topstitched the darts to make them look intentional. While this helped, the pants are still too large through the hips and need to be reduced another 4" or so.

I wanted to make these in something other than black. I have so many black pants and I'm feeling the need to branch out a bit, so I used a ponte I bought from Marcy Tilton in a color she calls Chestnut. It's a really nice fabric and very easy to sew. I *think* I prewashed it, but if not, I hope it behaves well. :)

I managed to finish the pants before 10am and to get a couple quick photos before running out the door. I do like the design very much, especially how the fullness nips in at the ankle.

Oh, I should mention that I didn't alter the length in any way. They are ankle length on me (at 5'5") but the pattern photo clearly shows them to be cropped, so be aware that they may run long. I love the long length, but shorter would have worked too, which is why I didn't worry about it in the alteration phase.

Before I make these again, I plan to grade the pattern down. Once I've tweaked it a bit, this will become a favorite pattern. I want to make View A/B as well.

I was so happy to complete a quick project - it's a nice change from the labor intensive projects I've been working on recently. And I will wear these a lot - they fit better than RTW pants I've bought in the past, but I've gotten more picky about fit since sewing my own clothing. :)

You can see in the back that there is too much fullness.

On the jacket front, I have two in process. I am waiting for my needle felting machine so I can finish the second one. I have more I can work on this weekend, though, since I need to fit the lining and sleeves. But beyond that, I am stuck until the machine arrives. I just may have to start jacket #4. :D